20.109(S24):M1D7

Contents
Introduction

Protocols
Part 1: Prepare and electrophorese DNA complexes
- Obtain your nuclear extract from the front laboratory bench.
- Be sure to keep your extract on ice as you are working!
- To calculate the volume of extract for the DNA complex reaction, you will use the NanoDrop to determine the concentration.
- Alert the teaching assistant when you are ready to use the NanoDrop and they will assist you.
- Determine the volume of extract needed to add 2 μg of protein to your reaction.
- If the volume calculated is more than 6 μL alert your Instructor.
- Add the following components to a 0.2 mL PCR tube in an ice bucket:
- X μL nuclear extract (2 μg)
- X = volume you calculated in Step #3.
- 1 μL Poly D (I-C)
- 2 μL 5X binding buffer
- 1 μL small molecule
- Y μL nuclease-free water
- Y = volume of nuclease-free water needed to bring final volume up to 10 μL.
- X μL nuclear extract (2 μg)
- Incubate the reaction on ice for 5 minutes.
- Add 1 μL of TF probe.
- Incubate the reaction at 22 °C for 30 minutes in the PCR machine.
- Add 1 μL of 10X loading buffer.
- Load your sample into the TBE polyacrylamide gel according to the maps below:
- Electrophorese the DNA complexes for 60 minutes at 100 V at 4 °C.

Part 2: Transfer DNA complexes onto membrane
Because the gels are shared between several teams, your Instructor will complete the following steps as a demonstration.
- Add cold 0.5X TBE buffer to a dish.
- Use the following steps to build the transfer stack (see image for reference):
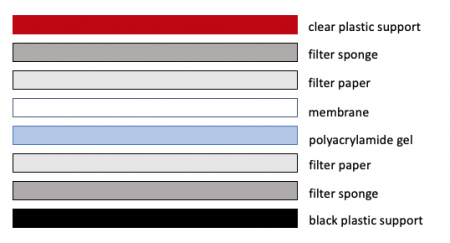

- Place the transfer cartridge in the dish such that the black plastic (negative) side is submerged in the buffer.
- Place 1 filter sponge on top of the black plastic side.
- Place 1 sheet of filter paper on the sponge.
- Carefully remove the TBE polyacrylamide gel from the electrophoresis cartridge and place it on top of the filter paper.
- Briefly submerge the NB membrane in cold 0.5X TBE buffer, then place it on top of the TBE polyacrylamide gel.
- Notch the top, right corner of the membrane to note the orientation and order of the samples.
- Submerge 1 sheet of filter paper in cold 0.5X TBE buffer and place on top of the membrane.
- Submerge 1 filter sponge in cold 0.5X TBE buffer and place on top of the filter paper.
- Close the transfer cartridge.
- Insert the transfer cartridge into the buffer chamber, then fill the chamber with cold 0.5X TBE buffer and attach lid.
- Transfer the DNA complexes for 60 minutes at 60V at 4 °C.
- Remove the membrane from the transfer stack and place into a clean dish.
- Immobolize the DNA complexes onto the membrane using the UV Cross-linker.
- Store the membrane in cold 0.5X TBE buffer at 4 °C.

Part 3: In-class paper discussion
To further help you in preparing your Data summary, we will discuss how similar data are presented in a publication from the Koehler laboratory.
Chen et al. titled "Small molecule microarrays enable the discovery of compounds that bind the Alzheimer's Aβ peptide" (2010) J Am Chem Soc 132:17015-17022.
The initial experiment presented by Chen et. al. was an SMM that identified ligands binders of the amyloid-β (Aβ) petptide. This first step is very similar to what was done to identify the hits you are testing in this module! To further assess the results of the SMM, the authors completed several follow-up experiments to test the effect of the small molecule on functionality of the Aβ petptide.
In the context of your research, this article focuses on the next step experiments that can be performed after a drug candidate is discovered from a screen. Though you can use this article as guidance as you consider the experiments that could follow your screen, remember that the specific next step experiments should be related to the protein target and drug candidate(s) identified in your project. For this exercise, the focus in on how the data are organized and presented.
From the Introduction
Consider the key components of an introduction:
- What is the big picture?
- Is the importance of this research clear?
- Are you provided with the information you need to understand the research?
- Do the authors include a preview of the key results?
From the Results
Carefully examine the figures. First, read the captions and use the information to 'interpret' the data presented within the image. Second, read the text within the results section that describes the figure.
- Do you agree with the conclusion(s) reached by the authors?
- What controls were included and are they appropriate for the experiment performed?
- Are you convinced that the data are accurate and/or representative?
From the Discussion
Consider the following components of a discussion:
- Are the results summarized?
- Did the authors 'tie' the data together into a cohesive and well-interpreted story?
- Do the authors overreach when interpreting the data?
- Are the data linked back to the big picture from the introduction?
In your laboratory notebook, complete the following:
- Based on your reading and the group discussion of the article, answer the questions above.
Reagent list
- EMSA kit (from Signosis):
- Poly D(I-C)
- 5X binding buffer
- 10X loading buffer
- 10X TBE (from BioRad)
- 5% TBE polyacrylamide gel (from BioRad)
Next day: Evaluate experimental results