20.109(F08): Mod 2 Day 4 SDS-PAGE, screen for phenotypes
Contents
Introduction

What exactly is this TAP tag we've added?
Life is evidently more complicated than base-pair chemistry since even a perfect cataloging of an organism’s genetic information does not allow us to build a cell from scratch. Furthermore, two cells in a multicellular organism can have identical genomes but different physiologies. Even at an organismal level, we see that identical twins do not exhibit identical traits. Moreover, minimal differences in DNA code can separate species. With human DNA sequence less than 1.25% different from that of chimpanzees, it appears too simple to believe, “…our fate is in our genes" (a phrase that was popularized when Nobelist Jim Watson told TIME magazine in 1989, "We used to believe our destiny was in the stars; now we know in large measure our fate is in our genes.”) These will be determined through Western analysis, looking for proteins that react to an anti-p3 antibody, and by plaque assay, with which you are already familiar.
SDS-PAGE
Western analysis begins with SDS-PAGE, an acronym for "Sodium Dodecyl Sulfate-Polyacrylamide Electrophoresis." The last word, "electrophoresis," is something we're already familiar with from our DNA work. SDS-PAGE uses charge to separate proteins rather than DNA, but is not identical to agarose gel electrophoresis since proteins are chemically and physically so different from DNA.
- Unlike DNA, proteins are not uniformly charged. Consequently, proteins are coated with a detergent ("SDS"---same thing that's in many shampoos) to allow them to be drawn through the electrophoresis matrix according to their size.
- Proteins are too big to move through most agarose gels, so a different matrix ("polyacrylamide" is used). Polyacrylamide is more hazardous than agarose (check out the MSDS) so extra care must be used when handling these gels.
- Proteins come in a wide wide variety of shapes and exist in interesting complexes with other proteins. In order for each protein to move through the gel according to its size, the higher order folds are removed by boiling the proteins in the presence of a reducing agent.
- The electrophoresis set-up differs from agarose gel electrophoresis because the protein gels are much thinner and are run vertically rather than horizontally. After the run is done, you'll transfer the proteins out of the gel (which is why the gel is so thin) onto a charged membrane which will be probed with antibody next time.
Yeast phenotypes
With this part of today's experiment, we'll ask if modifying a SAGA-related gene with a TAP-tag also changes the yeast's physiology. Common wisdom says that it shouldn't, but today will be the first chance you'll get to directly test this assumption. We'll look for growth phenotypes associated with the change you've engineered into the yeast genome. Phenotypic differences may reveal aspects of gene regulation and protein function related to the SAGA-complex and for the subunit you've chosen to study. NOTE: The pattern of gene expression in the TAP tagged strain may be changed but not in a way that affects growth. Next time in lab, we'll start our microarray experiment which can measure and compare every gene that's expressed in the parent versus TAP-tagged cells. Both the phenotypic and the microarray data will be informative, but keep in mind that neither can determine the mechanism for a change in gene expression since any observed changes could be a direct or indirect consequence of the TAP-tag gene.
Protocol
Part 1: SDS-PAGE
Each group will test a positive control strain that is known to have a TAP-tag (e.g. the SPT3-TAP tagged strain, NY412), a negative control strain that has no TAP-tags (e.g., the parental strain, NY411), and two TAP-tagged candidate yeast strains. All strains will be lysed by vortexing them with glass beads and then boiling them. This harsh but necessary treatment will release the contents inside the yeast from their sugary, tough cell coat.
Sample preparation
- To compare intensities between lanes on the protein gel, it's essential that equal numbers of cells be loaded into each well. Make a 1:10 dilution of the four strains that you've grown (50 ul cells plus 450 ul water). Transfer each dilution to a cuvette and use the spectrophotometer to measure the density of the samples at a wavelength of 600 nm. If you do not remember how to use the spectrophotometers, please ask the teaching faculty for help.
- The cells will scatter light in proportion to their density, at least within a certain range of densities, and the spectrophotometer will give you an "OD reading." OD stands for optical density. The OD value tells you something about the number of cells in a milliliter of liquid. For example a reading of 0.7 says the sample has 0.7 OD units of cells / ml. If you wanted to collect the number of cells equivalent to 1 OD unit, then you would have to collect 1/0.7 = 1.4 ml of that sample to get 1 OD's worth of cells.
- Calculate the OD associated with 1.5 ml of the most dilute sample. Next, calculate the volume of the more concentrated samples that will give the same OD as the 1.5 ml volume of the least concentrated one. For example, if candidate A had a measurement of 0.3 and candidate B measured 0.6 then you'll have to harvest only 0.75 of A to equal the same number of cells in a 1.5 ml of B.
- Move the calculated volume of cells to well-labeled eppendorf tubes, and spin the tubes in a microfuge for 1 minute to pellet the yeast.
- Aspirate the supernatant and resuspend the cell pellets in 100 ul of sample buffer. Sample Buffer contains glycerol to help your samples sink into the wells of the gel, SDS to coat amino acids with negative charge, BME to reduce disulfide bonds, and bromophenol blue to track the migration of the smallest proteins through the gel. For these reasons, you should do this step in the fume hood and wear gloves anytime you're using sample buffer or your hands will get blue and smelly.
- Add 30-50 ul of glass beads to each sample. The teaching faculty will show you how.
- At your bench, vortex each sample for 3X 30 seconds exactly, allowing the samples rest on ice for at least one minute between vortexings.
- Put lid locks on the eppendorf tubes and boil them in the chemical hood for 5 minutes.
- Move the samples back to ice at your bench and vortex each sample one more time for 30 seconds.
- Spin the samples (without the lid locks if you still have them) in a microfuge at full speed for one minute.
Loading, running and blotting your protein gel
You will share one gel with another team and 4 teams will share one electrophoresis chamber. Be sure to put on gloves then load the indicated volumes of each sample onto your portion of the gel. One of the teaching faculty will show you how to load the samples if you are unfamiliar. Once you have loaded a sample from one tube, move it to a different row in your eppendorf tube rack. This will help you keep track of which samples you have loaded. Once all 4 teams have loaded their samples, the power supply will be connected and the gel will run for ~ 1 hour at 200 V.
| Lane | Sample | Volume to load |
|---|---|---|
| Team 1 | ||
| 1 | "Kaleidoscope" protein molecular weight standards | 10 ul |
| 2 | TAP-tagged positive control strain | 40 ul |
| 3 | NY411, negative control strain | 40 ul |
| 4 | TAP-tagged, candidate A | 40 ul |
| 5 | TAP-tagged, candidate B | 40 ul |
| Team 2 | ||
| 6 | "Kaleidoscope" protein molecular weight standards | 10 ul |
| 7 | TAP-tagged positive control strain | 40 ul |
| 8 | NY411, negative control strain | 40 ul |
| 9 | TAP-tagged, candidate A | 40 ul |
| 10 | TAP-tagged, candidate B | 40 ul |
- The molecular weight standards are pre-stained and will separate as the gel runs. The gel should take approximately one hour to run. During that hour, you should work on Part 2 of today's protocol.
- Wearing gloves, you can disassemble the electrophoresis chamber.
- Blot the gel to nitrocellulose as follows:
- Place the gray side of the transfer cassette in a tupperware container which is half full of transfer buffer. The transfer cassette is color-coded so the gray side should end up facing the cathode (black electrode) and the clear side facing the anode (red).
- Place a ScotchBrite pad on the gray side of the cassette.
- Place 1 piece of filter paper on top of the ScotchBrite pad.
- Place your gel on top of the filter paper.
- Place a piece of nitrocellulose filter on top of the gel. The nitrocellulose filter is white and can be found between the blue protective paper sheets. Wear gloves when handling the nitrocellulose to avoid transferring proteins from your fingers to the filter.
- Gently but thoroughly press out any air bubbles caught between the gel and the nitrocellulose.
- Place another piece of filter paper on top of the nitrocellulose.
- Place a second ScotchBrite pad on top of the filter paper.
- Close the cassette then push the clasp down and slide it along the top to hold it shut.
- Place the transfer cassette into the blotting tank so that the clear side faces the red pole and the gray side faces the black pole.
- Two blots can be run in each tank. When both are in place, insert the ice compartment into the tank. Fill the tank with buffer. Be sure the stir bar is able to circulate the buffer. Connect the power supply and transfer at 100 V for one hour. You can use this time to complete Part 2 of today's protocol.
- After an hour, turn off the current, disconnect the tank from the power supply and remove the holders. Retrieve the nitrocellulose filter and confirm that the pre-stained markers have transferred from the gel to the blot. Cut each blot in half and move your team's half of the blot to blocking buffer (TBS-T +5% milk) and store it in the refrigerator until next time.
Part 2: Spot test TAP-tagged candidates for phenotypes
The yeast you are working with, S. cerevisiae, was the first eukaryotic organism to have its genome fully sequenced.Goffeau et al, Science 1996 A full 10 years later there is still ongoing discussion and work on how to best annotate the genome. Fish et al, Yeast 2006 There is general agreement that S. cerevisiae genes number ~6000, and of these approximately 20% are essential. The essential genes also show noteable conservation, with homologs identified in other sequenced organisms. Those essential genes that have no human homologs are useful antifungal drug targets. How to best make sense of the other 4000 annotated genes? About 15% of these affect the cell's physiology in at least one of several discernable ways. In many cases, the function of these genes can be revealed by the phenotype that arises from their loss.
Many phenotypes have been described for S. cerevisiae. A very fine review of these was published by Michael Hampsey in Yeast 1997 He groups the phenotypes into the following categories:
| Category | example of phenotype | Assay |
|---|---|---|
| Conditional growth | e.g. TS (37°) or CS (14°) |
growth on rich media at restrictive condition |
| Cell cycle defect | e.g. large, unbudded cells or very few unbudded cells |
microscopic examination |
| Mating and sporulation defect | e.g. failure to produce mating factor | e.g. halo assay |
| Auxotrophies, carbon catabolite repression, nitrogen utilization | e.g. Snf phenotype (Snf = "sucrose non-fermenter") | growth on incomplete or alternative media (e.g. other sugars) |
| Cell morphology and wall defect | e.g. bud localization | e.g. calcofluor staining |
| Stress response defect | e.g. sensitivity to heat shock | e.g. incubate 1 hr at 55° then test for viability |
| Sensitivities | e.g. canavanine | growth in presence of analog, antibiotic or drug |
| Carbohydrate and lipid biosynthesis defects | e.g. nystatin | growth in presence of synthesis inhibitor |
| Nucleic acid metabolism defects | e.g. UV light sensitivity | growth in presence of damaging agent |
| Other | e.g. caffeine | growth in presence of... |
You should begin by looking at the Hampsey review to familiarize yourself with the range of phenotypes that are detectable and the kinds of things each can tell you about the yeast displaying them. Next, consider the kinds of processes you might expect to be affected in your mutant. Do you know what phenotypes SAGA-mutants show? Do you know what processes the subunit you've deleted might play into? You do not have to know what the outcome will be to test for growth on a particular medium. It's certainly possible that no one has ever tested your strains under the conditions that you'll try. In an ideal world you would have limitless time and resources and you might explore all the possible phenotypes, individually and in combination (looking for a failure to grow on galactose as the sole carbon source when incubated at 37° for example). In reality, we have prepared some media for you to try today. You are welcome to use the plates we have and the incubators in the lab and if there are particular other experiments you'd like to try, please ask the teaching faculty and we will do our best to arrange things.
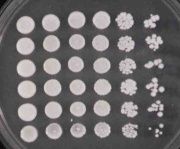
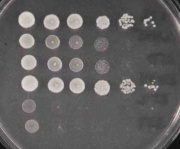
To test the phenotypes of your deletion strains you will perform a common lab technique, namely a "spot test." In this assay, overnight cultures are serially diluted in 96 well dishes and a few microliters of each dilution is spotted using a multichanel pipetman onto the surfaces of some petri dishes, each strain in a different row and each serial dilution in a different column. The resulting data may look like:
where the image on the left shows all the strains being compared, grown on rich media whereas the image on the right reveals the sensitivity of the same strains to growth on rich media plus 3% formamide. Strains #2, #3, #5 and #6 clearly grow less well on formamide-containing media since the spot at which the cells are no longer detected moves from the 10^-6 dilution back to the 10^-4 or 10^-1 dilution, depending on the strain.
- Decide on the types of media you will examine and any growth conditions (temperature etc). Retrieve these plates and label them with the date, your team color and the strains you are examining.
- Vortex the strains that you innoculated last time: FY2068, candidate A, candidate B, and candidate C.
- Next move 100 ul to the first well of a 96 well dish: FY2068 to position A1, candidate A to B1, candidate B to C1 and candidate C to D1.
- Add 90 ul of sterile water to the wells A2-A6, B2-B6, C2-C6 and D2-D6.
- Using your P20 set to 10 ul, pipet the yeast in well A1 up and down to mix them then move 10 ul of the yeast into the water that is in A2. Repeat, moving 10 ul of the dilution from A2 to A3 then 10 ul from A3 to A4 all the way out to A6.
- Repeat the serial dilution series for the yeast in wells B1, C1 and D1.
- Lay your labelled petri dishes open on the bench top.
- Place 4 pipet tips on the multichanel pipetman and spot 3 ul from column 1 onto the leftmost side of each petri dish. You can use the same pipet tips for all your plates but be sure that the tips are properly filling each time. Sometimes liquid can accumulate in them to give errors in measurement.
- Change pipet tips and then spot 3 ul from column 2 next to the spots you just placed from column 1. Spot all the petri dishes in this same way.
- Repeat for columns 3-6.
- Carefully replace the covers on the petri dishes but do not move them from your bench until all the spots have dried.
- Wrap them in your colored tape and place them in the incubators.
DONE!
For next time
This assignment can either be emailed to nkuldell and astachow AT mit DOT edu, or turned in as a hard copy when you arrive in lab next time.
- Remind yourself what size you expect your TAP-tagged protein to be. Don't forget that the TAP-tag itself adds ~20KDa to the gene product. Determine which of the kaleidoscope markers you expect to see nearby.
- Prepare a figure of the agarose gel in which your TAP-tagged candidates were tested for the genomic modifications. All standard rules apply for labels and legends in this figure, as it will be included in your final research article that you write for this module.
Reagents list
- Loading Dye
- XC
- glycerol
- BME
- 1X TGS = SDS PAGE running buffer
- Transfer Buffer
- 25 mM Tris
- 192 mM glycine
- 20% v/v methanol
- YPD
- 10g yeast extract
- 20g peptone
- 20g glucose
- 20g agar (for liquid media, leave agar out!)
- add 1L water, autoclave 20min, stir to cool
- YPGal+antimycin A
- 10g yeast extract
- 20g peptone
- 20g agar
- add 950ml water, autoclave 20min, stir to cool
- add 50ml 40% sterile filtered galactose + 1ml of 1mg/ml Antimycin A when cooled
- SC-lys
- In one 2L flask: 6.7g yeast nitrogen base + NH, 2g SC-lys D/O, 500ml water
- In another 2L flask: 20g agar, 450ml water
- autoclave both flasks 20min, stir to cool, combine contents
- add 50ml 40% glucose
- SC-his
- In one 2L flask: 6.7g yeast nitrogen base + NH, 2g SC-his D/O, 500ml water
- In another 2L flask: 20g agar, 450ml water
- autoclave both flasks 20min, stir to cool, combine contents
- add 50ml 40% glucose


