Difference between revisions of "20.109(F07): Transmission electron microscopy"
(→Introduction) |
(→Protocols) |
||
| Line 12: | Line 12: | ||
===Part 1: TEM sample preparation=== | ===Part 1: TEM sample preparation=== | ||
# Retrieve your dialyzed sample from the beaker of water and very carefully remove the top clip. The tubing will be slippery and you will be very sad if it slips out of your hand and spills. | # Retrieve your dialyzed sample from the beaker of water and very carefully remove the top clip. The tubing will be slippery and you will be very sad if it slips out of your hand and spills. | ||
| − | # Use your P1000 to sip the sample out of the tubing, squeezing the liquid that's in the tubing toward the tip of the P1000. Place your iridium-coated phage (= nanowires) in an eppendorf tube. You will use only a small aliquot of this solution today but | + | # Use your P1000 to sip the sample out of the tubing, squeezing the liquid that's in the tubing toward the tip of the P1000. Place your iridium-coated phage (= nanowires) in an eppendorf tube. You will use only a small aliquot of this solution today but be sure to give the rest of your nanowire sample to the teaching faculty before you leave. |
| − | # Place 15 ul of your nanowire solution on the <b> shiny, bright side </b> of the TEM grid that you have balanced in the specialized tweezers. [[Image:Macintosh_HD-Users-nkuldell-Desktop-tweezersTEMgrid.jpg| | + | # Place 15 ul of your nanowire solution on the <b> shiny, bright side </b> of the TEM grid that you have balanced in the specialized tweezers. [[Image:Macintosh_HD-Users-nkuldell-Desktop-tweezersTEMgrid.jpg|thumb|right|TEM grid balanced in tweezers]] |
# Allow the nanowires to settle onto the grid undisturbed for 30'. | # Allow the nanowires to settle onto the grid undisturbed for 30'. | ||
# Remove the droplet from the grid with your P200 set to 50 ul. | # Remove the droplet from the grid with your P200 set to 50 ul. | ||
# Wash the grid by placing adding 15 uL of sterile H2O onto the grid. Immediately remove the water. | # Wash the grid by placing adding 15 uL of sterile H2O onto the grid. Immediately remove the water. | ||
# Dry the grid by very gently touching the edge of the grid to a piece of blotting paper in a petri dish. Place the grid (shiny side up) onto the paper to transport to the TEM facility. | # Dry the grid by very gently touching the edge of the grid to a piece of blotting paper in a petri dish. Place the grid (shiny side up) onto the paper to transport to the TEM facility. | ||
| + | # To get there you should turn right as you leave our teaching lab and walk to the end of the hall to the "EXIT." Take the stairs down to the first floor and on your right you'll see a door to the core TEM facility that is run by the Center for Materials Science and Engineering. A member of the teaching faculty will be in the facility to examine your samples with you. | ||
| + | |||
===Part 2: TEM=== | ===Part 2: TEM=== | ||
| Line 23: | Line 25: | ||
DONE! | DONE! | ||
| + | |||
==For next time== | ==For next time== | ||
# Fig w image | # Fig w image | ||
Revision as of 19:25, 2 November 2007

Contents
Introduction


The Transmission Electron Microscope achieves its remarkable resolution by “illuminating” samples using an electron beam in a vacuum rather than using a conventional light source in air. Since the electron beam passes through the sample that is being examined, the sample must be sufficiently thin and sufficiently sturdy to allow for its visualization by electrons in a vacuum. It’s important to remember that many biological materials are damaged or destroyed by the incoming electrons and that the TEM can image only the species that survive this harsh treatment. The denser parts of the sample will absorb or scatter some of the electron beam, and it’s the scattered electrons or those that pass through the sample that are focused using an electromagnetic lens. This “electron shadow” then strikes a fluorescent screen, giving rise an image that varies in darkness according to its density. For samples that are amenable to TEM, this form of examination can allow observation of angstrom-sized objects and of cellular details down to near atomic levels.
- TEM grid
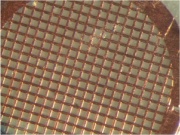 Copper TEM grid with carbon mesh, photographed at 60X magnification
- interp of what's visualized

Protocols
Part 1: TEM sample preparation
- Retrieve your dialyzed sample from the beaker of water and very carefully remove the top clip. The tubing will be slippery and you will be very sad if it slips out of your hand and spills.
- Use your P1000 to sip the sample out of the tubing, squeezing the liquid that's in the tubing toward the tip of the P1000. Place your iridium-coated phage (= nanowires) in an eppendorf tube. You will use only a small aliquot of this solution today but be sure to give the rest of your nanowire sample to the teaching faculty before you leave.
- Place 15 ul of your nanowire solution on the shiny, bright side of the TEM grid that you have balanced in the specialized tweezers.
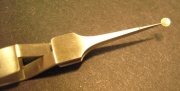 TEM grid balanced in tweezers
 - Allow the nanowires to settle onto the grid undisturbed for 30'.
- Remove the droplet from the grid with your P200 set to 50 ul.
- Wash the grid by placing adding 15 uL of sterile H2O onto the grid. Immediately remove the water.
- Dry the grid by very gently touching the edge of the grid to a piece of blotting paper in a petri dish. Place the grid (shiny side up) onto the paper to transport to the TEM facility.
- To get there you should turn right as you leave our teaching lab and walk to the end of the hall to the "EXIT." Take the stairs down to the first floor and on your right you'll see a door to the core TEM facility that is run by the Center for Materials Science and Engineering. A member of the teaching faculty will be in the facility to examine your samples with you.

Part 2: TEM
DONE!
For next time
- Fig w image
- research proposal paragraph