Lab Manual: Optical Microscopy
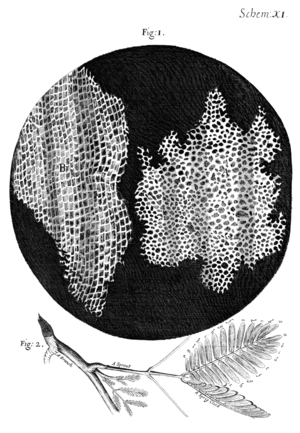
I took a good clear piece of Cork, and with a Pen-knife sharpen'd as keen as a Razor, I cut a piece of it off, and thereby left the surface of it exceeding smooth, then examining it very diligently with a Microscope, me thought I could perceive it to appear a little porous; but I could not so plainly distinguish them, as to be sure that they were pores, much less what Figure they were of: But judging from the lightness and yielding quality of the Cork, that certainly the texture could not be so curious, but that possibly, if I could use some further diligence, I might find it to be discernable with a Microscope, I with the same sharp Penknife, cut off from the former smooth surface an exceeding thin piece of it, and placing it on a black object Plate, because it was it self a white body, and casting the light on it with a deep plano-convex Glass, I could exceeding plainly perceive it to be all perforated and porous, much like a Honey-comb, but that the pores of it were not regular; yet it was not unlike a Honey-comb in these particulars.
I told several lines of these pores, and found that there were usually about threescore of these small Cells placed end-ways in the eighteenth part of an Inch in length, whence I concluded there must be neer eleven hundred of them, or somewhat more then a thousand in the length of an Inch, and therefore in a square Inch above a Million, or 1166400. and in a Cubick Inch, above twelve hundred Millions, or 1259712000. a thing almost incredible, did not our Microscope assure us of it by ocular demonstration.
— Robert Hooke from Micrographia: or Some Physiological Descriptions of Minute Bodies made by Magnifying Glasses with Observations and Inquiries Thereupon (1665)[1]
Introduction
In this lab, you will build an optical microscope using lenses, mirrors, filters, optical mounts, CCD cameras, lasers, and other components in the lab. The work is divided into 4 parts. Each part requires some lab work, some analysis, lots of clear thinking, and a written report. You will submit a short, group report after parts 1, 2, and 3. The final report should include results from all 4 parts of the lab. You may revise and improve your part 1-3 reports before the final submission. At the end of the lab, you will give an individual, 5 minute, oral presentation to an instructor. The presentation will be followed by ten minutes of questions and answers.
Part 1
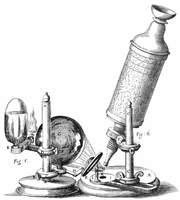
In part 1 of the lab, you will build a compound microscope, determine its magnification, and attempt to measure the size of microscopic objects. The instrument you create will have a great deal in common with the microscope Robert Hooke built in the mid-1660s. Hooke meticulously documented his microscopic observations and published them in a popular volume called Micrographia in 1665. The measurements you make in part 1 will call to mind Hooke's early quantification of the size of plant cells (see quote at top of page). You will grapple with many of the same challenges Hooke faced: resolution, contrast, field of view, optical aberrations, and obscurity of thick samples. (To overcome the thick sample problem, Hooke used a very sharp knife to cut an "exceeding thin" slice of cork — a technique still in everyday use.)
Hooke spent countless hours hand drawing the breathtaking illustrations for Micrographia. A CCD camera in the image plane of your microscope will provide a huge advantage. You will be able to record micrographs nearly as spectacular as Hooke's in a fraction of a second and with far less skill. (As a young man, Hooke apprenticed as a painter. The guy could draw.)
Specimens in part 1 will be illuminated by an LED that shines light through the sample plane. The illumination will show up as a bright background in your images. The unsurprising name of this method is: transilluminated, bright field microscopy. Transillumination works well for samples that absorb or scatter a lot of light. Most biological samples have low contrast when imaged this way. Despite the limitations of bright field microscopy, many important discoveries were made with this simple method. Hooke was an early discoverer of plant cells, but he was mostly interested in how the cell structure of his cork sample explained the material's unique mechanical properties. He soon trained his microscope on other things (like glass canes, a bloodsucking louse, and feathers).
Likely inspired by Micrographia, a Dutch draper named Anton van Leeuwenhoek honed his lens-making skills and developed his own microscope. Van Leeuwenhoek was intensely interested in the tiny creatures he dubbed "animalcules" that he observed in water, blood, semen, and other specimens. Looking at samples of plaque from his own mouth, van Leeuwenhoek recorded: "I then most always saw, with great wonder, that in the said matter there were many very little living animalcules, very prettily a-moving. The biggest sort. . . had a very strong and swift motion, and shot through the water (or spittle) like a pike does through the water. Looking at the second sort. . . oft-times spun round like a top. . . and these were far more in number." (Sadly, the colorful term "animalcule" did not have as much staying power as "cell.") Van Leeuwenhoek discovered bacteria, protozoa, spermatozoa, rotifers, Hydra, Volvox, and parthenogenesis in aphids. He was truly the first microbiologist.
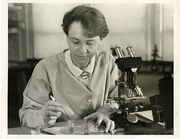
Perhaps the most remarkable discovery ever made with nothing but a simple light microscope was genetic transposition. Barbara McClintock was a talented microscopist who developed a technique that enabled her to visualize and differentiate individual chromosomes in Zea mays (corn) plant cells. One important element of her method was that she prepared her samples by squashing them instead of cutting thin slices as Hooke did 300 years earlier. She observed genetic transposition through an optical microscope in 1944, nearly 10 years before the chemical structure of DNA was deciphered. Several decades elapsed before molecular techniques sufficiently sophisticated to confirm her discovery were developed.[2] McClintock was awarded the Nobel Prize in Physiology or Medicine in 1983 for her discovery.
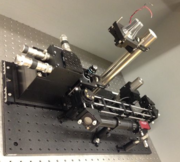
An example microscope made by the instructors will be available in the lab for you to examine. Feel free to make improvements on this design. Mechanical stability will be crucial for the particle tracking experiments in parts 3 and 4 of the lab. The required stability specification will be achieved through good design and careful construction — not by indiscriminate over-tightening of screws.
Part 2
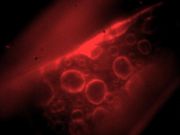
The development of fluorescence microscopy has been the single most important rejoinder to the contrast problem (and more recently to the resolution problem). Fluorescence microscopes rely on special molecules in the sample called fluorophores that absorb photons of one wavelength and then turn around and emit photons of a longer wavelength. Optical filters separate excitation from emission, producing an image that shows only the cordial glow of the fluorescent molecules on a dark background. Filtering out the illumination provides much better contrast than transillumination. Excellent techniques exist for attaching fluorophores to molecules of interest. The three principal techniques are: fluorescent stains, immunofluorescence, and fluorescent proteins. Fluorescent stains such as DAPI are small molecules that bind to particular sites (the minor groove of DNA in the case of DAPI). Immunofluorescence exploits antibodies conjugated to fluorophores to label specific molecules. A dizzying array of antibodies and dyes exists. Because they are amenable to genetic manipulations, fluorescent protein techniques have had perhaps the most profound impact on biological science. The 2008 Nobel Prize honored Osamu Shimomura, Martin Chalfie and Roger Tsien for developing the green fluorescent protein (GFP).
In part 2 of the lab, you will augment your microscope to support fluorescence imaging. To test the new capabilities of your microscope, you will image fluorescent microspheres and immunofluorescently labeled biological samples. You will use image processing techniques to correct the images for nonuniform illumination.
Part 3
In part 3, you will make quantitative measurements using fluorescence. You will image tiny, fluorescent microscpheres to measure the resolution of your microscope. The beads are so small they act essentially like point sources. You will also take movies of larger microspheres diffusing in solvents of different viscosities. You will use image processing and particle tracking techniques to measure the diffusion coefficient of the particles and estimate the viscosity of the solvents. The details of some of the solvents will be revealed to you and others will be unknown.
Part 4
In part 4, you will use particle tracking to make quantitative measurements of a biological sample. Procedures vary from year to year. Details will be provided in class.
The final report should consist of all 4 sections in a single file. In the final document, you may revise any part of the first three sections without penalty. Only the final report will be graded. You may not skip any of the weekly reports.
Follow the format suggested in the Microscopy report outline.
After your report is turned in, each student must schedule a 15 minute, individual oral with an instructor. Instructors will be assigned randomly. The oral will consist of a 5 minute presentation followed by 10 minutes of questions and (if you want a good grade) answers. You may use prepared slides for your presentation, but it is not required. Orals constitute a large percentage of your grade. Make certain to prepare appropriately.
Microscope design
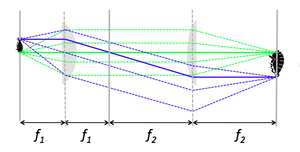
The design of your transillumination bright field microscope will closely resemble that of Hooke's: indeed, you too will use two positive lenses, an objective lens and its complementary tube lens, to examine samples and generate images. This simple design is commonly referred to as a "4f microscope". As you study geometrical optics this semester, you'll learn that if the object is positioned exactly at the focal length f1 of the objective lens, then its image will be crisp, non-blurry, or colloquially in focus at the focal length f2 of the tube lens. Moreover, the image will be magnified by the ratio of the focal lengths, f2 / f1.
|
|
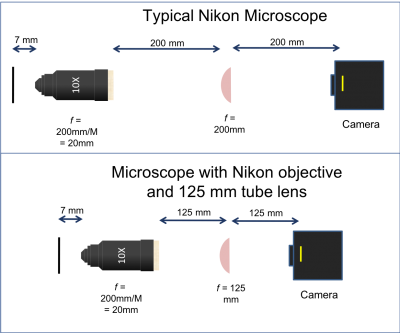
| A 4f microscope | The reference tube length for the Nikon objectives we will use is 200 mm.
A 200 mm lens, placed 200 mm from the back ring of the objective, will produce the rated magnification M. |
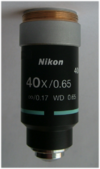
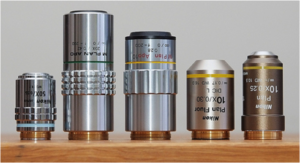
Even though modern objective lenses encapsulate high-complexity and high-performance optical systems, their basic function can be modeled as a single, ideal lens. You can read key properties of the objective lens directly from the markings engraved on its enclosure:
- The nominal magnification M precedes the sign 'X' on the casing.
- The objective's numerical aperture NA follows.
- The tube length is the distance between the back ring of the objective and the image plane.
- Most modern objectives have infinite tube length (∞ symbol).
- Thus, a second lens, the tube lens, is required to form an image.
- The reference tube length RTL (not specified on objective's body) relates the objective's focal length f and its nominal magnification M:
- f = RTL / M.
- The manufacturer of the objective lenses we'll use in class, Nikon, lists and recommends a RTL of 200 mm, for optimal correction of aberrations.
- The thickness of the coverslip to be used in conjunction with the objective follows the '/' sign.
- The object plane (i.e. the "focal plane" of the lens) is located at the working distance indicated in millimeters after the letters WD.
Other markings you'll find on modern objectives include an intricate yet arcane nomenclature and set of acronyms that describe their optical properties:
- chromatic aberration correction: Achro, Fluor, Apo
- flat field optical correction: Plan, Plano
- immersion medium: Oil , Oel, Water, Wasser, Gly
- specialized optics: Phase, DIC, ELWD, …
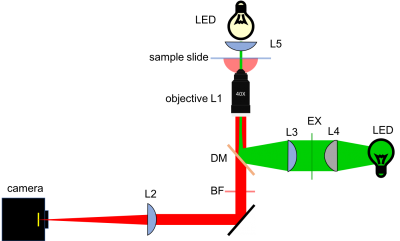
The imaging path of the microscope includes objective lens (L1) and a tube lens (L2). Specimens are placed at the front focus of L1, producing collimated light that reflects off mirror M1. L2 forms an image of the sample on a CCD camera, which is placed one focal length from L2. In bright-field mode, collimated light from an LED passes through the sample.
A green laser illuminates the sample in epi-fluorescence mode. Laser light passes through a Gallilean beam expander (L3 and L4). L5 focuses the laser beam at the back focus of L1. This arrangement provides collimated sample illumination. Dichroic mirror DM reflects the green light toward the sample and allows emitted red light to pass through.
Illumination for epi-fluorescence microscopy reaches the sample through the objective lens — from the same side of the sample that is observed. Epi-fluorescence microscopy is normally used on samples that have been labeled with a fluorescent molecule called a fluorophore. The (narrowband) illumination wavelength must match the absorption characteristic of the fluorophore. After becoming excited by a photon from the illuminator, fluorophores emit photons with a longer wavelength. A dichroic mirror in the microscope reflects the illumination wavelength but allows the emitted photons to pass through.
Optical microscopy lab
Code examples and simulations
- Converting Gaussian fit to Rayleigh resolution
- MATLAB: Estimating resolution from a PSF slide image
- Matlab: Scalebars
- Calculating MSD and Diffusion Coefficients
Background reading
- Geometrical optics and ray tracing
- Physical optics and resolution
- Optical aberrations
- Aperture and field stops
- Optical detectors, noise, and the limit of detection
- Manta G032 camera measurements
- Understanding log plots
References
- ↑ Hooke, R. Micrographia: or Some Physiological Descriptions of Minute Bodies made by Magnifying Glasses with Observations and Inquiries Thereupon London:Jo. Martyn, and Ja. Allestry, Printers to the Royal Society; 1665
- ↑ See, for example: McClintock, B. The origin and behavior of mutable loci in maize. PNAS. 1950; 36:344-355. [1], [2], and Endersby, Jim. A Guinea Pig's History of Biology. Cambridge, Massachusetts: Harvard University Press; 2007.
- ↑ See class stellar site for protocol. Oh & Yamaguchi, unpublished lab report

