|
|
| Line 6: |
Line 6: |
| | ==Protocols== | | ==Protocols== |
| | | | |
| | + | ===Part 1: Image Fet_mutant expression experiment=== |
| | | | |
| − | ===Part 1: Perform antibody staining to determine Fet4 transporter expression===
| + | [[Image:Fa16 M1D7 fluorescence microscope.png|thumb|right|400px|'''Diagram of a fluorescence microscope.''']]As discussed in prelab, two antibodies were used in the H2AX assay. The first antibody, or primary antibody, was anti-His tag and raised in a mouse. The secondary antibody was anti-mouse and raised in a goat, more importantly, this molecule is conjugated to a fluorescent dye tag called Alexa Fluor 568. The Alexa Fluor 568 tag is a orange/red fluorescent dye that is excited at 568 nm. To visualize the expression of your tagged mutant Fet4, we will use fluorescence microscopy. |
| | | | |
| − | '''Fix yeast and plate them on coverslips'''<br>
| + | In fluorescence microscopy the specimen is illuminated with a wavelength of light specific to the excitation of the fluorescent tag used to target the feature of interest. The excitation wavelength is absorbed by the fluorescent tag, which causes it to emit light at a longer, less energetic wavelength. Typically, fluorescence microscopes used in biology are an epifluorescence type with a single light path (the objective) for excitation and emission detection, as depicted in the diagram above. |
| − | #Obtain your 12-well plates with coated coverslips from the front laboratory bench.
| + | |
| − | #Obtain the following reagents from the front bench for your group:
| + | |
| − | #*1 culture of W303α yeast
| + | |
| − | #*1 culture of W303α yeast expressing Fet4
| + | |
| − | #*1 culture of W303α yeast expressing Fet4_mutant
| + | |
| − | #*Media aliquot
| + | |
| − | #*cuvettes
| + | |
| − | #Triturate your yeast culture to ensure even suspension, then transfer 1ml of each culture to a cuvette
| + | |
| − | #Add 1ml media to a fresh cuvette to use as a blank
| + | |
| − | #Determine the OD<sub>600</sub> of each yeast culture
| + | |
| − | #Calculate the volume of each culture needed to make 2ml of each culture with an OD<sub>600</sub> ~ 0.5 and dilute accordingly with fresh media in a fresh 15ml conical tube.
| + | |
| − | #Pellet cells by centrifugation at 900xg for 5 minutes and remove supernatent.
| + | |
| − | #Resuspend pellet in 1ml PFA, and incubate the cells at 30°C for 30 minutes.
| + | |
| − | #Pellet fixed cells at 900xg for 5 minutes and remove PFA.
| + | |
| − | #*DO NOT aspirate PFA-- pipette it from the pellet and collect it for appropriate disposal.
| + | |
| − | #Wash pellet by resuspension in 1ml sorbitol-citrate buffer, then pellet cells by centrifugation at 900xg for 5 minutes.
| + | |
| − | #Aspirate the supernatent and resuspend the pellet in zymolyase.
| + | |
| − | #*Prepare the zymolyase buffer by adding 10μL zymolyase (obtained at the front bench) to 990μL sorbitol-citrate buffer.
| + | |
| − | #Incubate the fixed yeast in zymolase for 30 minutes at 30°C to digest the yeast cell wall.
| + | |
| | | | |
| | + | Fluorescence, or epifluorescence, microscopes are composed of a light source, an excitation filter, a dichroic mirror, and an emission filter. The filters and the dichroic mirror are specific to the spectral excitation and emission characteristics of the fluorescent tag. To visualize fluorescence, light at the excitation wavelength is focused on the sample. The light emission from the sample is focused by the objective to a detector. |
| | | | |
| − | | + | Due to timing reasons, the Instructors will complete the imaging for the coverslips prepared during this laboratory session. To ensure you are familiar with the imaging procedure, each team will see a demonstration provided by the Instructor. |
| − | '''Complete primary staining steps'''<br>
| + | |
| − | | + | |
| − | [[Image:IMG_5503.JPG|thumb|right|350px|'''Immunofluorescence staining chamber''']]
| + | |
| − | #Obtain your 12-well plates with coated coverslips from the front laboratory bench.
| + | |
| − | #Gather an aliquot of 1 X TBS from the front laboratory bench.
| + | |
| − | #*Prepare 1.2 mL solution of 0.2% Triton X-100 (v/v) in 1X TBS in a micro centrifuge tube using the 10% Triton stock is at the front laboratory bench.
| + | |
| − | #*Prepare 2.5 mL solution of 1% BSA (v/v) in 1X TBS in 15 mL conical tube. 10% BSA stock is at the front bench.
| + | |
| − | #**One of the preparations will be the blocking solution used in Step #8 and the other preparation will be used in Step #9 for the primary antibody solution.
| + | |
| − | #Obtain a staining chamber from the front bench and add a damp paper towel to each side of the parafilm.
| + | |
| − | #*Label the parafilm with experimental details.
| + | |
| − | #Obtain a fine gauge (26 3/8) needle and a pair of tweezers from the front laboratory bench.
| + | |
| − | #*Carefully press the tip of the needle against the benchtop to bend it into a right angle such that the beveled side of the needle is the interior angle.
| + | |
| − | #Use the 'hook' created with the needle to lift the coverslip from the bottom of the well, then use the tweezers to 'catch' the coverslip.
| + | |
| − | #*Practice plates with coverslips will be available at the front laboratory bench.
| + | |
| − | #When you are confident with your ability to retrieve the coverslips from the wells, move one coverslip from each condition from your 12-well plates to the staining chamber. Cell-side UP!
| + | |
| − | #*The cell-side of the coverslip is the side that was facing up in the well of the 12-well plate.
| + | |
| − | #Quickly permeabilize the cells by adding 150 μL of the 0.2% Triton X-100/TBS solution to each coverslip and incubate for 10 min at room temperature.
| + | |
| − | #Aspirate the 0.2% Triton X-100/TBS solution and add 150 μL of BSA blocking solution to each coverslip, then incubate for 60 min at room temperature.
| + | |
| − | #With 15 min remaining of the blocking solution incubation, prepare the primary antibody.
| + | |
| − | #*Dilute the mouse anti-γH2AX antibody 1:1000 in the 1.2 mL aliquot of BSA blocking solution.
| + | |
| − | #Aspirate the block solution and add 150 μL of the diluted primary antibody solution to each coverslip before moving the next. Do not let the coverslips dry!
| + | |
| − | #Cover your staining chamber with the lid to incubate at room temperature.
| + | |
| − | #Incubate samples in the primary antibody solution for ~1 h.
| + | |
| − | | + | |
| − | '''Complete secondary staining steps'''
| + | |
| − | | + | |
| − | #Aspirate the primary antibody and wash each coverslip by pipetting 200uL of TBS to the top of the coverslip, then use pipet or aspirator to remove liquid.
| + | |
| − | #*Complete a total of 3 washes. At the final wash leave the liquid on the coverslip.
| + | |
| − | #Retrieve aliquot of diluted secondary antibody, Alexa Fluor 488 goat anti-mouse (diluted 1:200 in blocking solution) from front bench.
| + | |
| − | #Aspirate the wash liquid from one coverslip and immediately add 150 μL of the diluted secondary antibody to the coverslip.
| + | |
| − | #*Complete this step for each coverslip individually as it is important that the coverslips do not dry!
| + | |
| − | #Cover your coverslips to protect them from light.
| + | |
| − | #Incubate samples at 4 °C in the secondary antibody solution for ~1 h.
| + | |
| − | #Make sure to have TBS solution available before you start. Aspirate the secondary antibody solution off the coverslip and immediately add 150 μL of TBS. Do not let the coverslips dry out during this process.
| + | |
| − | #To complete the post secondary wash, add 150 μL of TBS per coverslip, let incubate at room temperature for 3 min covered, then aspirate.
| + | |
| − | #To add DAPI, dilute the DAPI stain 1:1000 in TBS and add 150 μL DAPI per coverslip.
| + | |
| − | #Incubate at room temperature for 10 min covered, then aspirate.
| + | |
| − | #Add TBS as in Step #2 for the final wash and leave for 3 min. Do not aspirate.
| + | |
| − | #Obtain glass slides from the front laboratory bench and label your slides with all of your experimental information and group name, add one drop (15 uL) of mounting media to the slide.
| + | |
| − | #Aspirate the final TBS wash and using tweezers place the coverslip cell-side down on the mounting media "spot" on the microscope slide. Try your best to avoid bubbles by slowly placing the coverslip over the mounting media.
| + | |
| − | #*The cell-side of the coverslip is the side that was facing up in the staining chamber.
| + | |
| − | #Complete Steps #5-6 for coverslips from all of the coverslips you stained.
| + | |
| − | #Add one small drop of nail polish to each side of your coverslip to seal it to the glass slide.
| + | |
| | | | |
| | <font color = #4a9152 >'''In your laboratory notebook,'''</font color> complete the following: | | <font color = #4a9152 >'''In your laboratory notebook,'''</font color> complete the following: |
| | | | |
| − | *Why is it important to wash the secondary antibody from the coverslip before imaging? | + | *What is the type of microscope used? |
| − | *What stain is used following secondary antibody? What cellular component is stained in this step? And why is this useful? | + | *What is the light source used by this microscope? |
| | + | *Which objective are you using to image the yeast? |
| | + | *What is a benefit of using a higher objective for this imaging? A consequence? |
| | + | *What is a benefit of using a lower objective for this imaging? A consequence? |
| | + | *Where do you expect to see the 568 nm signal in your images? What might it mean if you don't see the signal where it is expected? What might it mean if you see the signal where it is not expected? |
| | | | |
| − | ===Part 2: Set up experimental conditions for cytotoxicity assay=== | + | ===Part 2: Perform metal tolerance experiment=== |
| | | | |
| | ==Reagents list== | | ==Reagents list== |
| − | *4% paraformaldehyde (Electron Microscopy Sciences) | + | *WST-8 solution (Abcam) |
| − | *Sorbitol-citrate buffer: 1.2M sorbitol (Sigma), 10mM citric acid (Sigma), pH 7.0
| + | |
| − | *Zymolase (Zymo Research)
| + | |
| − | *permeabilization buffer: 0.1% Tween-20 in Phosphate buffer saline (PBS) (from Invitrogen)
| + | |
| − | *blocking buffer: 1% bovine serum albumin (BSA) in PBS (BSA from Sigma)
| + | |
| − | *1:500 Alexafluor-488 conjugated primary antibody to V5 tag, mouse (from Genescript)
| + | |
| − | *1:1000 DAPI (from ThermoFisher)
| + | |
| − | *Glycerol (Sigma)
| + | |
| − | *Synthetic dropout-uracil (SD-U) media: 0.17% yeast nitrogen base without amino acid and ammonium sulfate (BD Bacto), 0.5% ammonium sulfate (Sigma), 0.192 % amino acid mix lacking uracil (Sigma), 2% glucose (BD Bacto), 0.1% adenine hemisulfate (Sigma)
| + | |
| − | *Cadmium chloride (Sigma), [stock] = 100mM
| + | |
| | | | |
| | ==Navigation links== | | ==Navigation links== |
| | Next day: [[20.109(S23):M2D7 |Confirm transporter expression and cell survival of yeast exposed to metal]] <br> | | Next day: [[20.109(S23):M2D7 |Confirm transporter expression and cell survival of yeast exposed to metal]] <br> |
| | Previous day: [[20.109(S23):M2D5 |Analyze ICP-OES data]] <br> | | Previous day: [[20.109(S23):M2D5 |Analyze ICP-OES data]] <br> |
20.109(S23): Laboratory Fundamentals of Biological Engineering

Introduction
Protocols
Part 1: Image Fet_mutant expression experiment
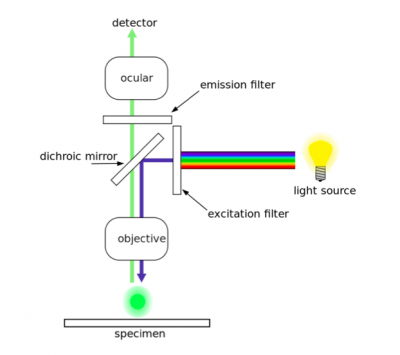
Diagram of a fluorescence microscope. As discussed in prelab, two antibodies were used in the H2AX assay. The first antibody, or primary antibody, was anti-His tag and raised in a mouse. The secondary antibody was anti-mouse and raised in a goat, more importantly, this molecule is conjugated to a fluorescent dye tag called Alexa Fluor 568. The Alexa Fluor 568 tag is a orange/red fluorescent dye that is excited at 568 nm. To visualize the expression of your tagged mutant Fet4, we will use fluorescence microscopy.
In fluorescence microscopy the specimen is illuminated with a wavelength of light specific to the excitation of the fluorescent tag used to target the feature of interest. The excitation wavelength is absorbed by the fluorescent tag, which causes it to emit light at a longer, less energetic wavelength. Typically, fluorescence microscopes used in biology are an epifluorescence type with a single light path (the objective) for excitation and emission detection, as depicted in the diagram above.
Fluorescence, or epifluorescence, microscopes are composed of a light source, an excitation filter, a dichroic mirror, and an emission filter. The filters and the dichroic mirror are specific to the spectral excitation and emission characteristics of the fluorescent tag. To visualize fluorescence, light at the excitation wavelength is focused on the sample. The light emission from the sample is focused by the objective to a detector.
Due to timing reasons, the Instructors will complete the imaging for the coverslips prepared during this laboratory session. To ensure you are familiar with the imaging procedure, each team will see a demonstration provided by the Instructor.
In your laboratory notebook, complete the following:
- What is the type of microscope used?
- What is the light source used by this microscope?
- Which objective are you using to image the yeast?
- What is a benefit of using a higher objective for this imaging? A consequence?
- What is a benefit of using a lower objective for this imaging? A consequence?
- Where do you expect to see the 568 nm signal in your images? What might it mean if you don't see the signal where it is expected? What might it mean if you see the signal where it is not expected?
Part 2: Perform metal tolerance experiment
Reagents list
Navigation links
Next day: Confirm transporter expression and cell survival of yeast exposed to metal
Previous day:
Analyze ICP-OES data

