20.109(S23):M2D7

Contents
Introduction
Metal tolerance assay
The BacTiter-Glo Microbial Cell Viability Assay is a method for quantifying the number of viable cells based on measuring the amount of ATP present. ATP is a proxy for the presence of metabolically active (alive) cells. In this assay, the cells are lysed and ATP is released from the active cells. In a reaction catalyzed by a propriety luciferase enzyme, luciferin, ATP, and oxygen result in oxyluciferin, AMP, PPi, carbon dioxide, and light. The light product is then measured using a luminometer.
Protocols
Part 1: Perform metal tolerance experiment
- Obtain your Fet4_mutant culture from the front bench.
- Untransformed W303α and W303α transformed with Fet4 will be tested in parallel by the teaching faculty.
- Gently tritruate with a 1ml pipette to create a homogeneous suspension.
- Obtain cuvettes from the front bench to measure the OD600 of each culture prior to beginning the experiment.
- Add 1ml of each cell suspension to individual cuvettes and read on the spectrophotometer.
- Use 1ml SD-G for a blank.
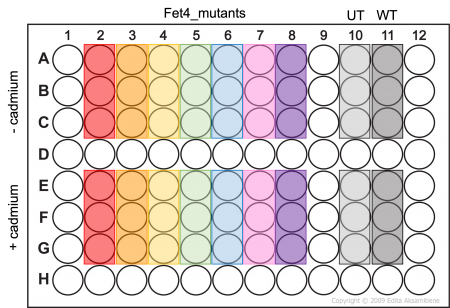 BacTiter-Glo assay map.
- Use 1ml SD-G for a blank.
- Record these numbers in your notebook.
- Using SD-G media as a diluent, dilute each of your cultures to OD600 ~ 1.0 and a final volume of 8ml. This does not have to be exact, but the cultures should have a similar OD600 before you begin the experiment.
- Add CdCl2 for a final concentration of 100μM in each culture.
- Incubate your labeled tubes shaking at 30°C for 2.5 hours to allow uptake.
- During this incubation time, complete Part 2 and 3 of the wiki.
- Following incubation, take an additional OD600 reading to account for any changes in culture density, and allow normalization of data across groups.
- Record this in your notebook.
- Add 100μL of cell suspension to the appropriate wells of an opaque-walled 96 well plate as shown in the plate map (Fet4_mutant cells -/+ cadmium will be assayed in triplicate).
- Add 100μL BacTiter-Glo reagent to each well containing cell suspension and mix.
- Incubate plate on orbital shaker, protected from light, for 5 minutes.
- Read the plate on a luminometer plate reader.

Part 2: Review collection of ICP-OES data
Due to the training required to operate the machinery, the teaching faculty have generated the ICP-OES data you will analyze. Please review the following steps to help conceptualize how the data were generated.
- Enter the ICP-OES facility and place samples in fume hood while setting up the equipment.
- Open the liquid argon regulator valve to begin the flow of argon gas to the ICP apparatus.
- Turn on the chiller to cool the ICP apparatus during operation.
- Tighten tubing connecting autosampler to nebulizer.
- Open the ICP Expert program and temporarily boost the argon gas flow to purge the system and maintain steady gas flow.
- Use the instrumentation panel in ICP Expert to light the plasma torch.
- Plasma must be burn for 20 minutes before data can be collected.
- Ensure collection probe is place in rinse solution.
- Place samples in autosampler.
- Before beginning experimental run, verify the following conditions to ensure machine is operational.
- Periodic bubbles present in drain lines for spray chamber and autosampler.
- Stable fog present in nebulizer sample chamber.
- Stable torch flame.
In your laboratory notebook, complete the following:
- What
Part 3: Analyze ICP-OES data
In your laboratory notebook, complete the following:
- What
Reagents list
- BacTiter-Glo Microbial Cell Viability Assay solution (Promega)
- Synthetic dropout - galactose (SD-G) media: 0.17% yeast nitrogen base without amino acid and ammonium sulfate (BD Bacto), 0.5% ammonium sulfate (Sigma), 0.192 % amino acid mix lacking uracil (Sigma), 2% raffinose (Sigma), 2% galactose (Sigma), 0.1% adenine hemisulfate (Sigma)
- Cadmium chloride (Sigma), stock concentration= 100mM
- TraceCERT cadmium standard for ICP (Sigma)
- TraceCERT iron standard for ICP (Sigma)
Next day: Complete data analysis and organize Research article figures