Difference between revisions of "Talk:20.109(F15):Agarose gel electrophoresis (Day3)"
From Course Wiki
MAXINE JONAS (Talk | contribs) (→T/R Section Recovery Gel) |
MAXINE JONAS (Talk | contribs) (→W/F Section Recovery Gel) |
||
| Line 70: | Line 70: | ||
|} | |} | ||
| + | <br> | ||
==W/F Section Recovery Gel== | ==W/F Section Recovery Gel== | ||
| − | [[Image:20.109(Fa15) WF Recovery Gel.png|thumb|left|400px|W/F Recovery Gel]] | + | [[Image:File 20.109(Fa15) WF Recovery Gel.png|thumb|left|400px|W/F Recovery Gel]] |
| − | + | ||
{| border="1" | {| border="1" | ||
Revision as of 22:04, 23 September 2015
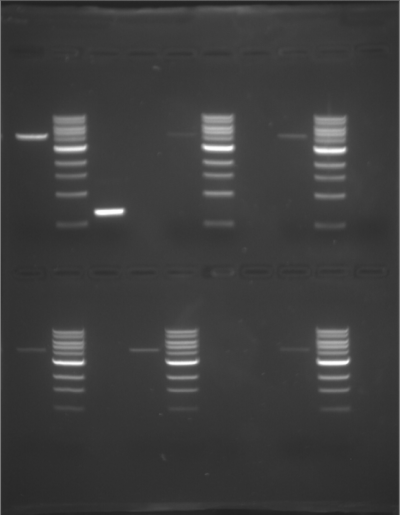
T/R Section Recovery Gel
| Lane | Sample |
| Top gel, Lane 1 | Instructor's backbone/vector |
| Top gel, Lane 2 | Ladder |
| Top gel, Lane 3 | Instructor's fragment/insert |
| Top gel, Lane 4 | Empty |
| Top gel, Lane 5 | Red Team backbone/vector |
| Top gel, Lane 6 | Ladder |
| Top gel, Lane 7 | Empty |
| Top gel, Lane 8 | Orange Team backbone/vector |
| Top gel, Lane 9 | Ladder |
| Top gel, Lane 10 | Orange Team fragment/insert |
| Bottom gel, Lane 1 | Green Team backbone/vector |
| Bottom gel, Lane 2 | Ladder |
| Bottom gel, Lane 3 | Empty |
| Bottom gel, Lane 4 | Blue Team backbone/vector |
| Bottom gel, Lane 5 | Ladder |
| Bottom gel, Lane 6 | Blue Team fragment/insert |
| Bottom gel, Lane 7 | Empty |
| Bottom gel, Lane 8 | Pink Team backbone/vector |
| Bottom gel, Lane 9 | Ladder |
| Bottom gel, Lane 10 | Empty |
W/F Section Recovery Gel
| Lane | Sample |
| Top gel, Lane 1 | Empty |
| Top gel, Lane 2 | Ladder |
| Top gel, Lane 3 | Red Team backbone/vector |
| Top gel, Lane 4 | Empty |
| Top gel, Lane 5 | Ladder |
| Top gel, Lane 6 | Yellow Team backbone/vector |
| Top gel, Lane 7 | Empty |
| Top gel, Lane 8 | Ladder |
| Top gel, Lane 9 | Green Team fragment/insert |
| Top gel, Lane 10 | Empty |
| Bottom gel, Lane 1 | Empty |
| Bottom gel, Lane 2 | Ladder |
| Bottom gel, Lane 3 | Blue Team fragment/insert |
| Bottom gel, Lane 4 | Empty |
| Bottom gel, Lane 5 | Ladder |
| Bottom gel, Lane 6 | Pink Team fragment/insert |
| Bottom gel, Lane 7 | Empty |
| Bottom gel, Lane 8 | Empty |
| Bottom gel, Lane 9 | Empty |
| Bottom gel, Lane 10 | Empty |

