Difference between revisions of "Lab orientation"
MAXINE JONAS (Talk | contribs) |
|||
| Line 9: | Line 9: | ||
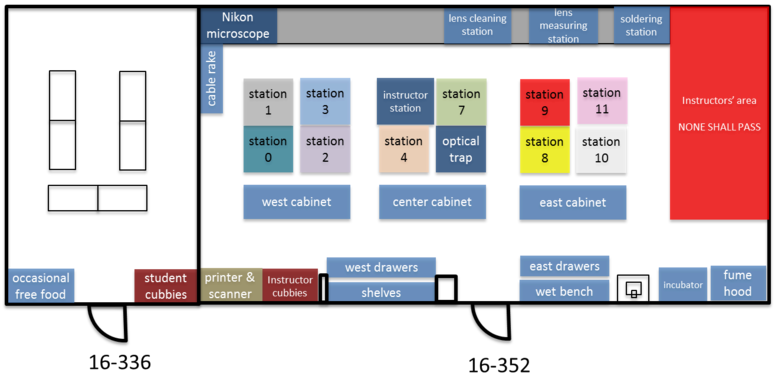
[[Image:20.390 Lab Map.png|775 px|Map of the 20.309 lab.]] | [[Image:20.390 Lab Map.png|775 px|Map of the 20.309 lab.]] | ||
| − | Note that Station | + | Note that Station 9 is now the "Instructor Station," and the previously labeled instructor station is now "Station 5" and available for your use. |
See! Wasn't that a worthwhile journey? | See! Wasn't that a worthwhile journey? | ||
</onlyinclude> | </onlyinclude> | ||
{{Template:20.309 bottom}} | {{Template:20.309 bottom}} | ||
Revision as of 21:02, 30 January 2019
The 20.309 lab contains more than 15,000 optical, mechanical, and electronic components that you will use for your lab work throughout the semester. To the untrained eye, they all look pretty much alike. (For the final exam, you will be required to identify various components while blindfolded.)
You can waste a lot of time looking for things, so it's important to learn your way around. The floor plan below shows the layout of rooms 16-352 and 16-336. When you get to the lab, take a walk around, especially to the center cabinet, west cabinet, and west drawers. Go everywhere and check things out for a few minutes. Read the time machine poster between the cable rake and the Nikon microscope. Discover the stunning Studley tool chest poster near the east parts cabinet.
Note that Station 9 is now the "Instructor Station," and the previously labeled instructor station is now "Station 5" and available for your use.
See! Wasn't that a worthwhile journey?

