Assignment 8, Part 3: add flow control and test your device
Overview
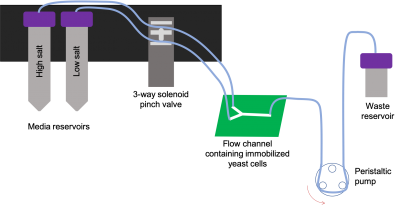
The next step is to set up the reservoirs, tubing, and valves to control the flow through our device. The fluid from two large reservoirs will be connected to the PDMS device with thin tubing. We also need at mechanism to drive fluid flow through our device. While some devices use carefully regulated air pressure or syringe pumps to drive flow, we will take advantage of gravity. By raising the fluid reservoirs higher than the outlet tubing of our device, we create a difference in potential energy that will push the fluid from the reservoir, through the tubing and device, then out into the waste. A pinch valve (that does exactly what you think) will allow us to choose which reservoir will provide flow to the device.
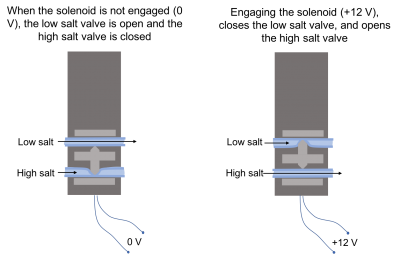
The solenoid pinch valve has two slots for tubing – one is normally open (NO), which will be used for the regular (low salt) medium, and one is normally closed (NC), which will be used for tubing connected to the high salt medium. Applying 12V to the solenoid will switch the flow from low to high salt. We will use a short length of flexible silicon tubing that can be easily pinched by the valves, and connect it to the device and reservoirs using a stiff less-expensive tubing made by Tygon.
- Overview
- Part 1: feedback systems
- Part 2: fabricate a microfluidic device
- Part 3: add flow control and test your device
Back to 20.309 Main Page

