|
|
| Line 51: |
Line 51: |
| | | | |
| | | | |
| − |
| |
| − | ===Part 2: Examine pgRNA sequencing results===
| |
| − | Your goal today is to analyze the sequencing data for you two potential mutant pgRNA clones - two independent colonies from your amplification reaction - and then decide which colony to proceed with for the CRISPRi manipulation of the ''E. coli'' MG1655 fermentation pathway.
| |
| − |
| |
| − | '''Retrieve sequence results from Genewiz'''
| |
| − |
| |
| − | #Your sequencing data is available from [http://genewiz.com Genewiz]. For easier access, the information was uploaded to the [http://engineerbiology.org/wiki/20.109(F19):Class_data Class Data Page].
| |
| − | #Download the zip folder with your team sequencing results and confirm that there are 8 files saved in the folder.
| |
| − | #For each sequencing reaction, you should have one .abi file and one .seq file.
| |
| − | #Open one of the .abi files.
| |
| − | #*This file contains the chromatogram for your sequencing reaction. Scroll through the sequence and ensure that the peaks are clearly defined and evenly spaced. Low signal (or peaks) or stacked peaks can provide incorrect base assignments in the sequence.
| |
| − | #Open one of the .seq files.
| |
| − | #*This file contains the base assignments for your sequencing reaction. The bases are assigned by the software from the chromatogram sequence.
| |
| − | #*The start of the a sequencing reaction result often contains several Ns, which indicates that the software was unable to assign a basepair. Given the chromatogram result, why might the software assign Ns in this region of the sequence?
| |
| − | #Include all of your observations in your Benchling notebook. You can also attach the files to your entry.
| |
| − |
| |
| − | '''Confirm gRNA sequence in pgRNA using SnapGene'''<br>
| |
| − |
| |
| − | You should align your sequencing data with a known sequence, in this case the gRNA target sequence you selected, to identify any unintended base changes that may have occurred. There are several web-based programs for aligning sequences and still more programs that can be purchased. The steps for using SnapGene are below. Please feel free to use any program with which you are familiar.
| |
| − |
| |
| − | #Generate a new DNA file that contains the gRNA oligo you designed on [[20.109(F19):Generate gRNA plasmid (Day3)| M2D3]]. This file should contain only the target sequence you selected and the dCas9 tag sequence (not the plasmid sequence).
| |
| − | #Generate an additional new DNA file that contains the results from the sequencing reaction completed by Genewiz.
| |
| − | #*For each sequencing result you should generate a distinct new DNA file. Remember you should have a forward and reverse sequencing result for each of your clones!
| |
| − | #*Paste the sequence text from your sequencing run into the new DNA file window. If there were ambiguous areas of your sequencing results, these will be listed as "N" rather than "A" "T" "G" or "C" and it's fine to include Ns in the query.
| |
| − | #*The start and end of your sequencing may have several Ns. In this case it is best to omit these Ns by pasting only the 'good' sequence that is flanked by the ambiguous sequence.
| |
| − | #To confirm the gRNA sequence in your clones, open one of the forward sequencing results files generated in the previous step.
| |
| − | #*Select 'Tools' --> 'Align to Reference DNA Sequence...' --> 'Align Full Sequences...' from the toolbar.
| |
| − | #*In the window, select the file that contains the gRNA oligo sequence and click 'Open'.
| |
| − | #A new window will open with the alignment of the two sequences. The top line of sequence shows the results of the sequencing reaction and the bottom line shows the oligo you designed.
| |
| − | #*Are there any discrepancies or differences between the two sequences? Scroll through the entire alignment to check the full sequencing result and note any basepair changes.
| |
| − | #Follow the above steps to examine all of your sequencing results. '''Remember: you used a forward and a reverse primer to interrogate both potential gRNA_target plasmids.'''
| |
| − | #You should save a screenshot of each alignment and attach them to your Benchling notebook.
| |
| − |
| |
| − | If both clones for your gRNA_target have the correct sequence, choose either co-transformant to use for the aTc induction step. If only one is correct, then this is the co-transformant you will use next time. If neither of your plasmids carry the appropriate insertion, talk to the teaching faculty.
| |
| − | <!--
| |
| − | '''Align with Benchling'''
| |
| − | #Make a Benchling DNA file that contains the gRNA oligo you used on [[20.109(F17):Generate gRNA plasmid (Day3)| M2D3]]. This sequence should contain the target sequence you selected and the dCas9 tag sequence.
| |
| − | #*Select the create button (plus sign) at the top of the Project window.
| |
| − | #*Select DNA.
| |
| − | #*Enter the gRNA oligo sequence.
| |
| − | #*Type 'gRNA oligo' into the Name text box.
| |
| − | #*Click "UPDATE INFORMATION" button.
| |
| − | #Download the Trace File for your forward and reverse sequences to your computer.
| |
| − | #*Create a folder for the files.
| |
| − | #Import these files into Benchling.
| |
| − | #*You need to be in the Inventory tab.
| |
| − | #*Select the create button (plus sign) at the top of the Project window.
| |
| − | #*Select Import DNA.
| |
| − | #*In the Convert Files tab, click the "OR CHOOSE A FILE" button.
| |
| − | #*Select the Trace Files from the folder into which you downloaded them above.
| |
| − | #*Before you continue, be sure the forward and reverse files are in the Inventory tab of your Project window.
| |
| − | #Find the consensus sequence for the forward and reverse sequences.
| |
| − | #*Select the expand button (right arrow) at the top of the Project window.
| |
| − | #*Check the boxes to the left of the forward and reverse sequence files.
| |
| − | #*Click the "More" button at the top right, then hover over Analyze, and select Create Alignment.
| |
| − | #*In the Alignment confirm that the forward and reverse sequence files are listed under the Sequences header.
| |
| − | #*Be sure MAFFT algorithm is selected under the Algorithm header.
| |
| − | #*Click "CREATE ALIGNMENT" button.
| |
| − | #*Click the Collapse button at the top right to view your alignment.
| |
| − | #Check the consensus sequence for mutations.
| |
| − | #*Red bars indicate the presence of a discrepancy between the forward and reverse sequences. If your alignment contains a discrepancy, check the traces at that location and attempt to resolve the issue by examining the quality of each sequence.
| |
| − | #*If you are unsure, please consult the teaching faculty.
| |
| − | #Save the consensus file.
| |
| − | #*Select the Sequence info button (i) at the right of the window that contains the consensus sequence.
| |
| − | #*Type 'pgRNA_target consensus' into the Name text box.
| |
| − | #*Click "UPDATE INFORMATION" button.
| |
| − | #Align gRNA oligo with consensus sequence.
| |
| − | #*Select the expand button (right arrow) at the top of the Project window.
| |
| − | #*Check the box to the left of the consensus file.
| |
| − | #*Check the box to the left of the gRNA oligo DNA file created in Step #1.
| |
| − | #*Click the "More" button at the top right, then hover over Analyze, and select Create Alignment.
| |
| − | #*In the Alignment confirm that the consensus and gRNA sequence files are listed under the Sequences header.
| |
| − | #*Be sure Clustal Omega algorithm is selected under the Algorithm header.
| |
| − | #*Click "CREATE ALIGNMENT" button.
| |
| − | #*Click the Collapse button at the top right to view your alignment.
| |
| − | #Confirm that the gRNA oligo sequence is present in your consensus sequence.
| |
| − | #Save the gRNA confirmation file.
| |
| − | #*Select the Sequence info button (i) at the right of the window that contains the consensus sequence.
| |
| − | #*Type 'pgRNA_target confirmation' into the Name text box.
| |
| − | #*Click "UPDATE INFORMATION" button.
| |
| − |
| |
| − | If both clones for your pgRNA have the correct sequence, choose one to use for the co-transformation step. If only one is correct, then this is the one you will use next time. If neither of your plasmids carry the appropriate gRNA target sequence, talk to the teaching faculty.
| |
| − | -->
| |
| | | | |
| | ==Reagents list== | | ==Reagents list== |
20.109(S22): Laboratory Fundamentals of Biological Engineering
Introduction
The sgRNA_target sequence that was inserted into the expression plasmid was confirmed using DNA sequencing. The invention of automated sequencing machines has made sequence determination a relatively fast and inexpensive process. The method for sequencing DNA is not new but automation of the process is recent, developed in conjunction with the massive genome sequencing efforts of the 1990s and 2000s. At the heart of sequencing reactions is chemistry worked out by Fred Sanger in the 1970s which uses dideoxynucleotides, or chain-terminating bases. These chain-terminating bases can be added to a growing chain of DNA but cannot be further extended. Performing four reactions, each with a different chain-terminating base, generates fragments of different lengths ending at G, A, T, or C. The fragments, once separated by size, reflect the DNA sequence due to the presence of fluorescent dyes, one color linked to each dideoxy-base. The four colored fragments can be passed through capillaries to a computer that can read the output and trace the color intensities detected.
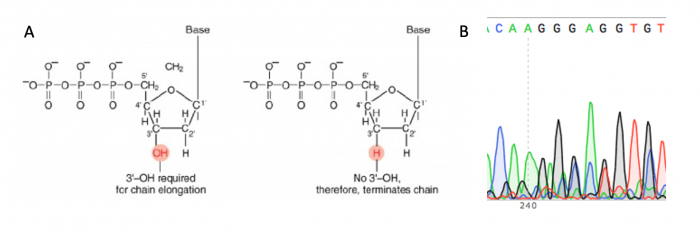
Principles of Sanger sequencing. A. Chain-terminating bases are used to halt the DNA synthesis reaction at different lengths and attach a fluorophore that is used to determine the sequence of the DNA strand. B. The sequence of the DNA strand is determined using the fluorescent signature associated with each length of DNA in the reaction, this is visualized as a chromatogram.
Protocols
Part 1: Participate in Communication Lab workshop
Our communication instructor, Dr. Prerna Bhargava, will join us today for a discussion on preparing a journal club presentation.
Part 4: Align sgRNA_target sequences to host genome
To ensure that you understand the principles of using sgRNA to target a gene of interest, complete the sgRNA Design Worksheet with your laboratory partner (linked here). It may be helpful to review the work you completed in Part 2 of the previous laboratory session.
In your laboratory notebook, attach the completed sgRNA Design Worksheet.
Next, you will use your knowledge of primer design to align the sgRNA_target sequences that were designed by former 109ers to the targeted genes in the MG1655 genome. Recall that your goal in this module is to optimize the CRISPRi system by building on the data collected by students in previous semesters. The first step in achieving this goal is mining the data that exist! The sgRNA_target sequences that you will assess are included in the table below:
With your laboratory partner, align the sgRNA_target sequences with the targeted genes. Feel free to divide the workload, one partner can align the sequences that target ldhA and the other can align the sequences that target pta-ack.
- Use the KEGG Database to obtain the DNA sequences of the targeted genes (ldhA and pta-ack) in the E. coli K-12 MG1655 strain.
- Enter the name of targeted gene in the Search genes box and click Go.
- Double click on the linked gene name.
- In your laboratory notebook, use the information provided in the KEGG database to answer the following questions:
- What is the full name of the gene (or Definition)?
- In what pathways is the gene involved?
- The amino acid (AA) sequence and nucleotide sequence (NT) for the gene are provided at the bottom of the page.
- Generate a new DNA file in SnapGene that contains the NT sequence of the gene.
- Because sgRNA_target molecules were generated that target the promoter, enter 50 in the +upstream box to get the 50 basepair sequence immediately preceding the start codon.
- Identify the sgRNA_target sequences from the table below in the MG1655 targeted gene.
- For each sgRNA_target sequence, create a feature in the SnapGene file.
- In your laboratory notebook, complete the following:
- Attach the SnapGene file with the sgRNA_target sequences aligned.
- Draw a simplified schematic that shows sgRNA_target sequence alignments. For an example, refer back to Fig. 2C and 2D from the Lei et. al. article.
- Determine which sgRNA_target sequences bind downstream of a PAM sequence and indicate this information on the schematic.
- Speculate on which sgRNA_target sequences might be better at increasing ethanol yield. Include reasons for why!
Reagents list
Navigation links
Next day: Prepare for induction of CRISPRi system
Previous day:
Clone psgRNA expression plasmid

