20.109(S17):In silico cloning and induction of protein expression (Day1)
Contents
Introduction
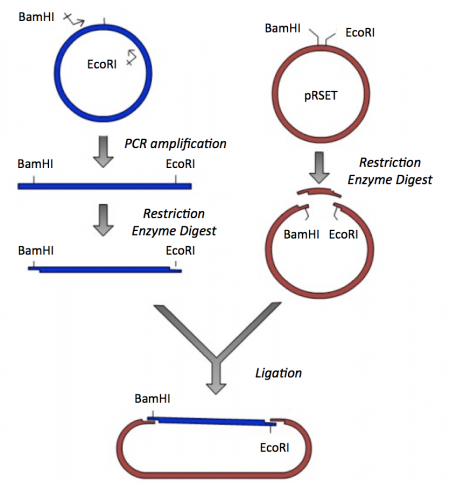
Though the theme of Module 1 is small molecule screening to understand protein interactions, today will focus on a few key techniques used in DNA engineering. Because the sequence of proteins is determined by the sequence of the genes that encode them, learning how to manipulate DNA is an important first step. Today you will complete a cloning reaction to generate a protein expression vector that contains the gene that encodes FKBP12, a protein that XXY. This process is illustrated in the schematic below.

The cloning vector we will use is pRSETb. This vector has several features that make it ideal for cloning and protein expression -- both of which are important for this module. We will discuss the FKBP12 protein in much more detail later, for now it is sufficient to know that XXY. To generate your final product you will use three common DNA engineering techniques: PCR amplification, restriction enzyme digestion, and ligation.
PCR amplification
The applications of PCR (polymerase chain reaction) are widespread, from forensics to molecular biology to evolution, but the goal of any PCR is the same: to generate many copies of DNA from a single or a few specific sequence(s) (called the “target” or “template”).
In addition to the target, PCR requires only three components: primers to bind sequence flanking the target, dNTPs to polymerize, and a heat-stable polymerase to carry out the synthesis reaction over and over and over. DNA polymerases require short initating pieces of DNA (or RNA) called primers in order to copy DNA. In PCR amplification, forward and reverse primers that target the non-coding and coding strands of DNA, respectively, are separated by a distance equal to the length of the DNA to be copied. Length is one important design feature. Primers that are too short may lack requisite specificity for the desired sequence, and thus amplify an unrelated sequence. The longer a primer is, the more favorable are its energetics for annealing to the template DNA, due to increased hydrogen bonding. On the other hand, longer primers are more likely to form secondary structures such as hairpins, leading to inefficient template priming. Two other important features are G/C content and placement. Having a G or C base at the end of each primer increases priming efficiency, due to the greater energy of a GC pair compared to an AT pair. The latter decrease the stability of the primer-template complex. Overall G/C content should ideally be 50 +/- 10%, because long stretches of G/C or A/T bases are both difficult to copy. The G/C content also affects the melting temperature. PCR is a three-step process (denature, anneal, extend) and these steps are repeated 20 or more times. After 30 cycles of PCR, there could be as many as a billion copies of the original target sequence.
Based on the numerous applications of PCR, it may seem that the technique has been around forever. In fact it is just over 30 years old. In 1984, Kary Mullis described this technique for amplifying DNA of known or unknown sequence, realizing immediately the significance of his insight.
"Dear Thor!," I exclaimed. I had solved the most annoying problems in DNA chemistry in a single lightening bolt. Abundance and distinction. With two oligonucleotides, DNA polymerase, and the four nucleosidetriphosphates I could make as much of a DNA sequence as I wanted and I could make it on a fragment of a specific size that I could distinguish easily. Somehow, I thought, it had to be an illusion. Otherwise it would change DNA chemistry forever. Otherwise it would make me famous. It was too easy. Someone else would have done it and I would surely have heard of it. We would be doing it all the time. What was I failing to see? "Jennifer, wake up. I've thought of something incredible." --Kary Mullis from his Nobel lecture; December 8, 1983
Restriction enzyme digest
Restriction endonucleases, also called restriction enzymes, 'cut' or 'digest' DNA at specific sequences of bases. The restriction enzymes are named according to the prokaryotic organism from which they were isolated. For example, the restriction endonuclease EcoRI (pronounced “echo-are-one”) was originally isolated from E. coli giving it the “Eco” part of the name. “RI” indicates the particular version on the E. coli strain (RY13) and the fact that it was the first restriction enzyme isolated from this strain.
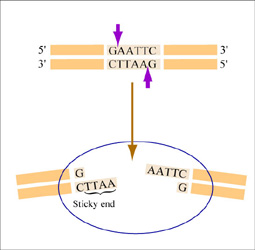
The sequence of DNA that is bound and cleaved by an endonuclease is called the recognition sequence or restriction site. These sequences are usually four or six base pairs long and palindromic, that is, they read the same 5’ to 3’ on the top and bottom strand of DNA. For example, the recognition sequence for EcoRI is below (see also figure at right). EcoRI cleaves the phosphate backbone of DNA between the G and A of the recognition sequence, which generates overhangs or 'sticky ends' of double-stranded DNA.
5’ GAATTC 3’
3’ CTTAAG 5’
Unlike EcoRI, some other restriction enzymes cut precisely in the middle of the palindromic DNA sequence, thus leaving no overhangs after digestion. The single-stranded overhangs resulting from DNA digestion by enzymes such as EcoRI are called sticky ends, while double-stranded ends resulting from digestion by enzymes such as HaeIII are called blunt ends. HaeIII recognizes
5’ GGCC 3’
3’ CCGG 5’
Ligation
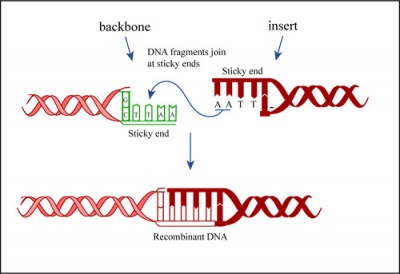
In a ligation reaction, DNA ends are covalently attached to one another via the ligase enzyme. The efficiency of the reaction is related to type of DNA ends: compatible sticky ends will ligate more efficiently than blunt ends, and non-compatible sticky ends will not be ligated due to the lack of hydrogen bonding between the basepairs. To initiate the ligation reaction, hydrogen bonds are formed between the compatible overhangs of DNA fragments. The ligase enzyme then forms a covalent phosphodiester bond between the 3' hydroxyl end of the 'acceptor' nucleotide and the 5' phosphodiester end of the 'donor' nucleotide.
The first step in this process is the addition of AMP (adenylation) to a lysine residue within the active site of DNA ligase, which releases a pyrophosphate. Next, the AMP is transferred to the 5' phosphate of the donor nucleotide resulting in the formation of a pyrophosphate bond. Lastly, a phosphodiester bond is formed between the 5' phosphate of the donor nucleotide and the 3' hydroxyl of the 3' acceptor nucleotide.
Protocols
Part 1: Laboratory orientation quiz
Complete the orientation quiz with your partner. Though you are working with your partner, each student should record all answers on the provided quiz. If you disagree with your partner on an answer, you should write what you think is the correct answer on your quiz.
Good luck!
Part 2: Subculture BL21(DE3) pRSETb_FKBP12 cells
Yesterday afternoon, the teaching faculty inoculated 5 mL of LB media with BL21(DE3) pRSETb_FKBP12 and incubated the culture overnight in the 37 °C inucbator. You will use this culture to prepare your sample for the protein purification protocol.
- Acquire a 125 mL flask from the front laboratory bench and add 50 mL of LB to the flask.
- Measure the OD600 of the overnight culture.
- Note: You will need to dilute the overnight culture 1:10 to obtain a reading within the range of the spectrophotometer.
- Subculture the overnight culture in the 50 mL LB such that the OD600 = 0.2.
- Move the flask to the 25 °C water bath shaker.
- Check the OD600 of your culture every hour and when the OD600 = 0.8, complete Part 4.
Part 3: Clone pRSETb_FKBP12 in silico
For timing reasons, you will be provided with the pRSETb_FKBP12 product that was cloned by the teaching faculty. In this exercise you will virtually work through the cloning steps that were used to ligate the FKBP12 gene into the pRSETb expression vector.
Part 4: Induce FKBP12 protein expression
- Add IPTG to a final concentration of 1 mM and return the flask to the 25 °C water bath shaker.
Your culture will incubate for ~16 hr in the water bath then the teaching faculty will collect the cells by centrifugation at XX g for XX min. The harvested cells will be stored in the -80 °C freezer.
Reagents
Next day: Purification of induced protein
Previous day: Orientation


