20.109(F19):Practice cell culture and begin sub-nuclear foci assay (Day1)

Contents
Introduction
In the past century, we have learned a tremendous amount by studying the behavior of mammalian cells maintained in the laboratory. Tissue culture was originally developed about 100 years ago as a method for learning about mammalian biology. The term tissue culture was coined because people were doing exactly that, extracting tissue and letting it live in a dish for a short time. Today, most tissue culture experiments are done using isolated cells rather than whole tissues. Much of what we know about cancer, heritable diseases, and the effects of the environment on human health has been derived from studies of cultured cells.
Cells that are isolated from tissue are called primary cells, because they come directly from an animal. It is very difficult to culture primary cells, largely because primary cells that are placed in culture divide only a limited number of times. This limitation on the lifespan of cultured primary cells, called the Hayflick limit, is a problem because it requires a researcher to constantly remove tissues from animals in order to complete a study. Cell isolation processes can be quite labor-intensive, and also can complicate data analysis due to inherent animal-to-animal variation. To get around the first of these problems, researchers use cells that are immortal, which means they can divide indefinitely, though some inherent cell-to-cell variation still exists in such cells.
One familiar type of immortalized cell is the cancer cell. Tumor cells continuously divide, allowing cancer to invade tissues and proliferate. Cancer cells behave the same way in culture, and under the right conditions, cells can be taken from a tumor and divide indefinitely in culture. Another type of immortalized cell is the embryonic stem cell. Embryonic stem cells are derived from an early stage embryo, and these cells are completely undifferentiated and pluripotent, which means that under the right conditions, they can become any mammalian cell type.
The art of tissue culture lies in the ability to create conditions that are similar to what a cell would experience in an animal, namely 37 °C and neutral pH. Blood nourishes the cells in an animal, and blood components are used to feed cells in culture. Serum, the cell-free (and clotting-factor free) component of blood, contains many of the factors necessary to support the growth of cells outside the animal. Consequently, serum is frequently added to tissue culture medium, although serum-free media exist and support some types of cultured cells. Furthermore, cultured mammalian cells must grow in a germ-free environment and researchers using tissue culture must be skilled in sterile technique.
Protocols
Part 1: Complete laboratory orientation quiz
Complete the orientation quiz with your partner. Though you are working with your partner, each student should record all answers on the provided quiz. If you disagree with your partner on an answer, you should write what you think is the correct answer on your quiz.
Good luck!
Part 2: Culture mammalian cells
One major objective for this experimental module is for you to learn how to perform tissue culture using correct sterile techniques. Pay close attention to the demonstration provided by the teaching faculty!
Review the following resource before you complete the tasks detailed in this exercise:
Guidelines on using the 20.109 tissue culture facility
Preparing tissue culture hood
- The tissue culture hood is partly set up for you. Finish preparing your hood according to the demonstration, first bringing in any remaining supplies you will need, then obtaining the pre-warmed reagents from the water bath, and finally retrieving your cells from the 37 °C incubator.
- Don't forget to spray everything (except cells) with 70% ethanol!
- One of the greatest sources for tissue culture contamination is moving materials in and out of the hood because this disturbs the air flow that maintains a sterile environment inside the hood. Think about what you will need during your experiment to avoid moving your arms in and out of the hood while you are handling your cells.
Collecting cells
- Obtain two ~48 h cultures of cells in T25 flask from the 37 °C incubator.
- Each team should get one '+DNAPKcs' and one '-DNAPKcs' flask.
- Examine your cell cultures after you remove the flask from the incubator.
- Look first at the color and clarity of the media. Fresh media is reddish-orange in color and if the media in your flask is yellow or cloudy, it could mean that the cells are overgrown, contaminated, or starved for CO2.
- Next, look at the cells using the inverted microscope. Note their shape, arrangement, and how densely the cells cover the surface of the flask.
- After you look at your cells, take the flask to your tissue culture hood to begin the seeding procedure.
- Aspirate the media from the cells using a sterile Pasteur pipet.
- Wash the cells by adding 2 mL PBS using a 5 mL pipet. Slightly tip the flask back and forth to rinse the cells then aspirate the PBS with a fresh Pasteur pipet.
- To dislodge the cells from the flask, you will add trypsin, a proteolytic enzyme.
- With a 2 mL pipet, add 0.5 mL of trypsin to the flask.
- 2 mL pipets are tricky! They fill up quickly. Be careful not to pull up the liquid too quickly or it will go all the way up your pipet into the pipet-aid! If this happens, please alert the teaching faculty rather than returning the pipet-aid to the rack.
- Tip the flask in each direction to distribute the trypsin evenly then incubate the cells at 37°C for 2 minutes using a timer.
- This is a great time to clear out your trash and read ahead!
- Retrieve your flask from the incubator and firmly tap the bottom to dislodge the cells.
- Check your cells using the microscope to ensure they are dislodged. They should appear round and move freely.
- If your cells are not detached from the flask, incubate at 37 °C for an additional minute.
- When your cells are dislodged, move your flask back into the tissue culture hood and add 3 mL of media to the cells then pipet the liquid up and down (“triturate”) to break up cells that are clumped together and suspend them in the liquid.
- Note: do not take up or release all the liquid, in order to avoid bubbles.
- Transfer the suspended cells into a labeled 15 mL conical tube.
- Transfer 90 μL of your cell suspension from the 15 mL conical tube into a labeled eppendorf tube.
Counting cells
During your work in tissue culture, you will use a hemocytometer to count mammalian cells. More importantly, you will use the cell count information to determine the density of your cultures. A hemocytometer is a modified glass microscope slide that has a chamber engraved with a grid. Stained mammalian cells are loaded into the chamber, which is manufactured such that the area within the gridlines is known and the volume of the chamber is known. These features enable researchers to count the number of cells within a specific volume of liquid. Furthermore, because the spacing of the gridlines is also defined it is possible to estimate the size of the cells within the chamber of the hemocytometer.
Using a hemocytometer, you can determine the density (cells per mL) of cell culture.

- Carry the tube with your 90 μL cell suspension aliquot to the center microscope bench and add 10 μL of trypan blue cell stain. Mix by pipetting up and down.
- Carefully pipet 10 μL of the stained cells between the hemocytometer and (weighted) glass cover slip.
- Count the cells that fall within the four corner squares (with a 4x4 etched grid pattern), average (i.e. divide by 4), and then multiply by 10,000 to determine the number of cells/mL.
- What was the density of the original culture you used? What volume of cells contains XX cells?
Part 3: Seed cells for sub-nuclear foci assay
- Obtain two 12-well plates from the teaching faculty.
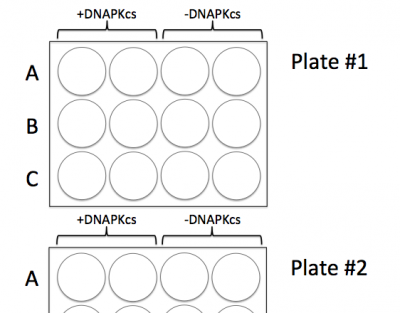

- Clearly label the plates with cell line names according the image to the right. Include the date and your team information.
- Carefully place a coverslip into each well that will be seeded with cells for your experiment.
- Note: in Plate #2 you are only using wells A1 - A4.
- Add 2 mL of fresh media to each well that will be seeded with cells.

- Calculate the volume of cells that contains 25,000 cells for each cell suspension (25,000 cells/well).
- Mix the cells and add the appropriate volume of cells into the appropriate wells.
- Be sure to add the cells to the correct wells according to the image above!
- To ensure that the cells are evenly dispersed in the well, slide the plate up / down and left / right 3-5 times.
- Carefully move your plates to the 37°C incubator
- Clean out the tissue culture hood.
Reagents list
Cell culture:
- Human glial fibroblasts from malignant glioblastoma: M059J (+DNAPKcs) and M059K (-DNAPKcs)
- 1:1 Dulbecco's Modified Eagle's Medium (DMEM) : Ham's F12 medium (Gibco)
- with 10% fetal bovine serum (Atlanta Biologicals)
- 0.05 mM Non-essential amino acids
- 100X antibiotic solution (Gibco)
- 10,000 U/mL Penicillin
- 10,000 U/mL Streptomycin
- Trypsin (Gibco)
- Trypan Blue
- Incubator maintains 37°C, 5% CO2 and 95% relative humidity
Next day: Treat cells for gamma-H2AX assay