20.109(F16):Test comet chip loading variables (Day2)

Contents
Introduction
experimental design...
Protocols
Part 1: Design experiment to optimize comet chip loading
You will design two experiments that test variables or conditions associated with loading cells into the microwells of your comet chip. In the first experiment you will consider the role of cell number. Specifically, how many cells should be added to each well to ensure the majority of the microwells are loaded? In addition, how many cells should be loaded into each microwell? The second experiment will interrogate the length of time needed for loading.
In the comet chip that you prepared during the previous laboratory class there is space for you to complete two experiments, each with two conditions. Your experiments will address the questions above and the conditions will provide data that will, hopefully, answer your research questions.

Experiment 1: Cell number

- How many cells should be loaded into each microwell?
- Consider the amount of DNA that is carried by a single mammalian cell and the detection limit provided by the SYBR gold DNA stain that will be used in your experiments. Also, use the data you collected during the Orientation exercise to determine how many cells can fit into a single microwell based on the dimensions provided above.
- Be sure to include any calculations or thoughts in your laboratory notebook!
- When you know how many cells you want to load into each microwell, move on to the next question.
- How many cells should be added to each well such that the desired number of cells are loaded into the microwells?
- Consider the likelihood that every cell you add to the well will fall into a microwell. Perhaps calculate the surface area of the bottom of a well (diameter is XX) and compare this to the size of the cells as you consider this question.
- Now that you have an idea as to the number of cells that are ideal for loading, consider the conditions you will use in your experiment.
- If you and your partner are in agreement on how many cells are ideal, you can load the ideal number of cells for Condition A and then either too few or too many for Condition B. Or you can load slightly more than the ideal number of cells for Condition A and slightly less for Condition B.
- If you and your partner are not in agreement, you can each load the number of cells you determine to be ideal as Condition A and Condition B.
- Again, all information concerning your experimental design choices should be recorded in your laboratory notebook!
Experiment 2: Loading time
After adding the cells to the wells, gravity causes the cells to fall or settle into the bottom of the well. The second experiment will examine the amount of time required for the cells to fall into the microwells.
- How long might it take for cells to fall to the bottom of the well?
- Consider the benefits and drawbacks of the loading time. Too little time and the cells will remain in the media; however, if you wait too long the agarose-based comet chip may dry out in the incubator.
- Record the conditions you will use for this experiment in your laboratory notebook!
As you decide on the conditions you will test for the two experiments, check-in with the teaching faculty to ensure that your experimental design choices are feasible given the laboratory constraints on supplies and time.
Part 2: Load comet chip
You will load your comet chip in a biosafety cabinet; however, it is important that you consider the following details before entering the tissue culture room.
- The volume of cells you will load into each well is 100 μL.
- Calculate the concentration of cells per μL that you will need to load for Experiment 1. Note that this value will be different for Condition 1 and Condition 2.
- You will also load cells into the wells for Experiment 2. For Experiment 2, you will load the same number of cells in all of the wells (remember from the introduction that each experiment should only contain a single variable). Select either Condition A or Condition B from Experiment 1 for loading here. If you and your partner are unable to agree on which Condition to use, consult the teaching faculty.
- The loading time will dictate when you add the cells to the wells of your comet chip.
- You will first add 100 μL of cells to the wells with the longest loading time, then add 1x PBS to the wells you will use to test shorter loading times.
- Incubate your comet chip at 37 °C until the time difference between Condition A and Condition B has elapsed. For example, if Condition A is a 30 min incubation and Condition B is a 5 min incubation, load 100 μL of cells into the wells labeled for Condition A and 100 μL of 1x PBS into the wells labeled for Condition B. Move the comet chip to the 37 °C incubator and wait 25 min (30 min - 5 min = 25 min). Retrieve your comet chip from the incubator, aspirate the 1x PBS and add 100 μL of cells to the wells labeled for Condition B. Return the comet chip to the incubator for 5 min.
- In Experiment 2 you will add the same number of cells to all wells. As above, select the number of cells used for either Condition A or Condition B of Experiment 1 and/or consult the teaching faculty for advice.
Now that you have a plan, alert the teaching faculty. Because there are not enough biosafety cabinets for all the groups you may be asked to wait until another team has finished. Please be patient.
- Retrieve your comet chip from the front laboratory bench.
- You will also need to gather one glass plate, one 96-well bottomless plate, and four 1.5" binder clips.
- Remove your comet chip from the 1x PBS and place it, gelbond side down, on the glass plate.
 Comet chip diagram showing well alignment.
- Press the 96-well bottomless plate onto the comet chip so that the wells line up with your labeling as shown in the diagram on the right.
- Be sure to press the top of the 96-well bottomless plate onto the comet chip. If you are unsure which side is the top, please ask the teaching faculty.
- Use the binder clips to secure the 96-well bottomless plate to the glass plate, thus creating a 'sandwich' with your comet chip in the center.
- Fasten the binder clips to the very edge of 96-well bottomless plate as shown in the image below.
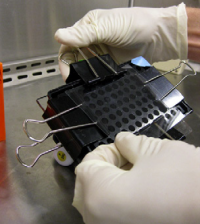 Image depicting binder clip placement.
- Fasten the binder clips to the very edge of 96-well bottomless plate as shown in the image below.


Reagents
Next day: [[
Previous day: Prepare comet chips