20.109(F16):Prepare comet chips (Day1)

Contents
Introduction
Most of laboratory exercises you complete for this module are based on the comet chip assay developed in the Engelward Laboratory. The comet chip assay is used to assess various types of DNA lesions, including base excisions, abasic sites, strand breaks, and crosslinks.
To measure DNA damage, the comet chip assay relies on gel electrophoresis. Electrophoresis is a technique used to separate molecules by size using an applied electrical field and a sieving matrix. DNA, RNA and proteins are often studied with this technique; agarose and acrylamide gels are the two most common sieves. The molecules to be separated enter the matrix through a well at one end and are pulled through the matrix when a current is applied. Because DNA and RNA are negatively charged molecules due to their phosphate backbone, and they naturally travel toward the positive charge at the far end of the gel. Larger molecules are entwined in the matrix and are stalled; the smaller molecules wind through the matrix more easily and travel further from the well. Over time fragments of similar length accumulate into “bands” in the gel. The comet chip assay is based upon the principle that damaged DNA travels more readily compared to undamaged DNA.

In your experiments, the comet tails will be visualized using flourescence microscopy and analyzed with code written by members of the Engelward Laboratory. Today you will complete the first steps of the comet chip assay by generating an agarose comet chip and preparing the cells that you will load into the microwells of your comet chip during the next laboratory meeting.
Protocols
Part 1: Laboratory orientation quiz
Complete the orientation quiz with your partner. Though you are working with your partner, each student should record all answers on the provided quiz. If you disagree with your partner on an answer, you should write what you think is the correct answer on your quiz.
Good luck!
Part 2: Prepare comet chips
blah...
- Obtain a sheet of gelbond film from the laboratory bench at the front of the room. The paper is on the hydrophilic side of the gelbond film.
- Be sure to keep the paper associated with the gelbond film so you know which side is which.
- Use the ruler in your team drawer to draw a X x X rectangle on the gelbond film.
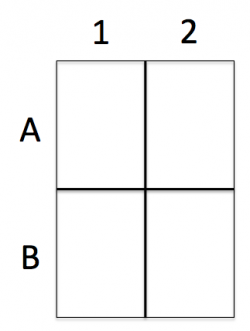 Gelbond labels for comet chip
- Divide the rectangle into four quadrants and label as depicted in the image on the right.
- Note: you are writing on what will be the bottom of the comet chip and may want to write backwards so the labels are clear when you look at the top of your comet chip.
- Prepare 20 mL of 1% normal melting point (NMP) agarose. Be careful as the agarose solution will be very hot!
- Calculate the amount of NMP agarose powder needed for a 1% w/v solution. Check your math with the teaching faculty before you continue.
- Obtain a small milk bottle from the front bench.
- Weigh out the appropriate amount of NMP and add it to the milk bottle.
- Use a cylinder to measure 20 mL of 1x PBS and add it to the milk bottle with the NMP agarose powder.
- Swirl to mix.
- To melt the NMP agarose, microwave the solution for 20 sec intervals. After each interval, remove the milk bottle and gently swirl while checking for unmelted agarose crystals. It is important that the solution does NOT boil as evaporation will cause the density of the agarose to change. If your solution starts to boil, remove it from the microwave and gently swirl.
- When no crystals are visible in the solution take the milk bottle to your bench.
- Obtain a small dish and the comet chip 'stamp' from the front bench.
- Add 2 mL of the agarose solution to the small dish, then quickly place the gelbond film in the dish with the hydrophilic side down.
- Add ~13 mL of the agarose solution on top of the gelbond film.
- Slowly place the comet chip stamp on top of the agarose.
- Lower the bottom of the stamp first, then slowly allow the stamp to 'roll' into the agarose. Be sure to leave one corner of the small dish accessible.
- Be careful not to introduce bubbles into the agarose and work quickly as the agarose will solidify as it cools.
- Allow the agarose to solidy, undisturbed, on your bench for 30 min.
- Add ~5 mL of 1x PBS to the small dish that contains your agarose comet chip.
- Pipet in the 1x PBS using the accessible corner.
- Slowly pull from one corner of the stamp to lift it away from your comet chip in the dish.
- If the comet chip sticks to the stamp, carefully peel it off using tweezers.
- Remove excess agarose from the perimeter of your comet chip using a razor blade.
- Clean the agarose from the bottom of your comet chip (gelbond side) using a kimwipe.
- Place your comet chip in the small dish containing 1x PBS for storage at 4 °C until next time.
- Be sure the comet chip is completely submerged.

Part 3: Split mammalian cells
Reagents
Next day: Test comet chip loading variables
Previous day: Orientation