20.109(F16):Induce CRISPRi system (Day7)
Contents
Introduction
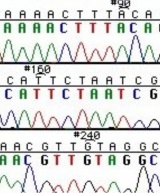
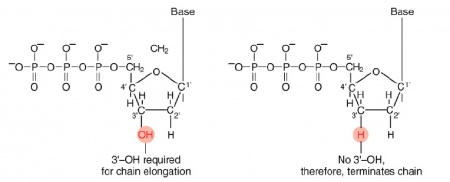
During this time, you will evaluate the DNA from your two X#Z candidates. The invention of automated sequencing machines has made sequence determination a relatively fast and inexpensive endeavor. The method for sequencing DNA is not new but automation of the process is recent, developed in conjunction with the massive genome sequencing efforts of the 1990s. At the heart of sequencing reactions is chemistry worked out by Fred Sanger in the 1970s which uses dideoxynucleotides (see schematic above left). These chain-terminating bases can be added to a growing chain of DNA but cannot be further extended. Performing four reactions, each with a different chain-terminating base, generates fragments of different lengths ending at G, A, T, or C. The fragments, once separated by size, reflect the DNA’s sequence. In the “old days” (all of 15-20 years ago!) radioactive material was incorporated into the elongating DNA fragments so they could be visualized on X-ray film (image above center). More recently fluorescent dyes, one color linked to each dideoxy-base, have been used instead. The four colored fragments can be passed through capillaries to a computer that can read the output and trace the color intensities detected (image above right). Your sample was sequenced in this way by Genewiz on an ABI 3730x1 DNA Analyzer.
Analysis of sequence data is no small task. “Sequence gazing” can swallow hours of time with little or no results. There are also many web-based programs to decipher patterns. The nucleotide or its translated protein can be examined in this way. Thanks to the genome sequence information that is now available, a new verb, “to BLAST,” has been coined to describe the comparison of your own sequence to sequences from other organisms. BLAST is an acronym for Basic Local Alignment Search Tool, and can be accessed through the National Center for Biotechnology Information (NCBI) home page.
Today you will carefully examine the results of your sequencing reactions and determine which of your two samples contains the wanted mutation (and no unwanted random mutations).
Protocols
Part 1: Communication Lab workshop
Manuscript architecture...
Part 2: Examine psgRNA sequencing results
Your goal today is to analyze the sequencing data for you two potential mutant IPC samples - two independent colonies from your X#Z mutant - and then decide which colony to proceed with for the X#Z mutant.
- Use the pRSET-IPC ApE file to mark and/or note down the expected location of your mutation before proceeding.
- You can simply compare to your annotation of the IPC alone ApE file that you prepared on Day 1 of the module.
- You may also find it helpful to generate another ApE file with only the CaM portion of IPC and use this when you assess the Genewiz sequencing results.
- Your sequencing data from Genewiz is available at this link.
- Choose the "Login" link and then use "nllyell@mit.edu" and "be20109" to access your results.
- At the bottom right should be a link to download your sequencing results.
- TR section: click on the Tracking Number 10-324382914 (Order Date 02-18-2016) and Tracking Number 10-324581564 (Order Date 02/21/2016)
- WF section: click on the Tracking Number 10-324426168 (Order Date 02-19-2016) and Tracking Number 10-324584038 (Order Date 02/21/2016)
- The quickest way to start working with your data is to follow the "View" link under the Seq File heading. For ambiguous data, you may want to look directly at the Trace File as well.
You can align your sequencing data with a known sequence, in this case the CaM portion of inverse pericam, and the differences will be quickly identified. There are several web-based programs for aligning sequences and still more programs that can be purchased. The steps for using APE and the NCBI-hosted tool are below. Please feel free to use either program...or any program with which you are familiar.
Align with Benchling
If both colonies for your mutant have the correct sequence, choose one to use for the protein purification step. If only one is correct, then this is the one you will use next time. If neither of your plasmids carry the appropriate mutation, talk to the teaching faculty.
Align with "bl2seq" from NCBI
- The "nucleotide BLAST" alignment program can be accessed through the NCBI BLAST page or directly from this link. The default settings should be fine.
- Paste the sequence text from your sequencing run into the "Query" box. This will now be the "query." If there were ambiguous areas of your sequencing results, these will be listed as "N" rather than "A" "T" "G" or "C" and it's fine to include Ns in the query.
- The start and end of your sequencing may have several Ns. In this case it is best to omit these Ns by pasting only the 'good' sequence that is flanked by the ambiguous sequence.
- Paste the pRSET-IPC or CaM sequence into the "Subject" box.
- Click on the BLAST button. Matches will be shown by vertical lines between the aligned sequences. You should see a long stream of matches, followed by lots of errors in the last ~200 bp of the sequence – ignore the error-ridden part of the data, as it may not accurately reflect your mutant plasmid. In this stream of matches, the 1 missing line indicating your mutant codon should stand out. If it doesn't, use the numbering or Find tool to locate the appropriate codon.
- Carefully examine the sequence to see if your mutation was incorporated.
- You should save a screenshot of each alignment and attach them to your notebook.
- Follow the above steps to examine all of your sequencing results. Remember: you used a forward and a reverse primer to interrogate both potentially mutated plasmids.
If both colonies for your mutant have the correct sequence, choose one to use for the protein purification step. If only one is correct, then this is the one you will use next time. If neither of your plasmids carry the appropriate mutation, talk to the teaching faculty.
===Part 3: Prepare media for mixed-acid fermentation inoculations===


