20.109(S14):Cell preparation for DNA repair assays (Day5)
Contents
Introduction
Today's the big day! The first of three pretty big days, actually: transfecting your cells, measuring their fluorescence, and beginning to infer relative repair rates for different cell populations.
Now is the time to clearly understand the nature of the flow cytometry controls that you will perform. (We will save until next time an explanation of how flow cytometry works and a related discussion of additional controls that will be performed by the teaching faculty.) For each cell population, you will prepare two DNA mixtures: intact pMax-GFP plus damaged pMax-BFP-MCS, and intact pMax-GFP plus intact pMax-BFP. The re-circularization of pMax-BFP-MCS (less nonsense insert) will be our most direct readout of how much repair occurred. In this simplest view, broken DNA = no fluorescence and repaired DNA = blue fluorescent signal. However, what if one cell population simply took up more plasmid than another? In more technical terms, what if the transfection efficiency is higher for one cell type than for the other, and therefore the repair rate artificially appears higher? To control for this factor, we co-transfect with intact pMax-GFP – a transfection control – and normalize according to its uptake. But what if GFP and BFP plasmids are either taken up at different frequencies, or successfully expressed at different frequencies and/or signal intensities? Here is where the dual intact control is useful. It shows us the typical ratio of BFP:GFP uptake and expression, which we can use as a secondary normalization. Note that we use pMax-BFP as a control rather than pMax-BFP-MCS, because the latter will have very low expression that is not representative of the repaired construct: the nonsense insert separates the promoter and gene by too great a distance for robust expression.
Putting all of the above information together and in mathematical form, the NHEJ repair frequency equation can be determined in three steps:
- (1) Raw XFP reporter expression = % cells positive for XFP x MFI(XFP) = "RAW"
- X can be "B" or "G" in our case
- MFI is mean fluorescence intensity or median fluorescence intensity
- (2) Normalized BFP expression $ \qquad ={RAW_{BFP} \over RAW_{GFP}}\qquad $ = "NORM"
- (3) Reporter expression percent $ \qquad ={NORM_{BFP.damaged} \over NORM_{BFP.intact}}\qquad $ = NHEJ repair value
So, how will we get the expression vectors into our cells? DNA can be put into mammalian cells in a process called transfection. Recall that if you want to, say, make a hamster cell fluoresce green, you can transfect it with DNA carrying the EGFP open reading frame, a promoter directing transcription of EGFP, and a signal sequence for polyadenylation of the mRNA. The promoter tells the cell that the EGFP sequence should be transcribed by RNA polymerase. The polyadenylation sequence assists in the export and stability of the mRNA so that it gets translated by the ribosome. The coding sequence tells the ribosome which amino acids should be joined together.
Mammalian cells can be transiently or stably transfected. For transient transfection, DNA is put into a cell and the transgene is expressed, but eventually the DNA is degraded and transgene expression is lost (transgene is used to describe any gene that is introduced into a cell). For stable transfection, the DNA is introduced in such a way that it is maintained indefinitely, often using antibiotic resistance.
There are several approaches that researchers have used to introduce DNA into a cell's nucleus. At one extreme there is ballistics. In essence, a small gun is used to shoot the DNA into the cell. This is both technically difficult and inefficient, and so we won't be using this approach! More common approaches are electroporation and lipofection. During electroporation, mammalian cells are mixed with DNA and subjected to a brief pulse of electrical current within a capacitor. The current causes the membranes (which are charged in a polar fashion) to momentarily flip around, making small holes in the cell membrane through which the DNA can pass.
The most popular chemical approach for getting DNA into cells is called lipofection. With this technique, a DNA sample is coated with a special kind of lipid that is able to fuse with mammalian cell membranes. When the coated DNA is mixed with the cells, they engulf it through endocytosis. The DNA stays in the cytoplasm of the cell until the next cell division, at which time the cell’s nuclear membrane dissolves and the DNA has a chance to enter the nucleus. Cells are therefore typically evaluated for fluorescence expression 1-3 days after transfection.
Protocols
Part 1: Transfection of cells with plasmid reporters
All manipulations are to be done with sterile technique in the TC facility.
Timing is important for this experiment, so calculate all dilutions and be sure of all manipulations before you begin.
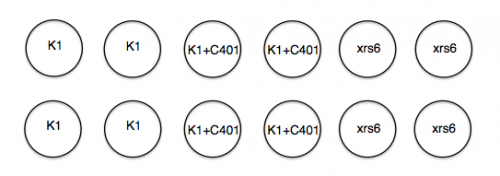
In anticipation of your lipofection experiment, the teaching faculty plated 1x10⁵ K1 and 1.2x10⁵ xrs6 cells per well in a 24-well dish at ~ 11 am yesterday. Half of the K1 cells then received 5 μM of DNA-PK inhibitor "C401" at ~ 5 pm yesterday. A plating schematic for your experiment is shown below. Note carefully which cells are which, including those that have been pre-treated with inhibitor.
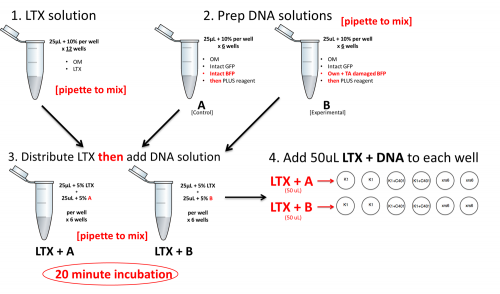
Below is a preview of the lipofection workflow. Do NOT begin these steps until you have completed the calculations further below. At each step, be sure to pipet to mix.
- Pre-label all of the eppendorfs that you will need.
- Prepare as much LTX diluted in OptiMEM (hereafter OM) as needed for all 12 transfections, plus 10%.
- The diluted LTX can sit at room temperature during the next two steps.
- Prepare the DNA mixtures – one control (A) and one experimental (B) – diluted in OM, enough for 6 transfections plus 10%, each.
- Add PLUS reagent to the DNA/OM mixtures.
- Distribute the LTX/OM to fresh eppendorf tubes, one for A and one for B. Here include 5% excess.
- For example, if 50 μL were required, you would add 52.5 instead.
- Then add the DNA/OM/PLUS (also 5% excess) to the LTX/OM.
- Incubate for 20 min at room temperature.
- Add 50 μL of the appropriate LTX/DNA/PLUS/OM mixture to each well. Read through the tips below before proceeding.
- Add the LTX/DNA/PLUS/OM drop-by-drop while making a circle with your pipet in the well, and then immediately swirl the plate (circularly) two times.
- Change tips between every addition.
- After distributing to all 12 wells, do a final mixing step for the whole plate, squeaky style: a few each of horizontal and vertical pushes.
The single-well basis reaction for each of the two DNA mixtures is shown below. Scale each one up to enough for 6 wells worth plus excess, carefully following the workflow above – for example, note that not everything is mixed together at once.
Due to a mistake in planning by the teaching faculty, none of you will have enough DNA to do this experiment with only your own stocks. (Ah, the trials of running a new module!) We recommend that you mix 500 ng of your own DNA with the additional (1000 ng + 150 ng) DNA that you will need for 6 reactions plus excess. You are also welcome to exclusively use the TA-prepared DNA.
| Component | [Stock] ng/μL | Amount per control well (A) | Amount per experimental (B) |
|---|---|---|---|
| LTX (μL) | N/A | 1 | 1 |
| OM for LTX (μL) | N/A | to total 25 μL per well | to total 25 μL per well |
| intact pMax-GFP (ng) | 455.3 | 250 | 250 |
| intact pMax-BFP (ng) | 521.4 | 250 | 0 |
| damaged pMax-BFP-MCS (ng) | unique | 0 | 250 |
| extra cut DNA from Su (ng) | 50 ng/μL | 0 | to supplement 250 above |
| PLUS (μL) | N/A | 0.5 | 0.5 |
| OM for DNA/PLUS (μL) | N/A | to total 25 μL per well | to total 25 μL per well |
Part 2: There is no part 2!
While your compatriots work in TC, you can: take a break, work on your Mod 1 revision, re-check your lipofection calculations, grab a snack, etc.
For next time
- Your Module 1 microbiota summary revision is due by 1 PM on Friday, submitted to Stellar and using a TeamColor_LabSection_Mod1-REV.doc naming scheme. Please remember to indicate the changes that you made, in order to facilitate grading!
- Your second reflection, written individually about lessons learned from the report revision process, is also nominally due Friday. We are happy to accept these within about 24 hours after you submit your report (no late penalty), but don't want to delay further than that as you may start to forget about the revision experience.
Reagent list
- Media as on Day 1
- Lipofectamine® LTX Reagent with PLUS™ Reagent (Life Technologies)
- Opti-MEM reduced serum medium (Life Technologies)
Next Day: DNA repair assays
Previous Day: Complete Western and prepare damaged DNA

