20.109(S10):Prepare expression system (Day4)
_frontpg.JPG)
Introduction
Now that we have prepared DNA encoding your mutant inverse pericams, we would like to actually produce the proteins. Last time you were here, you transformed competent bacteria (called XL1-Blue) with mutagenized DNA prepared from a template plasmid. Successfully transformed bacteria grew into colonies on amipicillin-containing plates, and yesterday your oh-so devoted teaching staff picked two colonies per mutant to grow in liquid culture. The XL1-Blue cell line, although it now carries the inverse pericam DNA, cannot produce the inverse pericam protein. Today you will extract DNA from the XL1-Blue cells, prepare it for analysis, and transform your IPC mutant plasmids into a new bacterial system that can produce the protein directly.

The bacterial expression vector we are using (pRSET) contains the bacteriophage T7 promoter. This promoter is active only in the presence of T7 RNA polymerase (T7RNAP), an enzyme that therefore must be expressed by the bacterial strain used to make the protein of interest. We will use the BL21(DE3)pLysS strain, which has the following genotype: F-, ompT hsdSB (rB- mB-) gal dcm (DE3) pLysS (CamR). In BL21(DE3), T7RNAP is associated with a lac construct, and its expression is under the control of the lacUV5 promoter. Due to the action of the lac repressor (lacI gene), the polymerase will not be produced except in the presence of lactose or a small-molecule lactose analogue such as IPTG (isopropyl β-D-thiogalactoside). To further reduce ‘leaky’ expression of the protein of interest (in our case, inverse pericam), the pLysS version of BL21(DE3) contains T7 lysozyme, which also inhibits basal transcription of T7RNAP. This gene is retained by Chloramphenicol selection, while the pRSET plasmid itself (and thus inverse pericam) is retained by Ampicillin selection - as you learned last time.

To isolate the inverse-pericam-containing pRSET plasmid from the overnight cultures, you will perform what is commonly called a “mini-prep.” This term distinguishes the procedure from a “maxi-” or “large scale-prep” which involves a larger volume of cells and additional steps of purification. The overall goal of each “prep” is the same--to separate the plasmid DNA from the chromosomal DNA and cellular debris, allowing the plasmid DNA to be studied further. In the traditional mini-prep protocol, the media is removed from the cells by centrifugation. The cells are resuspended in “Solution I” which contains Tris to buffer the cells and EDTA to bind divalent cations in the lipid bilayer, thereby weakening the cell envelope. A solution of sodium hydroxide and SDS is then added. The base denatures the cell’s DNA, both chromosomal and plasmid, while the detergent dissolves the cellular proteins and lipids. The pH of the solution is returned to neutral by the acetic acid and potassium acetate in “Solution III.” At neutral pH the SDS precipitates from solution, carrying with it the dissolved proteins and lipids. In addition, the DNA strands renature at neutral pH. The chromosomal DNA, which is much longer than the plasmid DNA, renatures as a tangle that gets trapped in the SDS precipitate. The plasmid DNA renatures normally and stays in solution, effectively separating plasmid DNA from the chromosomal DNA and the proteins and lipids of the cell.
Once you have the plasmid DNA isolated, you can prepare it for sequencing and gel analysis, as well as use it immediately for transformation. In order to transform BL21(DE3) cells with your mutant IPC plasmids, you will first have to make the cells competent, i.e., able to efficiently take up foreign DNA. With the XL1-Blue strain, we used commercially available competent cells that did not need further treatment prior to DNA addition. Today, you will make chemically competent cells yourself using calcium chloride, then incubate them with plasmid DNA and heat shock them as before prior to plating. Tomorrow, the teaching staff will pick colonies and set up liquid overnight cultures from your transformed cells. Next time, you will add IPTG to these liquid cultures to induce expression of your mutant proteins, which you will then isolate and characterize. Much of this process is summarized in the figure above.
Protocols
Part 1: Prepare competent BL21(DE3) cells
- Pick up one 5 mL tube of BL21(DE3) cells. These cells should be in or close to the mid-log phase of growth, which is indicated by an OD600 value of 0.4-0.8.
- Measure the OD600 value of a 1:10 dilution of your cells (use a total volume of 600 μL). If the cells are not yet dense enough, return them to the rotary shaker in the incubator. Remember to balance with another tube! As a rule, your cells should double every 20-30 min.
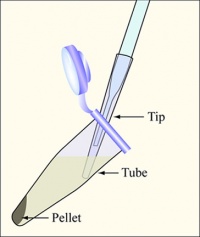 Aspirate the supernatant, as shown, removing as few cells as possible
- Once your cells have reached the appropriate growth phase, pour them into eppendorf tubes. Spin down 3 tubes of ~ 1.5 mL each for 1 min at max speed (~16,000 rcf/13,000 rpm), aspirate the supernatants, and resuspend in an equal volume of ice-cold calcium chloride (100 mM). Note: you can balance these tubes in the centrifuge with three-way symmetry.
- If you are nervous about pouring the liquid, you can use your P1000 to pipet 750 μL into each eppendorf twice. Either way, the eppendorf should be quite full when you try to close the cap. You can wear gloves to keep the bacteria from splashing your skin or you can wash your hands after closing all the caps.
- You may find it easiest to resuspend the cells in a small volume first (say, 200 μL), then add the remaining volume of CaCl2 (e.g., in two steps of 650 μL) and invert the tubes to mix.
- Spin again for 1 min. The resultant pellets should occur as streaks down the side of the eppendorf tube, so be very careful not to disturb the cells when aspirating.
- This time, resuspend each pellet in 100 μL of CaCl2, then pool the cells together in one tube.
- Incubate on ice for 1 hour. (You might work on parts 2, 4, and 5 of today's protocols now, as well as assemble the materials for part 3.)
- Meanwhile, label four eppendorfs and pre-chill them on ice. The labels should indicate a (-) no DNA control, a (+) M124S transformation control, and your two mutant candidate transformations (X#Z -1 and -2).

Part 2: DNA extraction (mini-prep)
- Pick up your two candidates cultures, growing in the test tubes labeled with your team colour. Label two eppendorf tubes to reflect your mutations and candidates (X#Z-1, X#Z-2).
- Vortex the bacteria and pour ~1.5 mL of each candidate into the appropriate eppendorf tube.
- Balance the tubes in the microfuge, and then spin them for one minute.
- Aspirate the supernatant, as shown above, removing as few cells as possible.
- Resuspend the cells in 100 μL of Solution I, changing tips between samples.
- Prepare Solution II by mixing 250 μL of 2% SDS with 250 μL of 0.4M NaOH in an eppendorf tube. Add 200 μL of Solution II to each sample and invert the tubes five or six times to mix. In some cases the samples may appear to "clear" but don't worry if you don't see a big change.
- Place the tubes on ice for five minutes.
- Add 150 μL of Solution III to each tube and immediately vortex the tubes for 10 seconds with your vortex set at the highest setting. White clumps should appear in the solution after you vortex it.
- Place the tubes in the room temperature microfuge and spin them for 4 minutes.
- While the tubes are spinning, label another set of eppendorf tubes with the candidate names and your team color.
- A white pellet should be visible when you remove your tubes from the microfuge. Use your P1000 to transfer 400 μL of each supernatant to the appropriate clean eppendorf tube. It's OK to leave some of the supernatant behind. Avoid transferring any of the white pellet.
- Add 1000 μL of room temperature 100% ethanol to each new tube. The tubes will be quite full. Close the caps and invert the tubes at least five times to thoroughly mix the contents.
- Microfuge the samples for 2 minutes. It is important to orient your tubes in the microfuge this time since the pellets from this spin may be barely visible.
- Remove the supernatants using your P1000, taking care not to disturb the pellet of plasmid DNA that is at the bottom of the tube, and put them in a 15 mL conical waste collection tube. Remove as much of the supernatant as possible, but you do not need to remove every drop since you will be washing the pellet in the next step.
- Add 500 μL of 70% ethanol to each pellet. You do not need to fully resuspend the pellet, but you might invert or flick the tube a few times. Spin the samples one minute, orienting the tubes in the microfuge so you will know where to find the pellet.
- Immediately remove the supernatant with your P1000, making sure to keep the tip on the side of the tube that doesn't have your pellet. Remove as much liquid as possible, using your P200 set to 100 μL, to remove the last few droplets and/or to streak them up the side of the tube to promote evaporation.
- To completely dry the pellets, place your rack in the hood with the caps open for ~ 10 minutes. When the pellets are completely dry, add 50 μL of sterile water to each sample and vortex each tube for 2 X 30 seconds to completely dissolve the pellets. The liquid can be brought back to the bottom of the tubes by spinning them in the microfuge for a few seconds. Store the DNA on ice.
Part 3: Transform BL21(DE3) with mutant DNA
- Prewarm and dry 4 LB+Amp/Cam plates by placing them in the 37°C incubator, media side up with the lids ajar. You will perform one transformation for each of your four samples.
- When your competent cells are ready, aliquot 70 μL of cells per pre-chilled eppendorf.
- Add 2 μL of the appropriate DNA to each tube. Remember, you are testing plasmid DNA that was prepared from two different colonies for your X#Z mutant, along with DNA from a colony that is already known to be M124S. You will also perform a no DNA control.
- Flick to mix the contents and leave the tubes on ice for at least 5 minutes.
- Heat shock the cells on the 42°C heat block for 90 seconds exactly and then put on ice for two minutes.
- Move the samples to a rack on your bench, add 0.5 ml of LB media to each one, and invert each tube to mix.
- Incubate the tubes in the 37°C incubator for at least 30 minutes. This gives the antibiotic-resistance genes some time be expressed in the transformed bacterial cells.
- While you are waiting, prepare 3 large glass test tubes containing LB+Amp/Cam, and label them with your team color and sample name. (You can also finish part 5 of the protocol if you have not yet done so.)
- Both Amp and Cam should be used at 1:1000, and the total volume in each tube should be 2.5 mL.
- Also prepare 4 eppendorf tubes containing 180 μL of LB each. You will use these to dilute your transformed cells 1:10 when you retrieve them from the incubator.
- If you label these tubes with stickers rather than directly on the cap, you can then transfer each sticker to the appropriate plate as you go, saving one labeling step.
- Note that we are reducing the cell concentration because miniprep DNA is much more concentrated than the DNA resulting from mutagenesis; it also does not require repair, further increasing the transformation efficiency.
- Plate 200 μl of each (1:10 diluted) transformation mix on an LB+Amp/Cam plate.
- Safety reminder: After dipping the glass spreader in the ethanol jar, then pass it through the flame of the alcohol burner just long enough to ignite the ethanol. After letting the ethanol burn off, the spreader may still be very hot, and it is advisable to tap it gently on a portion of the agar plate without cells in order to equilibrate it with the agar (if it sizzles, it's way too hot).
- Once the plates are done, wrap them with colored tape and incubate them in the 37°C incubator overnight. One of the teaching faculty will remove them from the incubator and set up liquid cultures for you to use next time.
Part 4: Count mutant colonies
When you have a spare moment today, count the colonies that arose on your transformed XL1-Blue plate, as well as on your positive and negative control plates and those of the teaching faculty. Does the negative control have any colonies? How does your mutation efficiency compare to that of the positive control? To that of the teaching faculty's positive control? Please put your colony counts on today's Talk page.
Part 5: Prepare DNA for Evaluation
Diagnostic Digests
You will perform diagnostic digests on the following samples: the inverse pericam parent plasmid (pRSET-IPC), a known mutant pRSET-M124S, and two candidates for your X#Z mutation. "Digest 1" (D1) will be used to show that pRSET-M124S contains the correct mutation, and "Digest 2" (D2) will be used to test if your candidates do. Thus, you will need enough D1 mixture for two reactions (IPC and M124S), and enough D2 mixture for three reactions (IPC and the two X#Z candidates). To avoid pipetting very small volumes of enzymes, and in order to have at least a little extra of each reaction (so you don't run out due to pipetting error), make enough of each digest for four reactions.
The table below is for one reaction and assumes that each digest will consist of a single enzyme. If you decide to use two enzymes for your mutant digest, you should also set up single-enzyme digests to be run as controls. Please see the teaching faculty for assistance.
If you are using the enzyme BseRI, you should triple the amount of enzyme in that digest due to its low stock concentration.
| Digest 1 | Digest 2 | |||
|---|---|---|---|---|
| Plasmid DNA | 4 μL | 4 μL | ||
| 10X NEB buffer | 2.5 μL of buffer#_____ | 2.5 μL of buffer#_____ | ||
| Enzyme | 0.25 μL of _AccI_ | 0.25 μL of _____ | ||
| H2O | For a total volume of 25 μL | |||
- Prepare a reaction cocktail for each of the above reactions (digest 1 and digest 2) that includes water, buffer and enzyme. Prepare enough of each cocktail for 4 digests. Leave the cocktails on ice.
- Aliquot 4 μL of the appropriate plasmids into five well-labeled eppendorf tubes. The labels should include the plasmid name, the enzyme(s) to be added and your team color.
- Add 21 μL of the appropriate cocktail to each tube. Flick the tubes to mix the contents, touch-spin, then incubate the mixtures at 37°C for at least one hour.
- While your samples are digesting, you can return to Part 3 of the protocol.
- Before leaving lab today, please add 2 μL of loading dye to each of the digests you have assembled. You should also prepare undigested samples of parent IPC and each mutant candidate, containing 4 μL of plasmid, 21 μL of water, and loading dye. We will store the digests and the remaining DNA at –20°C.
Sequencing Reactions
As we will discuss in lab today, sequencing reactions require a primer for initiation. Legible readout of the gene typically begins about 40-50 bp downstream of the primer site, and continues for ~1000 bp at most. Thus, multiple primers must be used to fully view genes > 1 Kbp in size. How many basepairs long is inverse pericam? (Try using the Word Count feature on this sequence document.) Luckily, we only care about the back end of IPC, i.e., the part containing calmodulin. To be more precise, if the mutation you incorporated occurs later than the 20th residue of calmodulin, set up your reactions with only the "reverse" primer. If your mutation is upstream of CaM-20, you should set up one reaction with the reverse primer and one with the forward, per each candidate. As for M124S, everyone will be given the same sequencing data to analyze, because you are all working with DNA from the same candidate.
The recommended composition of sequencing reactions is 200-500 ng of plasmid DNA and 3.2 pmoles of sequencing primer in a final volume of 12 μL. The miniprep'd plasmid should have ~1 μg of nucleic acid/μL but that will be a mixture of RNA and DNA, so we will guess at the amount of plasmid DNA appropriate for our reactions. If you are setting up reactions with both the forward-reading and the reverse primers, do not mix the two primers together in one tube!
For each reaction, combine the following reagents in an eppendorf tube:
- 2 μL of your plasmid DNA candidate
- 18 μL of the primer solution on the teaching bench, which (per 18 μL) contains
- 5.3 μL of sequencing primer at 1 pmol/μL
- 12.7 μL sterile water
Mix each solution by pipetting and then transfer 12 μL to an 8-PCR-tube strip. Keep track of which sample is in which tube (A-H), and label your tubes on both the side and the top according to the table below. The teaching faculty will turn in the strips at the Biopolymers Laboratory in E17 for sequencing.
| Group | Label Range | Group | Label Range |
|---|---|---|---|
| Red | 1-2 | Blue | 9-10 |
| Orange | 3-4 | Pink | 11-12 |
| Yellow | 5-6 | Purple | 13-14 |
| Green | 7-8 |
For next time
- The vector pRSET has several properties that make it useful for protein expression and production in bacteria. Some of these were described in today’s Introduction. Name 2 other features contained in the pRSET vector and what purposes they serve. (Use your own words to describe the purposes, don't just quote the catalogue.)
- BL21(DE3) E. coli are often used for protein expression. In contrast, XL1-Blue E. coli are ‘workhorse’ cells useful for plasmid propagation. What are the two modified genes in XL1-Blue that make them ideal for this task? It may help you to refer to the cell manual: (pdf download).
- The major assessment for this module will be a research article describing your protein design work. For this assignment, you will write a draft of the introduction to your report. The introduction provides a framework for the story you are about to tell (The Amazing Adventures of a Mutant Calcium Sensor), and thus serves two main purposes. For one, you must provide sufficient background information for a reader to understand the forthcoming results. Just as importantly, you must motivate the audience to keep reading! How? Reveal the significance of the work through connections to both prior scientific accomplishments and future applications. You are welcome to use your own creativity and judgement as to what a good introduction should look like; however, you may find the suggested structure and content below useful.
- Paragraph 1: most general, "big picture" paragraph. Here you should introduce the reader to the broader context of your experiment and motivate why your research is important. You might address questions such as those below, but you won't necessarily touch on all of them equally or even at all. Be sure to tell a coherent story, not a dense but unconnected list of facts.
- Why is calcium biologically relevant?
- What types of natural and synthetic calcium sensors exist and why are they useful?
- What is protein engineering and by what strategies can it be accomplished?
- Paragraph 2: "zooming in" somewhat. Now that the reader has a frame for thinking about your research, you can present background information in more depth, including
- The structure of inverse pericam, and particularly of calmodulin
- Specific areas of the protein that could be altered (not just the one you chose, but broad categories of modification)
- Why changing calcium (or M13) affinity or cooperativity could be useful
- Paragraph 3: most specific, a description of your particular investigation. Finally you can cover topics such as
- How you chose your specific mutation (and rationale for the M124S mutation) given the local protein structure
- Your expectations for how these mutations will affect protein function
- A brief summary of how you intend to assess whether your experiment worked
- (Later you will add a brief overview of your results and conclusions)
4. Please download the midsemester evaluation form found here. Complete the questionnaire and then print it out without including your name to turn in. If there is something you'd like to see done differently for the rest of the course, this is your chance to lobby for that change. Similarly, if there is something you think the class has to keep doing, let us know that too.
Reagent list
Microbial work
- 100 mM CaCl2, sterile
- LB (Luria-Bertani broth)
- 1% Tryptone
- 0.5% Yeast Extract
- 1% NaCl
- autoclaved for sterility
- Ampicillin: 100 mg/mL, aqueous, sterile-filtered
- Chloramphenicol: 34 mg/mL in ethanol
- LB+AMP+CAM plates
- LB with 2% agar and 100 μg/ml Ampicillin and 34 μg/ml Chloramphenicol
DNA Mininprep
- Solution I
- 25 mM Tris pH8
- 10 mM EDTA pH8
- 5 mM Glucose
- Solution II
- 1% SDS
- 0.2M NaOH
- Solution III
- 3M KAc, pH 4.8
Plasmid Digests
- Parental plasmid (pRSET-IPC)
- Mutant plasmids (pRSET-M124S, and your two minipreps)
- NEB buffers 1-4
- NEB enzymes
DNA Sequencing materials
- Reverse sequencing primer "pRSET-seq" (original stock 100 pmol/μL)
- Forward sequencing primer "IPC-seq-f1" (original stock 100 pmol/μL)