20.109(F18):Prepare and treat cells for genomic instability experiment (Day3)

Introduction
Today you will continue to examine the data collected for your cell loading experiment, and then use these results to probe the effects of oxidative stress on genomic stability. DNA damage is defined as any change in the chemical structure of the molecule, including breaks in the backbone, missing basepairs, and certain structurally altered basepairs. Remember, damaged DNA does not mean mutated DNA! Though both instances relay that the DNA has been changed, a mutation is defined as a change in the sequence.
In lecture, you reviewed exogenous factors that lead to DNA damage (i.e. ultraviolet rays, smoking, etc.). Naturally occurring DNA damage results from native cell processes, such as metabolism. In this module, we will measure the amount of damage induced by oxidative stress.
Oxidative agent: hydrogen peroxide (H2O2)
Normal cell tissues have a basal level of DNA damage due to cell processes involved in cellular metabolism. For example, electrons can escape the electron transport chain and result in the formation of superoxide. Furthermore, defense mechanisms employed to protect the host from bacterial infection involved the release of reactive oxygen species. These reactive oxygen species are implicated in causing more than 20 types of DNA base lesions. One of the most common types of damage is the change of guanine to 8-hydroxyguanine.
Base excision repair (BER) pathway Most DNA damage induced by oxidative agents is corrected via the BER pathway; which is critical in the removal of small, non-helix distorting lesions from DNA. Thus, this pathway is responsible for repairing damage before a mutation results. Recall the lecture material as you review the image below.

Protocols
Part 1: BE Communication Lab workshop
Our communication instructors, Dr. Sean Clarke and Dr. Prerna Bhargava, will join us today for a workshop on designing effective figures and captions.
Part 2: Determine cell loading number for genomic instability experiment
In a group discussion with the teaching faculty, you will assess the results of the class data from the CometChip loading experiments. The goal here is to determine which cell number to use when preparing your CometChip for the next experiments. Use the data you collected concerning the following: 1. number of wells loaded and 2. an estimate of number of cells per well.
Be sure to include notes on the discussion and the values for cell loading number that you will use in your notebook!
Part 3: Load cells into CometChip
- You will load CometChips prepared by the teaching faculty, but first need to calculate the volume of cell suspension to load using the following information:
- For the cell number, you will use the value selected during the group discussion today.
- The cell suspensions (both +DNAPKcs and -DNAPKcs) prepared by the teaching faculty are each at a density of 500,000 cells / mL.
- Retrieve your CometChip from the front laboratory bench.
- Obtain one glass plate, one 96-well bottomless plate, and four 1.5" binder clips from the front bench per CometChip.
- Remove your CometChip from the 1x PBS and place it, gelbond side down, on the glass plate. Save the dish your CometChip was stored in for storage later.
- Press the 96-well bottomless plate onto the CometChip so that the wells line up with your labeling as shown in the diagram on the right.
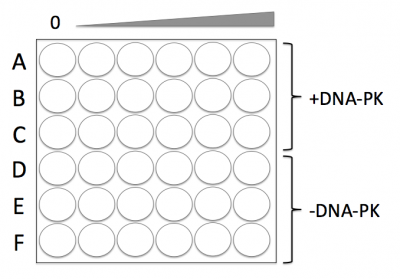 Plate map for genomic instability experiment.
- Be sure to press the top of the 96-well bottomless plate onto the CometChip. If you are unsure which side is the top, please ask the teaching faculty.
- Do not move the 96-well bottomless plate while it is on the CometChip as you will damage the agarose and the microwells.
- Use the binder clips to secure the 96-well bottomless plate to the glass plate, thus creating a 'sandwich' with your CometChip in the center.
- Fasten the binder clips to the very edge of 96-well bottomless plate.
- Add the appropriate volume of your +DNAPKcs cell suspension (calculated in Step #1) to the wells in Rows A, B, and C.
- Add the appropriate volume of your -DNAPKcs cell suspension (calculated in Step #1) to the wells in Rows D, E, and F.
- Incubate your CometChip in the 37 °C incubator in the main laboratory for 15 min.
- After the incubation, complete a wash step to remove excess cells that are not within the microwells of your CometChip.
- Carefully remove the binder clips and the 96-well bottomless plate.
- With the CometChip on the glass plate, 'waterfall' ~5 mL of 1x PBS over the wells, which are now imprinted onto the agarose.
- Hold the glass plate with the CometChip such that the letter labels are at the top to ensure you do not wash cross-contaminant the cells in the wells.
- To waterfall the 1x PBS, hold the glass plate at a 45° angle over a blue plastic dish, found at front bench.
- Pipet up ~5 mL of 1x PBS.
- Press the pipet tip onto the glass plate above your CometChip.
- As you expel the 1x PBS, quickly move the pipet tip from left-to-right.
- The 1x PBS should pass over the top of the CometChip and fall into the dish.
- Use a P200 tip attached to the pasteur pipet to aspirate the excess liquid from your CometChip wells.
- Lightly touch the tip to the bottom of each imprinted well on the CometChip and immediately lift the tip from the agarose.
- Use the molten 1% low melting point (LMP) agarose in the 42 °C waterbath on the front bench to 'trap' the cells in your CometChip.
- You will need to work quickly from this point as the LMP agarose will solidify as it cools.
- Using the P1000, pipet up 1000 μL of molten agarose from the tube.
- Hold the pipet tip over the top left well of your CometChip and as you expel the agarose move the pipet tip from left to right. Ensure that each row of your CometChip gets covered.
- The goal is to lightly cover the wells that contain cells, which will 'trap' the cells into the microwells.
- If the LMP agar 'fell' off the CometChip in any areas during this process, it is important to 'fill in' those portions of the CometChip. Please alert the teaching faculty if you experience any difficulties!
- Leave your CometChip undisturbed on the benchtop for 3 min then carefully move it to the 4 °C cooler for 5 min to ensure the LMP agarose solidifies.

Part 4: Treat cells for genomic instability experiment
- While the LMP agar is solidifying at 4 °C, calculate the dilutions of H2O2 that you will use for your experiment.
- The H2O2 stock solution is at a ~10 M concentration.
- You will add 100 μL per well to induce DNA damage.
- Calculate dilutions that result in doses of 0, 0.01, 0.1, 0.25, 0.5 and 1 μM.
- Retrieve your CometChip from the 4 °C and carefully replace the bottomless 96-well plate to recreate the wells that you used for cell loading.
- Secure the bottomless 96-well plate with binder clips as before.
- Obtain an aliquot of H2O2 and prepare the doses that you calculated in Step #1 using 1x PBS as the diluent in a 12-well reservoir as discussed in prelab.
- Be sure to keep the H2O2 on ice at all times!
- Using a multi-channel pipet, add the appropriate treatment doses of H2O2 to each well of your CometChip.
- The 0 μM treatment should be added to the wells at the far left and the 2 μM treatment should be added to the wells at the far right of the CometChip.
- Carefully transport your CometChip to the 4 °C cooler and incubate for exactly 20 min.
- Retrieve your CometChip from the 4 °C cooler and quickly remove the bottomless 96-well plate while holding the CometChip at an angle such that the low doses of H2O2 'run' over the wells with high doses.
- If the high doses of H2O2 run over the low dose wells, additional damage may be induced and confound the results.
- Rinse your CometChip using 1x PBS into the same dish used during the cell loading procedure.
- Complete a total of 3 washes.
Part 5: Complete cell lysis
- Use the same dish your CometChip was stored in at the start of lab and a 30 mL aliquot of alkaline lysis buffer from the front laboratory bench.
- Carefully move your CometChip into the dish.
- Add the aliquot of alkaline lysis solution by slowly pouring it into a corner of the dish rather than directly over the CometChip.
- Be sure the CometChip is completely submerged and not floating in the dish.
- Label the dish with your team and section information.
- Move your dish into the 4 °C cooler.
The teaching faculty will transfer your CometChip from the alkaline lysis solution into 1X PBS at ~24 hr.
Reagents list
- H2O2: hydrogen peroxide (Sigma Aldrich)
- Alkaline Lysis Solution (2.5 M NaCl, 100 mM Na2EDTA, 10 mM Tris, 1% Trition-X)
Next day: Complete genomic instability experiment and load cells for sub-nuclear foci assay