20.109(F16):Agarose gel electrophoresis (Day3)

Contents
Introduction
Electrophoresis is a technique that separates large molecules by size using an applied electrical field and a sieving matrix. DNA, RNA and proteins are the molecules most often studied with this technique; agarose and acrylamide gels are the two most common sieves. The molecules to be separated enter the matrix through a well at one end and are pulled through the matrix when a current is applied across it. The larger molecules get entwined in the matrix and are stalled; the smaller molecules wind through the matrix more easily and travel further from the well. Molecules of the same size and charge migrate the same distance from the well and collect into a band.


DNA and RNA are negatively charged molecules due to their phosphate backbone, and they naturally travel toward the positive charge at the far end of the gel. They are typically examined with agarose gels. Proteins are composed of amino acids that can be positively, negatively, or uncharged. To give proteins a uniformly negative charge, they are coated with a detergent, SDS, prior to running them on a gel. Protein samples are also boiled to remove any secondary structure that might make two molecules of the same size migrate differently. Polyacrylamide is the matrix commonly used to separate proteins. These gels are typically run vertically while agarose gels are run horizontally but gravity has nothing to do with the separation.
Today you will separate DNA fragments using an agarose matrix. Agarose is a polymer that comes from seaweed and if you’ve ever made Jell-O™, then you already have all the skills needed for pouring an agarose gel. To prepare these gels, agarose and 1X TAE buffer are microwaved until the agarose is melted and fully dissolved. The molten agar is then poured into a horizontal casting tray, and a comb is added. Once the agar has solidified, the comb is removed, leaving wells into which the DNA sample can be loaded.
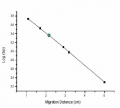
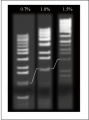
The distance a DNA fragment travels is inversely proportional to the log of its length. Over time fragments of similar length accumulate into “bands” in the gel. Higher concentrations of agarose can be used to resolve smaller DNA fragments. The figure below (far right) shows the same DNA fragments resolved using three different agarose concentrations. The 1000 base pair fragment is indicated in each image.
- Agarose gel electrophoresis
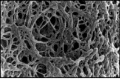
Scanning EM image of agarose polymer
Agarose gel data analysis
Agarose gel raw data


SYBR Safe is a fluorescent dye that is commonly added to visualize DNA in agarose gels. This dye intercalates between the bases of DNA, allowing DNA fragments to be located in the gel and photographed. The intensity of the band reflects the concentration of molecules that size, although there are upper and lower limits to the sensitivity of dyes. Even though it interacts with DNA, SYBR Safe is not classified as hazardous under the Resource Conservation and Recovery Act (RCRA) - hence MIT opting for substituting it to its highly mutagenic predecessor, ethidium bromide. SYBR Safe stained gels and gel equipment should be handled with nitrile gloves, but do not have to be disposed of in dedicated solid waste jars; the regular biowaste bins are suitable.
Today you will run your digested plasmid backbone and the digested PCR product on an agarose gel. You will then cut the relevant bands of DNA from your gel (i.e. the pCX-NNX backbone and the D32N-EGFP insert) and purify them from the agarose. Next time you will mix them in a ligation reaction.
Protocols
Part 1: Running your gel
You will use a 1% agarose gel (prepared by the teaching faculty), running seven samples as well as a reference lane of molecular weight markers (also called a DNA ladder).
- Add 20 μL of sterile water to the 5 μL uncut PCR aliquots (not the PCR double digest) you stored after M1D2. One is assumedly D32N-pCX-EGFP, before clean-up by the Qiagen kit, one is the no-template control.
- Add 5 μL of 6x loading dye to the PCR aliquots, as well as to the pCX-NNX digested by XbaI and/or EcoRI, and the PCR product digested by XbaI/EcoRI.
- Loading dye contains bromophenol blue as a tracking dye to follow the progress of the electrophoresis (so you don’t run the smallest fragments off the end of your gel!) as well as glycerol to help the samples sink into the well.
- Xylene cyanol may also be used as a tracking dye, but does not migrate as far across the gel.
- Flick the eppendorf tubes to mix the contents, then quick spin them in the microfuge to bring the contents of the tubes to the bottom.
- Load the gel in the order shown in the table below.
- To load your samples, draw the volume listed on the table below into the tip of your P200. Lower the tip below the surface of the buffer and directly over the well. You risk puncturing the bottom of the well if you lower the tip too far into the well itself (puncturing well = bad!). Expel your sample into the well. Do not release the pipet plunger until after you have removed the tip from the gel box (or you'll draw your sample back into the tip!).
- Once all the samples have been loaded, attach the gel box to the power supply and run the gel at 125 V for no more than 45 minutes.
- While the gels run, we will have our pre-lab lecture. Please also find some time to pre-weigh and label two eppendorf tubes before your gel is done!
- You will be shown how to photograph your gel and excise the relevant bands of DNA.

| Lane | Sample | Volume to load |
|---|---|---|
| 1^ | Uncut pCX-NNX^ | 10 μL^ |
| 2 | pCX-NNX XbaI | 5 μL |
| 3 | pCX-NNX EcoRI | 5 μL |
| 4 | pCX-NNX XbaI + EcoRI | 25 μL |
| 5 | 1kb DNA ladder | 20 μL |
| 6 | PCR product XbaI + EcoRI | 25 μL |
| 7 | PCR product uncut | 25 μL |
| 8 | PCR no-template-control | 25 μL |
^Available from the teaching faculty

Part 2: Pre-lab lecture
Today we'll do our pre-lab lecture once everyone's gel is running!
Part 3: Isolating/purifying DNA
To purify your DNA from the agarose, you will use another kit sold by Qiagen. Again the reagents have uninformative names and their contents are proprietary. Like the PCR Clean-up kit, the Agarose Purification kit requires binding the DNA to a spin-column with a silica-gel membrane, washing away salts and eluting the DNA from the membrane.
- Estimate the volume of your gel slices by weighing them.
- You have excised two bands: the pCX-NNX backbone from lane 4 and the D32N-EGFP insert from lane 6.
- Add 3 volumes of QG for every 1 mass of agarose. For instance, if you excised piece of DNA-loaded agarose is 100 mg, add 300 mL of QG. (The maximum advised volume is 550 μL. Continue for now, but read step 5 carefully.)
- Incubate in the 50 °C water bath for 10 minutes, until the agarose is completely dissolved. Every few minutes, you can remove your tubes from the 50 °C heat to flick the contents. This agitation will help dissolve the agarose.
- Add 125 μL of isopropanol to each eppendorf tube.
- Get two QIAquick columns and two collection tubes from the teaching faculty. Label the spin-column (not the collection tubes!) either “bkb” or “frag” then pipet the appropriate dissolved agarose mixture to the top. Microfuge the column in the collection tube for 60 seconds. The maximum capacity of the QIAquick columns is 800 μL! If you have more than 800 μL in your mixture, you will need to repeat this step on the same column.
- Discard the flow-through in a temporary waste container (such as a 15 mL conical tube) and replace the spin-columns in their collection tubes. Add 750 μL of PE to the top of the column and spin as before.
- Discard the flow-through in your waste container and replace the spin-columns in their collection tubes. Add nothing to the top but spin for 60 seconds more to dry the membrane.
- Trim the cap off two new eppendorf tubes and label the sides with your team color, the date, and either “bkb” or “frag.” Place the spin-column in the correct trimmed eppendorf tube and add 30 μL of EB to the center of the membrane.
- Allow the columns to sit at room temperature for one minute and then spin as before. The material that collects in the bottom of the eppendorf tubes is your purified plasmid backbone or insert, ready to be ligated.
- At the end of the day, dump your waste tube into the chaotropic salt/ethanol waste in the fume hood, and save the tube for another day.
Part 4: Evaluating recovery
Ligations generally work best when there is a 1:4 molar ratio of backbone to insert. You will ligate your fragments next time, but before you do, run a small amount out of the purified products on a gel. This will allow you
- to check that you purified your DNA from the agarose
- to assess the quality of the DNA (i.e. that it’s not degraded or contaminated)
- to adjust the amount of backbone and fragment in your ligations for a ~1:4 ratio.
- Move 5 μL of each sample into an eppendorf tube labeled “purif bkb” or “purif frag.” Add 15 μL sterile water to each tube and 3 μL loading dye. Use a colored label to identify your team color and give the samples to the teaching staff. We will run a 1% agarose gel for you and the result will be posted. Once it is posted, you may complete the homework to prepare for the ligation you will do in lab next time.
- Freeze the remainder of your purified DNAs at -20 °C.
Reagents list
- NEB Loading Dye (link)
- 2.5% Ficoll®-400
- 11 mM EDTA
- 3.3 mM Tris-HCl
- 0.017% SDS
- 0.015% bromophenol blue
- pH 8.0 @ 25 °C
- NEB 1 kb ladder (link)
- 1% agarose gel in 1x TAE
- 1x TAE
- 40 mM Tris
- 20 mM acetic acid
- 1 mM EDTA, pH 8.3
- QIAquick gel extraction kit
- Isopropanol
Next day: DNA ligation & transformation