Difference between revisions of "20.109(S16):Introduction to cell strains and plating (Day1)"
Noreen Lyell (Talk | contribs) (→Protocols) |
Noreen Lyell (Talk | contribs) (→Introduction) |
||
| Line 19: | Line 19: | ||
Cultured mammalian cells must grow in a germ-free environment and researchers using tissue culture must be skilled in sterile or asceptic technique. Bacteria double very quickly relative to mammalian cells. An average mammalian cell doubles about once per day whereas many common bacteria can double every 20 minutes under optimal conditions. Consequently, if you were to co-culture 100 mammalian cells and 1 bacteria together in a flask, within 24 hours you would have ~200 unhappy mammalian cells, and about 100 million happy bacteria! Needless to say, you would not find it very useful to continue to study the behavior of your mammalian cells under these conditions. | Cultured mammalian cells must grow in a germ-free environment and researchers using tissue culture must be skilled in sterile or asceptic technique. Bacteria double very quickly relative to mammalian cells. An average mammalian cell doubles about once per day whereas many common bacteria can double every 20 minutes under optimal conditions. Consequently, if you were to co-culture 100 mammalian cells and 1 bacteria together in a flask, within 24 hours you would have ~200 unhappy mammalian cells, and about 100 million happy bacteria! Needless to say, you would not find it very useful to continue to study the behavior of your mammalian cells under these conditions. | ||
| − | Today you will learn and practice asceptic technique to collect and count cells that were previously cultured by the teaching faculty. You will use the cells you collect to seed (or culture) cells for Western blot analysis. To ensure you are well-prepared for your work in the tissue culture room, your instructor will deliver the prelab information to you during a demo at the tissue culture hood. | + | Today you will learn and practice asceptic technique to collect and count cells that were previously cultured by the teaching faculty. You will use the cells you collect to seed (or culture) cells for Western blot analysis. To ensure you are well-prepared for your work in the tissue culture room, your instructor will deliver the prelab information to you during a demo at the tissue culture hood. Because the tissue culture room is not large enough to accommodate the entire class at once, we will be split into two groups today...and all subsequent days that involve tissue culture. Half of the class will begin in tissue culture with Part 1 and the other half of the class will begin by learning more about the cell lines we are using with Part 2. Your instructor will designate the groups. |
==Protocols== | ==Protocols== | ||
Revision as of 21:58, 4 February 2016

Contents
Introduction
To be confident of your findings related to DNA repair, you will first validate the cell lines you are using to assess the effect of DNA damage and drugs on NHEJ. Just as it was important to confirm the template you used for your mutagenesis reaction in Mod 1, it is important to confirm the cells you are using are indeed mutants in the protein you are assessing in this module. You will do this by completing a Western blot. A Western blot allows researchers to detect specific proteins within a mixed sample, such as cell lysate. We will use this protein analysis technique to assess DNA-PK levels in the wild-type M059K and DNA-PK mutant M059J cell lines.


Tissue culture was developed ~100 years ago as a means to study mammalian biology, and since that time we have learned a tremendous amount by observing the behavior of mammalian cells maintained in the laboratory. The term tissue culture was originally coined because researchers were doing exactly that, extracting tissue and letting it live in a dish for a short time. Today, most tissue culture experiments are done using cells rather than tissues. Much of what we know about cancer, heritable diseases, and the effects of the environment on human health has been derived from studies of cultured cells.
What types of cells do people study, and from where do they come? Cells acquired directly from animal tissue are called primary cells. They are difficult to culture, largely because primary cells in this context divide only a limited number of times. This limitation on the lifespan of cultured primary cells, called the Hayflick limit, is a problem because it requires a researcher to repeatedly remove tissues from animals to complete a study. Cell isolation processes can be quite labor-intensive, and also can complicate data analysis due to inherent animal-to-animal variation. To get around this problem, researchers study cells that are immortal, which means the cells are able to divide indefinitely. Though using immortal cells is preferable for many reasons, some inherent cell-to-cell variation still exists in such populations and the genetic changes that cause immortality may affect experimental outcomes.
The art of tissue culture lies in the ability to create conditions that are similar to what a cell would experience in an animal, namely 37°C and neutral pH. Blood nourishes the cells in an animal, and blood components are therfore used to feed cells in culture. Serum, the cell-free (and clotting-factor free) component of blood, contains many of the factors necessary to support the growth of cells outside the animal. Consequently, serum is frequently added to tissue culture medium, although serum-free media (also called chemically defined media) exist and support some types of cultured cells.
Cultured mammalian cells must grow in a germ-free environment and researchers using tissue culture must be skilled in sterile or asceptic technique. Bacteria double very quickly relative to mammalian cells. An average mammalian cell doubles about once per day whereas many common bacteria can double every 20 minutes under optimal conditions. Consequently, if you were to co-culture 100 mammalian cells and 1 bacteria together in a flask, within 24 hours you would have ~200 unhappy mammalian cells, and about 100 million happy bacteria! Needless to say, you would not find it very useful to continue to study the behavior of your mammalian cells under these conditions.
Today you will learn and practice asceptic technique to collect and count cells that were previously cultured by the teaching faculty. You will use the cells you collect to seed (or culture) cells for Western blot analysis. To ensure you are well-prepared for your work in the tissue culture room, your instructor will deliver the prelab information to you during a demo at the tissue culture hood. Because the tissue culture room is not large enough to accommodate the entire class at once, we will be split into two groups today...and all subsequent days that involve tissue culture. Half of the class will begin in tissue culture with Part 1 and the other half of the class will begin by learning more about the cell lines we are using with Part 2. Your instructor will designate the groups.
Protocols
Part 1: BE Communications Lab workshop
One of the major assignments of this module is the Journal Club presentation. Conveying your science orally to an audience is an important skill that requires practice, practice, and practice. To prepare you for this task, today we will be joined by Dr. Diana Chien and Dr. Vivian Siegel to discuss slide design and how to best deliver the information to your audience.
Part 2: Preparing cells for Western blot analysis
We will begin with a demo about sterile technique and how to use the tissue culture hoods.
Each team will receive two T25 culture flasks: one with M059K (wild-type) cells, and one with M059J (DNA-PK mutant) cells. You will enzymatically detach these adherent cells, count them, and plate them at a specific seeding density in a 6-well culture plate. Next time, after these cells have doubled a couple of times, you will lyse them to make cell free extracts and begin your first assay of the module. For this reason, it is important that you take care to use sterile technique today.
It is essential that you do not mix up or cross-contaminate the M059K and M059J cell lines! We suggest that one partner is responsible for each flask, and that partners do not share Pasteur pipets or other equipment.
- Each tissue culture hood is partly set up for you. Finish preparing your hood according to the demo, first bringing in any remaining equipment you will need, then picking up the pre-warmed reagents from the water bath, and finally obtaining your cells. Don't forget to spray everything down with 70% ethanol.
- One of the greatest sources for TC contamination is moving materials in and out of the hood since this disturbs the air flow that maintains the sterile environment inside the hood. Anticipate what you will need during your experiment to avoid moving your arms in and out of the hood while your cells are inside.
- Look at your cells as you remove them from the incubator. Look first at the color and clarity of the media. Fresh media is reddish-orange in color and if the media on your cells is yellow or cloudy, it could mean that the cells are overgrown, contaminated, or starved for CO2. Next look at the cells on the inverted microscope. Note their shape and arrangement in the dish and how densely the cells cover the surface.
- After you look at your cells, take the flask to your tissue culture hood to begin the seeding process.
- Aspirate the media from the cells using a sterile Pasteur pipet.
- Wash the cells by adding 3 ml PBS using a 5 mL pipet. Slightly tip the flask back and forth to rinse all the cells then aspirate the PBS with a fresh Pasteur pipet.
- To dislodge the cells from the dish, you will add trypsin, a proteolytic enzyme. With a 2 ml pipet, add 1 mL of trypsin to the flask. Be careful not to pull up the liquid too quickly or it will go all the way up your pipet into the pipet-aid!
- Tip the flask in each direction to distribute the trypsin evenly. Incubate the cells at 37°C for 3-5 minutes, until the cells round up and are easily dislodged from the plate by tapping. Check your cells using the microscope to ensure they are dislodged.
- While you are waiting, you may label the 6-well plate that you will share with your partner. Include your group color and today’s date on the left-hand side (assuming you are right-handed). Then label the two rightmost wells, which you will use for your cells, directly with the cell strain name and the initials of the partner who prepared those particular cells.
- Prepare two 15 mL conical tubes as well.
- Finally, this is a great time to clear out your trash!
- After retrieving your cells, add 3 ml of media to the trypsinized CHO cells and pipet the liquid up and down (“triturate”) to remove the cells from the plastic and suspend them in the liquid.
- Remember: Neither take up nor release quite all the liquid, in order to avoid bubbles.
- When you are satisfied that the cell suspension is homogeneous, transfer a known volume (such as 3.5 mL) to the appropriately labeled 15 mL conical tube. Take 90 μL from this solution into a (labeled!) eppendorf tube. Be sure to keep the conical tube containing your cells capped while you work at the microscope.
- Add 10 μL of Trypan blue to the eppindorf tube with your cells and pipet up and down.
- With a new pipet tip, transfer 10 μL of the cell/dye suspension to a hemocytometer, as shown to you by the teaching faculty. Keep K1 on top and xrs6 on the bottom, so you don't forget which is where.
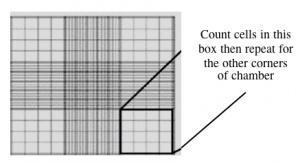 Counting cells using a hemocytometer
- Count two diagonal corners, as shown to you by the teaching faculty. If the numbers are within 20% of each other, continue. If they are more different than that, count the other two corners. Be sure to record all of your raw data. Finally, take the average of either the two or the four values.
- This slide has an etched grid of nine large squares. The concentration of cells in a sample can be determined by counting the cells that fall within one such square and then multiplying by 10,000 to determine the number of cells/mL in the solution measured. (Always remember to account for the dilution to cell stock at the end!)
- Note that different squares are sub-divided into different grids. Very dense cells could be counted in the fine grids. In your case, the 4x4 grids and a 10x magnification will be most convenient for counting.
- Calculate the volume of cells you need to seed 50,000 cells in the dedicated well of the 6-well plate.
- For example, if your concentration is 1 million (1 M) cells/mL, you would take 0.05 mL of cells and 2.95 mL of media.
- Make this new cell suspension in a 15 mL conical tube -- first add your cells and then add the needed media. Pipette up and down to mix, but don't introduce bubbles.
- Please note; you may need to mix your original cell suspension by pipetting before distributing the small volume of cells to the new 15 mL conical. Pay attention to see if the cells have settled to the bottom of the conical while you were counting.
- Add the full 3 mL of cell suspension to the dedicated well in your 6-well plate.
- Finally, use the squeaky technique taught in pre-lab to distribute the cells evenly in the plate. Remember to move vertically and horizontally rather than in a circular fashion.
- Waste disposal, final: Aspirate any remaining cell suspensions to destroy them and then clean up the hood. Dispose any vessels that held cells in the burn box, and any sharps in the mayo jars. The next group who uses your hood should find the surfaces wiped down and free of equipment that you brought inside. Please do leave the equipment that was already there.

Part 3: Researching cell lines
Before or after you plate the two CHO cell lines today, let's learn a little about their characteristics.
The wild-type strain is called K1, and a great place to learn about this common cell line is through the American Type Culture Collection, or ATCC. Visit the K1 homepage at this link and answer the questions below in your notebook.
- When were CHO cells originally derived?
- Do these cells float in the culture media, or stick to the culture dish? How do you know?
- From what type of tissue (not what organ; e.g., connective tissue) did these cells come? How do you know?
- Finally, look at the two CHO cell images. Which one looks more like the cells you cultured/will culture today? Are there any differences between what you saw and this image?
The NHEJ-deficient strain is called xrs6, and you will learn about it directly from the primary literature, specifically a 1997 paper from Professor Penny Jeggo's lab (PubMed entry linked here). Note: the .pdf file does not download reliably using Firefox, so Safari is a safer browser to examine the paper.
- Introduction
- Read the first paragraph for context and to learn why we care about DNA repair.
- Read the second paragraph through the words "predicted to be radiosensitive." Draw a picture that includes a DNA double-strand break, Ku70, Ku80, and DNA-PKcs, depicting their relationships to each other.
- Read the third and fourth paragraphs for further context about xrs cell lines and for a preview of the major results in the paper. Don't worry about understanding every detail of the fourth paragraph yet – it will make more sense as you explore the results. For now, address the following:
- What protein is defective in xrs6? What gene encodes for that protein?
- Results
- Look at Figure 2 in the paper, in which protein levels are measured by Western analysis. Similarly to a DNA gel, band intensities correlate with protein amount.
- What do you expect to see when you perform your Ku80 Western using K1 and xrs6 cells next week?
- What do we learn from the final lane in Figure 2A?
- Look at Figure 6 in the paper, and its associated text in the "Sequence analysis… (iii) xrs6" section of the paper.
- What is the nature of the sequence change in xrs6 mutants? (Insertion, deletion, substitution? How big?)
- Normally, Ku80 is more than 700 amino acids long. How long is the defective Ku80, and why?
- Skim the section "Analysis of azacytidine-induced revertants," particularly the first and third paragraphs.
- Briefly, why can xrs6 cells revert to a wild-type phenotype?
- Is the defective Ku80 absent from reverted cells?
- Look at Figure 2 in the paper, in which protein levels are measured by Western analysis. Similarly to a DNA gel, band intensities correlate with protein amount.
Reagent list
- glioblastoma cells
- M059K: plated at 200,000 cells per flask 1 day in advance (T/R) or 100,000 cells per flask 2 days in advance (W/F)
- M059J: plated at 200,000 cells per flask 1 days in advance (T/R) or 100,000 cells per flask 2 days in advance (W/F)
Media components from Life Technologies, Inc. unless noted otherwise.
- M059J/K cell media
- 1:1 Dulbecco's Modified Eagle's Medium (DMEM) : Ham's F12 medium
- 2.5 mM L-Glutamine
- 15 mM HEPES
- 0.5 mM sodium pyruvate
- 1.2 g/L sodium bicarbonate
- 10% fetal bovine serum (FBS)
- 100X antibiotic solution from Cellgro
- 10,000 U/mL Penicillin
- 10,000 μg/mL Streptomycin
- 100X non-essential amino acids (NEAA)
- varying amounts of seven amino acids
- 1:1 Dulbecco's Modified Eagle's Medium (DMEM) : Ham's F12 medium
- Dulbecco's phosphate-buffered saline (D-PBS)
- 0.25% trypsin/0.91 mM EDTA
Next day: Begin Western protein analysis