Difference between revisions of "20.109(S14):Design experiment (Day1)"
| Line 2: | Line 2: | ||
<div style="padding: 10px; width: 640px; border: 5px solid #FF6600;"> | <div style="padding: 10px; width: 640px; border: 5px solid #FF6600;"> | ||
| − | |||
| − | |||
| − | |||
| − | |||
==Introduction== | ==Introduction== | ||
| − | [[Image: | + | |
| − | [[Image: | + | Today we will continue the discussion that we began in lecture about cell-biomaterial interactions and cartilage tissue engineering, with the ultimate goal of designing an experiment probing chondrocyte phenotype development and/or maintenance. Several papers on chondrocyte tissue culture and cartilage tissue engineering will be available in class, and you are also welcome to search the scientific literature on your own for further ideas. You will also get some practice with cell culture today, to prepare you for beginning your experiment next week. |
| + | |||
| + | ==Protocols== | ||
| + | |||
| + | Half the class today will start in the cell culture facility and half will start with experimental design. Midway through class, you'll switch places. We recommend that you only write up Part 2 of the protocol in your notebooks. For Part 1, the only thing you need to docoument is your cell count data, for use in a later FNT calculation. '''The Part 1 protocol will be posted on each tissue culture hood for your reference.''' | ||
| + | |||
| + | ===Part 1: Practice cell culture=== | ||
| + | |||
| + | ====Background==== | ||
| + | |||
| + | Tissue culture was developed about 100 years ago as a method for learning about mammalian biology, and since that time we have learned a tremendous amount by studying the behavior of mammalian cells maintained in the laboratory. The term tissue culture was originally coined because people were doing exactly that, extracting tissue and letting it live in a dish for a short time. Today, most tissue culture experiments are done using cells rather than tissues. Much of what we know about cancer, heritable diseases, and the effects of the environment on human health has been derived from studies of cultured cells. | ||
| + | |||
| + | What types of cells do people study, and where do they come from? Cells that come from a tissue are called primary cells, because they come directly from an animal. It is very difficult to culture primary cells, largely because primary cells that are placed in culture divide only a limited number of times. This limitation on the lifespan of cultured primary cells, called the Hayflick limit, is a problem because it requires a researcher to repeatedly remove tissues from animals in order to complete a study. Cell isolation processes can be quite labor-intensive, and also can complicate data analysis due to inherent animal-to-animal variation. To get around this problem, people have studied cells that are immortal, which means that they can divide indefinitely. Some inherent cell-to-cell variation still exists in such populations. Moreover, the genetic changes that cause immortality may affect experimental outcomes. | ||
| + | |||
| + | One familiar type of immortalized cell is the cancer cell. Tumor cells continuously divide, allowing cancer to invade tissues and proliferate. In this respect, cancer cells behave the same way in culture as ''in vivo'', and under the right conditions cells taken from a tumor can divide indefinitely in culture. Another type of immortalized cell is the embryonic stem cell. Embryonic stem cells are derived from an early stage embryo, and these cells are completely undifferentiated and pluripotent, which means that under the right conditions, they can become any mammalian cell type. Mouse embryonic stem cells have become a valuable research tool, and it is this cell type that we will be using for our practice cell culture today. | ||
| + | |||
| + | [[Image:Be109normalmousefibroblasts.jpg|thumb|250px|left|'''Normal Mouse Fibroblasts; Photographs courtesy of G. Steven Martin''']] | ||
| + | [[Image:Be109transformedmousefibroblasts.jpg|thumb|250px|center|'''Transformed Mouse Fibroblasts; Photographs courtesy of G. Steven Martin''']] | ||
<br style="clear:both;"/> | <br style="clear:both;"/> | ||
| − | The | + | The art of tissue culture lies in the ability to create conditions that are similar to what a cell would experience in an animal, namely 37°C and neutral pH. Blood nourishes the cells in an animal, and blood components are used to feed cells in culture. Serum, the cell-free (and clotting-factor free) component of blood, contains many of the factors necessary to support the growth of cells outside the animal. Consequently, serum is frequently added to tissue culture medium, although serum-free media (also called chemically defined media) exist and support some types of cultured cells. |
| − | + | Cultured mammalian cells must grow in a germ-free environment and researchers using tissue culture must be skilled in sterile technique. Germs double very quickly relative to mammalian cells. An average mammalian cells doubles about once per day whereas many common bacteria can double every 20 minutes under optimal conditions. Consequently, if you put 100 mammalian cells and 1 bacteria together in a dish, within 24 hours you would have ~200 unhappy mammalian cells, and about 100 million happy bacteria! Needless to say, you would not find it very useful to continue to study the behavior of your mammalian cells under these conditions! | |
| − | + | ||
| − | + | ||
| − | + | ||
| − | + | One major objective for this experimental module is for you to learn how to perform tissue culture. Today you will learn how to get mouse embryonic stem cells to grow in a dish and also how to prevent contaminants from getting into your cell cultures. Next time you will set up 3D cultures of bovine-derived cells in alginate beads. | |
| − | + | ||
| − | === | + | ====Protocol==== |
| − | + | Each of you will have a 35 mm dish of mouse embryonic stem (MES) cells that you will use to seed a six-well dish. You and your partner will seed the dishes at different concentrations so you should decide who will seed at 1:10 and who will seed at 1:2. We will begin with a brief demo about sterile technique and how to use the tissue culture hoods. | |
| − | + | #'''Waste disposal, preview:''' Pasteur pipets, pipet tips, and small conical tubes can go directly into the sharps mayo jars. Please set aside serological pipets, large conical tubes, tissue culture dishes, and gloves/papers; periodically put them in the benchtop biowaste containers or directly in the burn box. | |
| + | #Each tissue culture hood is partly set up for you. Finish preparing your hood according to the demo, first bringing in any remaining equipment you will need, then picking up the pre-warmed reagents from the water bath. Don't forget to spray everything down with 70% ethanol. | ||
| + | #*One of the greatest sources for TC contamination is moving materials in and out of the hood since this disturbs the air flow that maintains the sterile environment inside the hood. Anticipate what you will need during your experiment to avoid moving your arms in and out of the hood while your cells are inside. | ||
| + | #Look at your cells as you remove them from the incubator. Look first at the color and clarity of the media. Fresh media is reddish-orange in color and if the media on your cells is yellow or cloudy, it could mean that the cells are overgrown, contaminated, or starved for CO2. Next look at the cells on the inverted microscope. Note their shape and arrangement in the dish and how densely the cells cover the surface. | ||
| + | #Aspirate the media from the cells using a sterile Pasteur pipet. Dip the pipet in your beaker of ethanol when needed (to clean it). | ||
| + | #Wash the cells by adding 2 ml PBS using a 5 mL pipet. Slightly tip the dish back and forth to rinse all the cells, and then aspirate the liquid. | ||
| + | #To dislodge the cells from the dish, you will add trypsin, a proteolytic enzyme. Using a 2 ml pipet, add 0.7 ml of trypsin to the flask. Be careful not to pull up liquid too quickly or it will go all the way up your pipet into the pipet-aid! | ||
| + | #Tip the flask in each direction to distribute the liquid evenly. Incubate the cells at 37°C for 3-5 minutes, until the cells round up and are easily dislodged from the plate by tapping. | ||
| + | #While you are waiting, you can add 1 ml of sterile 0.1% gelatin to the two leftmost wells of a six-well dish (one dish per pair) and also label the dish. | ||
| + | #*The gelatin will be removed before you seed your MES cells but it is important to pre-treat the dish this way. MES must grow on either a "feeder layer" of fibroblasts, or on a gelatin-coated surface. '''The pre-treatment must be done for at least 10 minutes.''' | ||
| + | #*Label the plate lid with your group colour, today’s date, and the cell line (called [http://www.atcc.org/ATCCAdvancedCatalogSearch/ProductDetails/tabid/452/Default.aspx?ATCCNum=SCRC-1010&Template=cellBiology “J1”]). Label the well you used with your initials and the cell dilution you did, and make sure your partner does the same. | ||
| + | #After retrieving your cells, add 1.3 ml of media to the trypsinized MES cells and pipet the liquid up and down (“triturate”) to remove the cells from the plastic and suspend them in the liquid. Remove a small amount of the suspension (perhaps 50 μL) to an eppendorf tube. | ||
| + | #According to the procedures below, either begin counting your cells or begin plating them (no matter what count you get, you will plate a 1:2 and a 1:10 dilution), depending on microscope availability. The teaching faculty will explain cell counting to 1-2 groups at a time. | ||
| + | #Take your cell aliquot to the inverted microscopes and fill one chamber of a hemocytometer with 10 μL of the cell suspension. | ||
| + | #*This slide has an etched grid of nine large squares. The concentration of cells in a sample can be determined by counting the cells that fall within one such square and then multiplying by 10,000 to determine the number of cells/mL in the solution measured. (Always remember to convert from dilution to cell stock at the end!) | ||
| + | #*Note that different squares are sub-divided into different grids. Very dense cells could be counted in the fine grids. In your case, the 4x4 grids and a 10x magnification will be most convenient for counting. | ||
| + | #*You should count the cells in two of the four corner squares of the 25 square grid, then average the numbers to determine the concentration of cells in your suspension. Save your raw data for a later FNT assignment! [[Image:Be109cellcounting.jpg|thumb|right|300px|'''Counting cells using a hemocytometer''']] | ||
| + | #You and your partner will each seed 3 mL of cells but at different concentrations. Decide if you will try the 1:10 or 1:2 dilution and mix the appropriate amount of cell suspension and culture media together in a 15 ml conical tube. | ||
| + | #*Note that the dilution factor refers to the volume of the original cell culture, not the volume that you are moving the cells into. (If the surface area of the 35 mm dish and 6-well dish were very different, we would also want to take that into account.) | ||
| + | #Remove the gelatin from the six-well dish (if you haven't already) and add 3 ml of your cell dilution to one of the gelatin-treated wells. Your partner will use the other treated well in the same dish. Be sure to label your plate if you haven't already, then return your cells to the incubator. | ||
| + | #'''Waste disposal, final:''' Aspirate any remaining cell suspensions to destroy them and then clean up the hood. Dispose any vessels that held cells in the burn box, and any sharps in the mayo jars or burn box according to the waste disposal preview above. The next group who uses your hood should find the surfaces wiped down, no equipment that you brought in left inside, and the sash closed. Please '''do''' leave the equipment that was already there. | ||
| − | == | + | ===Part 2: Experiment design=== |
| − | + | The overall goal of this module is to test the effect of the surrounding environment on cell phenotype. In particular, you will work with primary chondrocytes and/or mesenchymal stem cells in 3D gel culture. The specific aspects of phenotype assayed will be collagen I and collagen II transcript and protein levels (these are markers for cell type), as well as proteoglycan levels and the general cell characteristic of viability. You will be able to compare some of the data in your 3D culture experiments with control data from freshly isolated chondrocytes and stem cells. | |
| − | + | Each pair of you will test two samples. Both samples will be grown in 3D alginate bead culture, and should have one parameter varied between them. For example, you might try changing the mechanical properties of the beads (how would you do this?), or the cell density within the beads. Be as creative as you like! If your protocol requires a new reagent or equipment to be ordered, we will do our best to get it in time. Of course, two samples is not very many for determining a trend. You are more than welcome to join up with another group or two in order to expand the range of the parameter you are testing (e.g., testing four cell densities instead of two). If everyone wants to test something different, that’s okay too. | |
| − | + | Most of you should explore conditions for maintaining or destroying chondrocyte phenotype -- recall from lecture that chondrocytes grown without proper signals, for example in simple monolayer culture, tend to de-differentiate to a fibroblastic phenotype over time. We will also have some mesenchymal stem cells for a few groups to work with in order to investigate conditions that promote chondrogenesis. Please see the teaching faculty with your proposed experiment, as we have a limited amount of each cell type. | |
| − | + | On that note, this year we are strongly recommending that teams of four people work together, with each of the two lab groups duplicating the same two samples. In the past, protein and proteoglycan concentrations have been too low for many groups to robustly analyze. Our recommended plan is thus that both groups test mRNA levels (which will tell us something about reproducibility), but that one group tests the rest of their sample for protein content while the other tests for proteoglycans. These larger sample sizes should improve signal. However, we will not absolutely require you to take this approach, because we have also increased our isolation scale over the past year. | |
| − | + | ||
| − | + | ||
| − | + | ||
| − | + | ||
| − | + | ||
| − | + | ||
| − | + | ||
| − | + | ||
| − | + | ||
| − | + | ||
| − | + | ||
| − | + | ||
| − | + | ||
| − | + | ||
| − | + | ||
| − | + | ||
| − | + | One change to the module this year is that you will grow your cells for 7 days instead of 12 days. There are pros and cons to this timing that we will discuss further in class, the main con being less time for samples in different conditions to diverge in phenotype from each other. With that drawback in mind, we'll summarize here a few experiments that yielded the greatest dramatic phenotype differences in the past: | |
| − | + | ||
| − | + | ||
| − | + | ||
| − | + | ||
| − | + | ||
| − | + | ||
| − | + | ||
| − | + | ||
| − | + | * Addition of TGF-β1 to ''chondrocyte'' culture | |
| − | + | * MSC growth in 1% vs 2.5% low viscosity alginate | |
| − | + | * Some alternative growth factors and additives for each cell type | |
| − | + | ||
| − | + | ||
| − | + | ||
| − | + | ||
| − | + | We'll have more info available during class on a need-to-know basis :) But please do explore ideas on your own first! | |
| − | + | ||
| − | + | Although you need not specify your entire plan today, you should hand in a draft plan to the teaching faculty. Plans that require reagents or equipment to be purchased are due by noon on Friday for T/R section and noon on Monday for W/F section. Plans that do not require additional reagents are due by Monday, April 22nd at 3 pm. '''Ultimately, your group or super-group should hand in the following information:''' | |
| − | + | ||
| − | + | ||
| − | + | ||
| − | + | ||
| − | + | ||
| − | + | ||
| − | + | ||
| − | + | ||
| − | + | ||
| − | + | ||
| − | + | ||
| − | + | ||
| − | + | ||
| − | + | ||
| − | + | ||
| − | + | ||
| − | + | ||
| − | + | ||
| − | + | ||
| − | + | ||
| − | + | ||
| − | + | ||
| − | + | ||
| − | + | ||
| − | + | ||
| − | + | ||
| − | + | ||
| − | + | ||
| − | + | ||
| − | + | ||
| − | + | ||
| − | + | ||
| − | + | ||
| − | + | ||
| − | + | ||
| − | + | ||
| − | + | ||
| − | + | ||
| − | + | ||
| − | + | ||
| − | + | ||
| − | + | ||
| − | + | ||
| − | + | ||
| − | + | ||
| − | + | ||
| − | + | ||
| − | + | ||
| − | + | ||
| − | + | ||
| − | + | ||
| − | + | ||
| − | + | ||
| − | + | ||
| − | + | ||
| − | + | ||
| − | + | ||
| − | + | ||
| − | + | ||
| − | + | ||
| − | + | ||
| − | + | ||
| − | + | ||
| − | + | ||
| − | + | ||
| − | + | ||
| − | + | ||
| − | + | ||
| − | + | ||
| − | + | ||
| − | + | * Type of alginate to be used, and at what % | |
| + | * Cell type to be used | ||
| + | * Cell density per condition (in cells/mL) | ||
| + | * Total number of cells needed | ||
| + | * Unique medium formulations or supplements to be used | ||
| + | * Unique systems (mechanical, electrical, etc.) to be used | ||
| − | + | Per 3D sample, you will prepare 1 mL of alginate beads (thus a cell density of 10 million cells per mL would require 10 million cells per sample, 20 million total). | |
| − | {|border = 1 | + | |
| − | + | As discussed in the pre-lab lecture, we recommend that you write a brief summary of at least 2-3 of the papers that you read/skimmed today in your notebook. | |
| − | + | ||
| − | + | ====Materials available for 3D culture==== | |
| − | | | + | |
| − | | | + | {| border="1" |
| − | | | + | |Alginate company |
| − | | | + | |Alginate name |
| − | | | + | |Viscosity (reference standard) |
| − | | | + | |G/M Ratio |
| − | | | + | |Suggested use (%) |
| − | | | + | |- |
| − | | | + | |Sigma Aldrich |
| − | | | + | | "low viscosity" |
| − | | | + | |250 cps at 2% |
| − | | | + | |~40:60 |
| + | |~1.2-3 | ||
| + | |- | ||
| + | |Sigma Aldrich | ||
| + | | "medium viscosity" | ||
| + | |2000 cps at 2% | ||
| + | |~40:60 | ||
| + | |~0.8-2 | ||
| + | |- | ||
|} | |} | ||
| − | |||
| − | |||
| − | |||
| − | |||
| − | |||
| − | |||
| − | |||
| − | |||
| − | |||
| − | + | Collagen I and II gels can also be ordered upon request. Keep in mind that using collagen directly will confound your protein assay results (unless you devise some controls), but not the transcript-level assay results. | |
| − | + | ||
| − | + | ||
| − | === | + | ====Standard stem cell media==== |
| − | + | ||
| − | + | *Differentiation medium | |
| + | **Hi-glucose DMEM | ||
| + | ** FCS and/or ITS+1 (insulin/transferrin/selenium) | ||
| + | **Penicillin/Streptomycin (antibiotic) | ||
| + | **Amphotericin B (antimycotic) | ||
| + | **Non-essential amino acids | ||
| + | **Sodium pyruvate | ||
| + | **Proline (400 μM) | ||
| + | **HEPES (10 mM) | ||
| + | **Chondrogenic factors | ||
| + | ***TGF-beta1 (10 ng/mL) | ||
| + | ***Dexamethasone (100 nM) | ||
| + | ***Ascorbate (40 μg/mL) | ||
| − | + | *Expansion medium (only for your reference) | |
| + | **Low-glucose DMEM | ||
| + | **10% FCS | ||
| + | **Penicillin/Streptomycin | ||
| + | **Amphotericin B | ||
| + | **HEPES buffer, 10 mM (4-(2-hydroxyethyl)-1-piperazineethanesulfonic acid) | ||
| + | **up to 5 ng/mL bFGF (basic fibroblast growth factor) | ||
| − | == | + | ====Standard chondrocyte media==== |
| − | + | *Growth medium | |
| + | **Hi-glucose DMEM | ||
| + | **10% FCS (or 2% FCS with ITS, for more defined media) | ||
| + | **Penicillin/Streptomycin (antibiotic) | ||
| + | **Amphotericin B (antimycotic) | ||
| + | **Non-essential amino acids | ||
| + | **Sodium pyruvate | ||
| + | **Proline (400 μM) | ||
| + | **HEPES (10 mM) | ||
| + | **Ascorbate(20 μg/mL) | ||
| − | + | *Isolation media (only for your reference) | |
| − | + | **More info soon | |
| + | **Digest with pronase 1 hour, then collagenase overnight | ||
| − | + | ==For next time== | |
| − | + | ||
| − | + | ||
| − | + | ||
| − | + | ||
| − | + | ||
| − | + | ||
| − | + | ||
| − | + | ||
| − | + | ||
| − | + | #Module 3, Day 2 will happen in two distinct shifts. Sign up for either the 1 pm or the 3 pm Day 2 session on that day's [[Talk:20.109%28S13%29:Initiate_cell_culture_%28Day2%29 | Talk page]]. If your culture requires complicated preparations, you will be asked to join the second group. Be sure to tell the teaching faculty a brief description of your plans before leaving today. | |
| − | + | #Familiarize yourself with the cell culture portion of [[20.109(S13):Initiate_cell_culture_%28Day2%29 | Day 2]] of this module. The better prepared we all are, the less likely it is that the day will run long. The hoods will be set up for you when you come in. | |
| − | + | #Write a two or three sentence description of your design plan and expected assay results, and post it on the Day 2 Talk page by 11 pm Tuesday or Wednesday, respectively. (Assay result expectations should be stated in a relative fashion: e.g., "we think [3D sample 1] will maintain a chondrocyte-like phenotype better than [3D sample 2], because..." You might also comment on cell viability, if you expect it to vary among your samples.) '''This posting will count for homework credit.''' | |
Revision as of 19:44, 17 January 2014

Contents
Introduction
Today we will continue the discussion that we began in lecture about cell-biomaterial interactions and cartilage tissue engineering, with the ultimate goal of designing an experiment probing chondrocyte phenotype development and/or maintenance. Several papers on chondrocyte tissue culture and cartilage tissue engineering will be available in class, and you are also welcome to search the scientific literature on your own for further ideas. You will also get some practice with cell culture today, to prepare you for beginning your experiment next week.
Protocols
Half the class today will start in the cell culture facility and half will start with experimental design. Midway through class, you'll switch places. We recommend that you only write up Part 2 of the protocol in your notebooks. For Part 1, the only thing you need to docoument is your cell count data, for use in a later FNT calculation. The Part 1 protocol will be posted on each tissue culture hood for your reference.
Part 1: Practice cell culture
Background
Tissue culture was developed about 100 years ago as a method for learning about mammalian biology, and since that time we have learned a tremendous amount by studying the behavior of mammalian cells maintained in the laboratory. The term tissue culture was originally coined because people were doing exactly that, extracting tissue and letting it live in a dish for a short time. Today, most tissue culture experiments are done using cells rather than tissues. Much of what we know about cancer, heritable diseases, and the effects of the environment on human health has been derived from studies of cultured cells.
What types of cells do people study, and where do they come from? Cells that come from a tissue are called primary cells, because they come directly from an animal. It is very difficult to culture primary cells, largely because primary cells that are placed in culture divide only a limited number of times. This limitation on the lifespan of cultured primary cells, called the Hayflick limit, is a problem because it requires a researcher to repeatedly remove tissues from animals in order to complete a study. Cell isolation processes can be quite labor-intensive, and also can complicate data analysis due to inherent animal-to-animal variation. To get around this problem, people have studied cells that are immortal, which means that they can divide indefinitely. Some inherent cell-to-cell variation still exists in such populations. Moreover, the genetic changes that cause immortality may affect experimental outcomes.
One familiar type of immortalized cell is the cancer cell. Tumor cells continuously divide, allowing cancer to invade tissues and proliferate. In this respect, cancer cells behave the same way in culture as in vivo, and under the right conditions cells taken from a tumor can divide indefinitely in culture. Another type of immortalized cell is the embryonic stem cell. Embryonic stem cells are derived from an early stage embryo, and these cells are completely undifferentiated and pluripotent, which means that under the right conditions, they can become any mammalian cell type. Mouse embryonic stem cells have become a valuable research tool, and it is this cell type that we will be using for our practice cell culture today.

The art of tissue culture lies in the ability to create conditions that are similar to what a cell would experience in an animal, namely 37°C and neutral pH. Blood nourishes the cells in an animal, and blood components are used to feed cells in culture. Serum, the cell-free (and clotting-factor free) component of blood, contains many of the factors necessary to support the growth of cells outside the animal. Consequently, serum is frequently added to tissue culture medium, although serum-free media (also called chemically defined media) exist and support some types of cultured cells.
Cultured mammalian cells must grow in a germ-free environment and researchers using tissue culture must be skilled in sterile technique. Germs double very quickly relative to mammalian cells. An average mammalian cells doubles about once per day whereas many common bacteria can double every 20 minutes under optimal conditions. Consequently, if you put 100 mammalian cells and 1 bacteria together in a dish, within 24 hours you would have ~200 unhappy mammalian cells, and about 100 million happy bacteria! Needless to say, you would not find it very useful to continue to study the behavior of your mammalian cells under these conditions!
One major objective for this experimental module is for you to learn how to perform tissue culture. Today you will learn how to get mouse embryonic stem cells to grow in a dish and also how to prevent contaminants from getting into your cell cultures. Next time you will set up 3D cultures of bovine-derived cells in alginate beads.
Protocol
Each of you will have a 35 mm dish of mouse embryonic stem (MES) cells that you will use to seed a six-well dish. You and your partner will seed the dishes at different concentrations so you should decide who will seed at 1:10 and who will seed at 1:2. We will begin with a brief demo about sterile technique and how to use the tissue culture hoods.
- Waste disposal, preview: Pasteur pipets, pipet tips, and small conical tubes can go directly into the sharps mayo jars. Please set aside serological pipets, large conical tubes, tissue culture dishes, and gloves/papers; periodically put them in the benchtop biowaste containers or directly in the burn box.
- Each tissue culture hood is partly set up for you. Finish preparing your hood according to the demo, first bringing in any remaining equipment you will need, then picking up the pre-warmed reagents from the water bath. Don't forget to spray everything down with 70% ethanol.
- One of the greatest sources for TC contamination is moving materials in and out of the hood since this disturbs the air flow that maintains the sterile environment inside the hood. Anticipate what you will need during your experiment to avoid moving your arms in and out of the hood while your cells are inside.
- Look at your cells as you remove them from the incubator. Look first at the color and clarity of the media. Fresh media is reddish-orange in color and if the media on your cells is yellow or cloudy, it could mean that the cells are overgrown, contaminated, or starved for CO2. Next look at the cells on the inverted microscope. Note their shape and arrangement in the dish and how densely the cells cover the surface.
- Aspirate the media from the cells using a sterile Pasteur pipet. Dip the pipet in your beaker of ethanol when needed (to clean it).
- Wash the cells by adding 2 ml PBS using a 5 mL pipet. Slightly tip the dish back and forth to rinse all the cells, and then aspirate the liquid.
- To dislodge the cells from the dish, you will add trypsin, a proteolytic enzyme. Using a 2 ml pipet, add 0.7 ml of trypsin to the flask. Be careful not to pull up liquid too quickly or it will go all the way up your pipet into the pipet-aid!
- Tip the flask in each direction to distribute the liquid evenly. Incubate the cells at 37°C for 3-5 minutes, until the cells round up and are easily dislodged from the plate by tapping.
- While you are waiting, you can add 1 ml of sterile 0.1% gelatin to the two leftmost wells of a six-well dish (one dish per pair) and also label the dish.
- The gelatin will be removed before you seed your MES cells but it is important to pre-treat the dish this way. MES must grow on either a "feeder layer" of fibroblasts, or on a gelatin-coated surface. The pre-treatment must be done for at least 10 minutes.
- Label the plate lid with your group colour, today’s date, and the cell line (called “J1”). Label the well you used with your initials and the cell dilution you did, and make sure your partner does the same.
- After retrieving your cells, add 1.3 ml of media to the trypsinized MES cells and pipet the liquid up and down (“triturate”) to remove the cells from the plastic and suspend them in the liquid. Remove a small amount of the suspension (perhaps 50 μL) to an eppendorf tube.
- According to the procedures below, either begin counting your cells or begin plating them (no matter what count you get, you will plate a 1:2 and a 1:10 dilution), depending on microscope availability. The teaching faculty will explain cell counting to 1-2 groups at a time.
- Take your cell aliquot to the inverted microscopes and fill one chamber of a hemocytometer with 10 μL of the cell suspension.
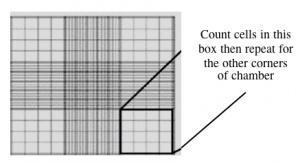
- This slide has an etched grid of nine large squares. The concentration of cells in a sample can be determined by counting the cells that fall within one such square and then multiplying by 10,000 to determine the number of cells/mL in the solution measured. (Always remember to convert from dilution to cell stock at the end!)
- Note that different squares are sub-divided into different grids. Very dense cells could be counted in the fine grids. In your case, the 4x4 grids and a 10x magnification will be most convenient for counting.
- You should count the cells in two of the four corner squares of the 25 square grid, then average the numbers to determine the concentration of cells in your suspension. Save your raw data for a later FNT assignment!
 Counting cells using a hemocytometer
- You and your partner will each seed 3 mL of cells but at different concentrations. Decide if you will try the 1:10 or 1:2 dilution and mix the appropriate amount of cell suspension and culture media together in a 15 ml conical tube.
- Note that the dilution factor refers to the volume of the original cell culture, not the volume that you are moving the cells into. (If the surface area of the 35 mm dish and 6-well dish were very different, we would also want to take that into account.)
- Remove the gelatin from the six-well dish (if you haven't already) and add 3 ml of your cell dilution to one of the gelatin-treated wells. Your partner will use the other treated well in the same dish. Be sure to label your plate if you haven't already, then return your cells to the incubator.
- Waste disposal, final: Aspirate any remaining cell suspensions to destroy them and then clean up the hood. Dispose any vessels that held cells in the burn box, and any sharps in the mayo jars or burn box according to the waste disposal preview above. The next group who uses your hood should find the surfaces wiped down, no equipment that you brought in left inside, and the sash closed. Please do leave the equipment that was already there.

Part 2: Experiment design
The overall goal of this module is to test the effect of the surrounding environment on cell phenotype. In particular, you will work with primary chondrocytes and/or mesenchymal stem cells in 3D gel culture. The specific aspects of phenotype assayed will be collagen I and collagen II transcript and protein levels (these are markers for cell type), as well as proteoglycan levels and the general cell characteristic of viability. You will be able to compare some of the data in your 3D culture experiments with control data from freshly isolated chondrocytes and stem cells.
Each pair of you will test two samples. Both samples will be grown in 3D alginate bead culture, and should have one parameter varied between them. For example, you might try changing the mechanical properties of the beads (how would you do this?), or the cell density within the beads. Be as creative as you like! If your protocol requires a new reagent or equipment to be ordered, we will do our best to get it in time. Of course, two samples is not very many for determining a trend. You are more than welcome to join up with another group or two in order to expand the range of the parameter you are testing (e.g., testing four cell densities instead of two). If everyone wants to test something different, that’s okay too.
Most of you should explore conditions for maintaining or destroying chondrocyte phenotype -- recall from lecture that chondrocytes grown without proper signals, for example in simple monolayer culture, tend to de-differentiate to a fibroblastic phenotype over time. We will also have some mesenchymal stem cells for a few groups to work with in order to investigate conditions that promote chondrogenesis. Please see the teaching faculty with your proposed experiment, as we have a limited amount of each cell type.
On that note, this year we are strongly recommending that teams of four people work together, with each of the two lab groups duplicating the same two samples. In the past, protein and proteoglycan concentrations have been too low for many groups to robustly analyze. Our recommended plan is thus that both groups test mRNA levels (which will tell us something about reproducibility), but that one group tests the rest of their sample for protein content while the other tests for proteoglycans. These larger sample sizes should improve signal. However, we will not absolutely require you to take this approach, because we have also increased our isolation scale over the past year.
One change to the module this year is that you will grow your cells for 7 days instead of 12 days. There are pros and cons to this timing that we will discuss further in class, the main con being less time for samples in different conditions to diverge in phenotype from each other. With that drawback in mind, we'll summarize here a few experiments that yielded the greatest dramatic phenotype differences in the past:
- Addition of TGF-β1 to chondrocyte culture
- MSC growth in 1% vs 2.5% low viscosity alginate
- Some alternative growth factors and additives for each cell type
We'll have more info available during class on a need-to-know basis :) But please do explore ideas on your own first!
Although you need not specify your entire plan today, you should hand in a draft plan to the teaching faculty. Plans that require reagents or equipment to be purchased are due by noon on Friday for T/R section and noon on Monday for W/F section. Plans that do not require additional reagents are due by Monday, April 22nd at 3 pm. Ultimately, your group or super-group should hand in the following information:
- Type of alginate to be used, and at what %
- Cell type to be used
- Cell density per condition (in cells/mL)
- Total number of cells needed
- Unique medium formulations or supplements to be used
- Unique systems (mechanical, electrical, etc.) to be used
Per 3D sample, you will prepare 1 mL of alginate beads (thus a cell density of 10 million cells per mL would require 10 million cells per sample, 20 million total).
As discussed in the pre-lab lecture, we recommend that you write a brief summary of at least 2-3 of the papers that you read/skimmed today in your notebook.
Materials available for 3D culture
| Alginate company | Alginate name | Viscosity (reference standard) | G/M Ratio | Suggested use (%) |
| Sigma Aldrich | "low viscosity" | 250 cps at 2% | ~40:60 | ~1.2-3 |
| Sigma Aldrich | "medium viscosity" | 2000 cps at 2% | ~40:60 | ~0.8-2 |
Collagen I and II gels can also be ordered upon request. Keep in mind that using collagen directly will confound your protein assay results (unless you devise some controls), but not the transcript-level assay results.
Standard stem cell media
- Differentiation medium
- Hi-glucose DMEM
- FCS and/or ITS+1 (insulin/transferrin/selenium)
- Penicillin/Streptomycin (antibiotic)
- Amphotericin B (antimycotic)
- Non-essential amino acids
- Sodium pyruvate
- Proline (400 μM)
- HEPES (10 mM)
- Chondrogenic factors
- TGF-beta1 (10 ng/mL)
- Dexamethasone (100 nM)
- Ascorbate (40 μg/mL)
- Expansion medium (only for your reference)
- Low-glucose DMEM
- 10% FCS
- Penicillin/Streptomycin
- Amphotericin B
- HEPES buffer, 10 mM (4-(2-hydroxyethyl)-1-piperazineethanesulfonic acid)
- up to 5 ng/mL bFGF (basic fibroblast growth factor)
Standard chondrocyte media
- Growth medium
- Hi-glucose DMEM
- 10% FCS (or 2% FCS with ITS, for more defined media)
- Penicillin/Streptomycin (antibiotic)
- Amphotericin B (antimycotic)
- Non-essential amino acids
- Sodium pyruvate
- Proline (400 μM)
- HEPES (10 mM)
- Ascorbate(20 μg/mL)
- Isolation media (only for your reference)
- More info soon
- Digest with pronase 1 hour, then collagenase overnight
For next time
- Module 3, Day 2 will happen in two distinct shifts. Sign up for either the 1 pm or the 3 pm Day 2 session on that day's Talk page. If your culture requires complicated preparations, you will be asked to join the second group. Be sure to tell the teaching faculty a brief description of your plans before leaving today.
- Familiarize yourself with the cell culture portion of Day 2 of this module. The better prepared we all are, the less likely it is that the day will run long. The hoods will be set up for you when you come in.
- Write a two or three sentence description of your design plan and expected assay results, and post it on the Day 2 Talk page by 11 pm Tuesday or Wednesday, respectively. (Assay result expectations should be stated in a relative fashion: e.g., "we think [3D sample 1] will maintain a chondrocyte-like phenotype better than [3D sample 2], because..." You might also comment on cell viability, if you expect it to vary among your samples.) This posting will count for homework credit.