20.109(F18):Complete genomic instability experiment and load cells for sub-nuclear foci assay (Day4)

Contents
Introduction
To this point in the module we have been using the CometChip assay to study DNA damage in the context of the BER pathway. Specifically, we considered the role of oxidative stress in generating base lesions. It is important to remember that the data collected using the CometChip assay is not specific to base lesions and that the DNA damage observed may be the result of various types of DNA lesions, including base excisions, abasic sites, strand breaks, and crosslinks. The experimental work you complete in the next three laboratory classes will focus on a technique used to measure DNA double-strand breaks.

In your γH2AX assay experiment, you will assess the effects of H2O2 on double-strand break abundance in the cell lines used for the CometChip assay. Furthermore, you will consider the repair efficiency of the cell lines and use the γH2AX assay to test your research question.
Protocols
Part 1: Separate CometChip 'tails' using gel electrophoresis
- Remove your CometChip from the 1X PBS and use a kimwipe to dry the GelBond side.
- Carefully move your CometChip to the gel electrophoresis station in the 4 °C cold room.
- Place your CometChip on the raised center region of an electrophoresis box.
- Double-sided tape was applied to the gel electrophoresis box. Be sure you lay your CometChip on the tape strips and lightly press down with a pipet tip to ensure it is secure.
- Add enough of the alkaline electrophoresis buffer to the gel electrophoresis box to cover your CometChip.
- Leave the CometChip in the alkaline electrophoresis buffer (aka unwinding buffer) for 45 minutes.
- To separate the damaged DNA into 'comets', electrophorese for 40 min (at 16 V, or 1 V/cm).
- It is important that the electrophoresis occur at 300 mA. To maintain the appropriate current, the volume of electrophoresis buffer may need to be adjusted. The teaching faculty will assist you in adding/removing electrophoresis buffer such that this value is reached.
- Carefully remove your CometChip from the electrophoresis box and place it in a dish.
- Obtain an aliquot of neutralization buffer from the front laboratory bench.
- Wash your CometChip by adding enough neutralization buffer to cover (~10-12 mL) and incubate for 5 min at room temperature.
- Repeat this step a total of 3 washes.
- Add the SYBR gold DNA stain to your CometChip and carefully move it to the 4 °C cooler.
The teaching faculty will image your CometChip and provide the images to you in the next laboratory section.
Part 2: Seed cells for sub-nuclear foci assay
- Clean the tissue culture hood and prepare it with the supplies you will need.
- Carefully read through the protocol to ensure you have everything you need at hand.
- Obtain two 12-well plates from the teaching faculty.
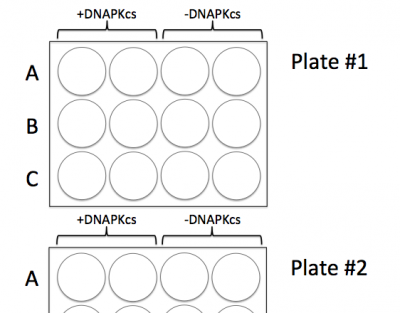

- Clearly label the plates with cell line names according the image to the right. Include the date and your team information.
- Carefully place a coverslip into each well that will be seeded with cells for your experiment.
- Note: in Plate #2 you are only using wells A1 - A4.
- Add 2 mL of fresh media to each well that will be seeded with cells.
- Retrieve one flask of each cell line from the 37°C incubator.
- Prepare cell suspensions for use in your cell loading experiment as done previously. Briefly,
- Examine your cell culture.
- Aspirate the media.
- Wash the cells with 5 mL PBS.
- Dislodge the cells with 2 mL of trypsin.
- Incubate the cells at 37°C for 3 minutes using a timer.
- Retrieve your flasks from the incubator.
- Check your cells using the microscope to ensure they are dislodged.
- They should appear round and move freely. If they are still partially adhered, incubate for longer and keep track of the time. Note: Since the M059J (-DNAPKcs) cells tend to aggregate, you may need to trypsinize them longer.
- Once the majority of the cells are detached, firmly tap the bottom to fully dislodge the cells.
- Add 5 mL of media to the cells then triturate to break up cells that are clumped together and suspend them in the liquid.
- Transfer the suspended cells into a labeled 15 mL conical tube.
- Transfer 90 μL of each cell suspension from the 15 mL conical tube into a labeled eppendorf tube.
- Determine the number of cells / mL in your cell suspension as done previously. Briefly,
- Add 10 μL of trypan blue to the 90 μL aliquot of each cell suspension.
- Use the hemocytometer to count the cells, then calculate the cells / mL in each suspension.
- Calculate the volume of cells that contains 25,000 cells for each cell suspension (25,000 cells/well).
- Mix the cells and add the appropriate volume of cells into the appropriate wells.
- Be sure to add the cells to the correct wells according to the image above!
- To ensure that the cells are evenly dispersed in the well, slide the plate up / down and left / right 3-5 times.
- Carefully move your plates to the 37°C incubator
- Clean out the tissue culture hood.

Reagents list
- Alkaline electrophoresis solution: (Sigma Aldrich)
- 0.3 M NaOH
- 1 mM Na2EDTA
- pH 13.5
- Neutralization buffer: (Sigma Aldrich)
- 0.4 M Tris
- pH 7.5
Next day: Analyze genomic instability experiment data and treat cells for sub-nuclear foci assay